

Changing a flat tire on your Ford F-150 doesn’t have to be a stressful roadside ordeal. With the right tools and steps, you can get back on the road in under 30 minutes. Unlike most cars, the F-150 stores its full-size spare tire under the truck bed, requiring a unique lowering mechanism and specific tools stored inside the cab. This guide walks you through every step, from unlocking the spare to torquing lug nuts correctly, using only factory equipment.
Whether you’re a first-time DIYer or a seasoned truck owner, you’ll learn how to change an F-150 tire safely, avoid common mistakes, and ensure your spare is securely stowed afterward.
Essential Safety Steps Before Changing Your F-150 Tire
Before touching any tools, protect yourself and others from potential hazards. Never skip these safety measures, even in a hurry.
Move to a flat, stable surface away from traffic. Avoid gravel, mud, or slopes. Turn on hazard lights immediately to alert other drivers. Engage the parking brake and shift into Park (P). Exit all passengers, as no one should remain in the truck while it’s lifted. Place reflective triangles or cones 50 to 100 feet behind the vehicle if available.
Warning: Never work under a vehicle supported only by a jack. Use the spare tire or a jack stand as a safety backup.
Gathering Your F-150 Tire Change Tools
The F-150 includes all tools needed for tire changes. Store them behind the passenger-side second-row seat. Familiarize yourself with these components before you need them.
The tool kit contains a scissor or screw-type jack, a lug wrench (tire iron), three metal extension bars that connect to form a long rod, a hooked bar that attaches to the jack for lifting, a vehicle key or key fob to unlock the spare, a locking lug nut key if equipped, and a fuel funnel that must be removed to access the tools.
Pro Tip: Wear work gloves for better grip and hand protection throughout the process. All tools are designed to work together, so don’t start until you’ve retrieved everything from the kit.
Unlocking and Lowering the F-150 Spare Tire
The spare tire on your F-150 is stored under the rear of the bed, accessed via a hidden panel. This unique system requires a specific sequence to operate correctly.
Locate the round peg to the right of the license plate. Pull it out to reveal a key slot near the bumper. Insert your vehicle key and turn clockwise to unlock. Remove the panel and set it aside. On Lariat and higher trims, use the mechanical key from the fob inserted into the bumper slot instead.
Assemble the extension rod by connecting the three metal bars end-to-end. Press the release button and lock each bar into the next. Keep the hooked end attached to the longest section. Attach the lug wrench to the top of the rod.
Insert the rod into the hole where the panel was removed. Feed it down until the square end engages the bolt mechanism. Turn the lug wrench counter-clockwise to lower the spare. Keep turning until the tire touches the ground and the cable goes slack. Remove the rod and take off the center retainer from the spare.
Visual Cue: You’ll feel resistance drop when the tire hits the ground.
Loosening Lug Nuts Before Lifting the Truck
This step prevents the wheel from spinning when it’s off the ground. Always loosen nuts while the vehicle is still grounded for better leverage and safety.
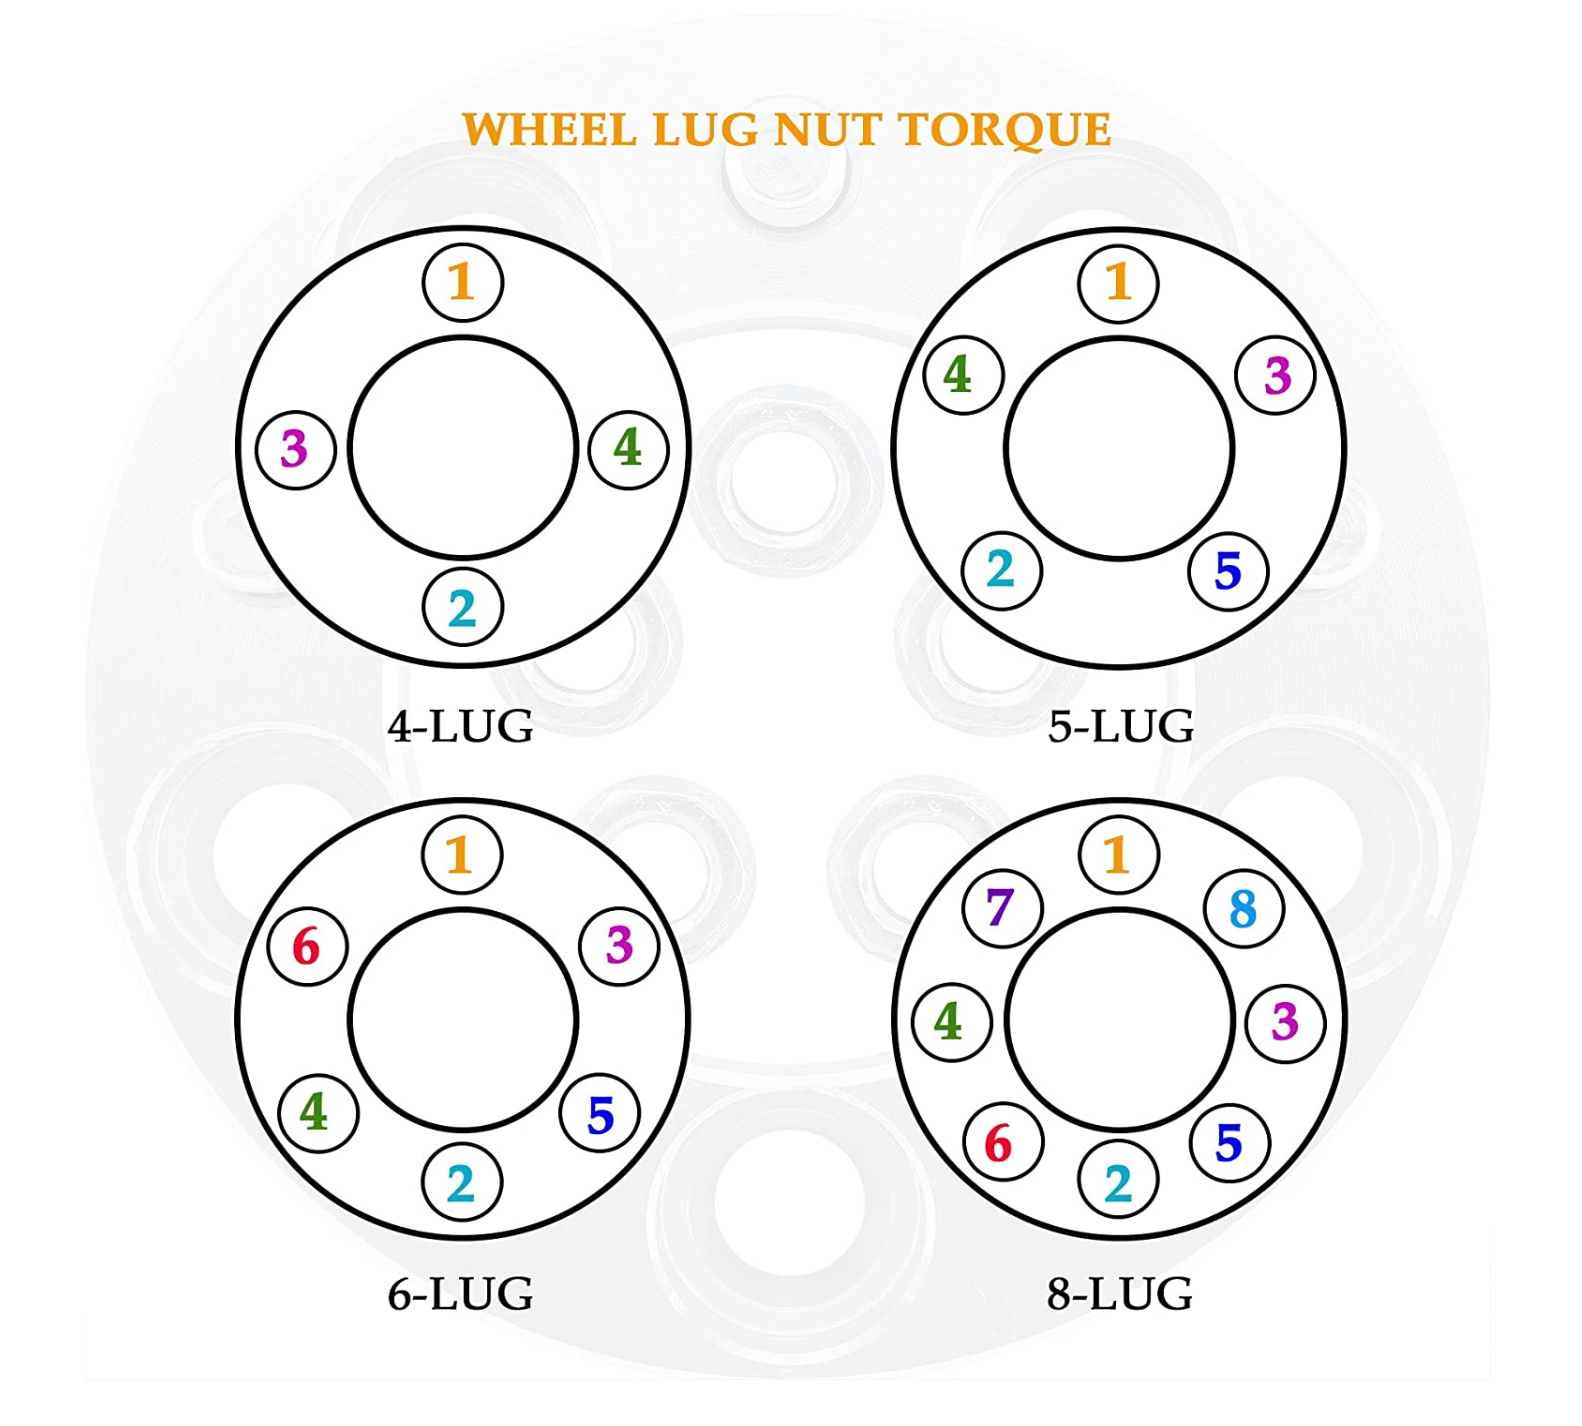
Use the lug wrench to turn each nut counter-clockwise. Loosen slightly but do not remove completely. Work in a criss-cross star pattern to avoid warping the rotor. If nuts are stuck, stand on the wrench or use a pipe for extra leverage.
Positioning and Raising the Jack on Your F-150

Correct jack placement prevents damage to your truck and ensures stability during the tire change. The F-150 has specific jack points you must follow.
For front tire changes, look for the arrow molded into the frame rail near the wheel. For rear tire changes, place the jack under the solid rear axle housing, close to the wheel. Place a wooden board under the jack on soft surfaces to prevent sinking.
Insert the hooked extension bar into the jack’s rear slot. Connect the lug wrench to the bar. Turn clockwise to lift the truck. Raise slowly until the flat tire clears the ground by 1 to 2 inches. Confirm the truck is stable with no wobbling or shifting.
Safety Move: Slide the spare tire under the frame as a backup support in case the jack fails.
Removing the Flat Tire From Your F-150
With the truck securely lifted, you can now remove the damaged wheel. Work carefully to avoid injury and keep all hardware organized.
Fully remove all lug nuts and place them in a hubcap or ziplock bag to prevent losing them. Grip the tire with both hands and pull straight off the hub. Lay it flat on the ground to prevent rolling.
Inspect the hub for rust, debris, or brake damage. Wipe the center bore and lug studs clean for proper spare seating.
Installing the Spare Tire on Your F-150
Mounting the spare correctly ensures safe driving once you lower the vehicle. Take your time with this step to avoid problems later.
Lift the spare and line up the holes with the lug studs. Slide it on until it sits flush against the rotor or drum. Hand-thread one lug nut to hold it in place temporarily. Install the remaining lug nuts by hand. Tighten just enough to hold, but do not fully tighten yet. Use a star pattern to keep the wheel centered.
Warning: Never lower the truck with loose or missing lug nuts.
Lowering the Truck and Torquing Lug Nuts Properly
Final tightening must be done on the ground to prevent damage to wheel studs and ensure proper seating. This step is critical for your safety.
Turn the jack handle counter-clockwise slowly. Lower until the tire fully supports the truck’s weight. Remove the jack and set it aside.
Use a torque wrench to tighten each lug nut to 150 ft-lbs (203 Nm). Follow a star pattern to distribute pressure evenly. If no torque wrench is available, apply full body weight to an 18 to 24 inch wrench.
Analogy: 150 ft-lbs equals a 150-pound person standing on a one-foot wrench.
After driving 50 to 100 miles, stop and recheck lug nut tightness. Have a shop verify torque if you’re unsure.
Stowing the Flat Tire and Tools Under Your F-150
Leaving tools or a loose spare creates hazards while driving. Proper storage ensures everything stays secure and ready for next time.
Slide the flat tire under the truck. Align the guide hole with the protruding tube on the bumper. Reinsert the extension rod and lug wrench into the access hole. Turn clockwise until you hear a ratchet click. Tug the tire gently to confirm it’s locked.
Return the jack, bars, wrench, funnel, and keys to the kit. Secure with straps behind the passenger seat. Replace the access panel and store your key.
Final Check: Nothing should rattle while driving.
Understanding F-150 Spare Tire Limits
Even though it’s full-size, the spare isn’t designed for long-term use. Know these limitations to avoid unsafe driving conditions.
Maximum speed on the spare is 55 mph (88 km/h). Avoid rough terrain and highway cruising. Repair or replace the flat tire as soon as possible.
Warning: Don’t ignore a damaged tire. Driving on it risks blowouts and costly repairs down the road.
F-150 Model-Specific Tips and Common Challenges
Knowing your trim level helps with small differences in the tire change process. Most steps remain the same across model years.
Lariat and Platinum trims use the mechanical key from the fob to unlock the spare. All models use the same cable-and-rod system. No electric winch is involved.
If the rod won’t engage, adjust the angle and reinsert. If the spare is stuck, tap the mechanism gently or lubricate the cable annually. Practice at home to master rod assembly and spare lowering.
Time estimates show experienced users complete this in 15 to 20 minutes. First-time changers should allow 30 to 45 minutes.
Maintaining Your F-150 Emergency Tire System
A failed jack or rusted cable can leave you stranded when you need help the most. Regular maintenance prevents emergencies.
Check spare tire pressure monthly and match it to the PSI on the sidewall or door jamb sticker. Inspect the cable and winch for rust, fraying, or stiffness. Ensure rods connect smoothly and the jack operates freely.
Lubricate the spare lowering mechanism with silicone spray annually. Inspect the scissor jack for bent threads or wobbling.
Warning: Never use the factory jack for under-vehicle work. It’s designed only for tire changes.
Final F-150 Tire Change Checklist
Before driving off, verify everything is complete and secure.
Check that lug nuts are torqued to 150 ft-lbs in a star pattern. Confirm the spare is properly inflated and seated. Verify the flat tire is locked under the bed. Ensure all tools are secured in the storage compartment. Confirm the access panel is replaced and secured. Check that no warning lights (ABS, traction control) are active. Schedule the damaged tire for repair.
Frequently Asked Questions About Changing F-150 Tires
Where is the spare tire located on a Ford F-150?
The spare tire is stored under the rear of the truck bed, accessed through a panel near the license plate. It uses a cable lowering mechanism that requires a special rod to deploy.
What tools come with the F-150 for tire changes?
The F-150 includes a scissor jack, lug wrench, three metal extension bars, a hooked bar, a vehicle key, and a locking lug nut key if equipped. All stored behind the passenger-side second-row seat.
How tight should lug nuts be on an F-150?
Lug nuts should be torqued to 150 ft-lbs (203 Nm) using a star pattern. Recheck after driving 50 to 100 miles.
Can I drive long distances on the F-150 spare tire?
No. The maximum safe speed is 55 mph, and you should avoid highway driving. The spare is for emergency use only until you can repair or replace the damaged tire.
How do I unlock the spare tire on an F-150 Lariat?
On Lariat and higher trims, use the mechanical key from your key fob. Insert it into the slot near the rear bumper, push down, and turn to release the lock.
Why won’t my spare tire lower on the F-150?
The rod may not be engaging the bolt mechanism correctly. Try adjusting the angle and reinserting. If stuck, the cable may need lubrication or the mechanism may be rusted.
Key Takeaways for Changing Your F-150 Tire
Changing a tire on your Ford F-150 is straightforward once you know the unique steps involved. The key is preparation: know where your tools are, practice the rod assembly, and always torque lug nuts to 150 ft-lbs in a star pattern.
The spare tire system under the bed differs from traditional vehicles, so familiarize yourself with the lowering mechanism before you need it on the roadside. Regular maintenance of your jack, cable, and spare tire ensures everything works when you need it most.
Keep your owner’s manual handy for model-year specifics, and inspect your spare every few months. When you need it, you’ll be glad it works.


