

You turn the climate control knob, press the AC button, and expect a blast of cool air, but nothing comes. No breeze, no fan noise, just silence. If your Ford F150 AC fan isn’t working, you are not alone. Thousands of F-150 owners, from 2004 to 2021 models, have faced this exact issue.
This guide walks you through diagnosing the root cause in under 30 minutes and applying proven fixes backed by real-world repairs. Whether your fan works only on high speed, cuts out after idling, or won’t run at all, you will find step-by-step solutions here.
Decode Common Failure Symptoms

Understanding what your fan does and does not do points you directly to the faulty component.
Fan Works Only on High Speed
If your F-150’s blower motor runs only at Speed 4 or 5, the issue is almost certainly the blower motor speed controller, also called the resistor. This component regulates lower speeds by adding resistance to the ground circuit. When it fails, only the high-speed relay bypass remains functional.
The failure happens because the resistor overheats due to poor connector contact or internal breakdown. Model years 2004 to 2016 are most affected, especially 2011 to 2014. Look for a melted or discolored white connector with burnt wires. One pin often shows heat damage, and the wire feeding it turns brittle.
No Airflow at Any Speed
Complete blower motor failure means zero airflow regardless of settings. This could stem from a blown fuse, failed relay, dead blower motor, or an open circuit in the wiring. The key test is listening for a click from the relay when turning the fan on. No click suggests a relay or control signal issue.
Fan Stops After Idling on PowerBoost Models
Owners of 2021 F-150 PowerBoost models report the fan shuts off after 15 to 20 minutes of idling, returning only after restarting the engine. Dealerships have traced this to a faulty blower motor control module interacting with the 12V system charge management. One user fixed it temporarily by running the fan on Speed 5 to reduce electrical load, pointing to system-level strain.
Test the Blower Motor Relay First
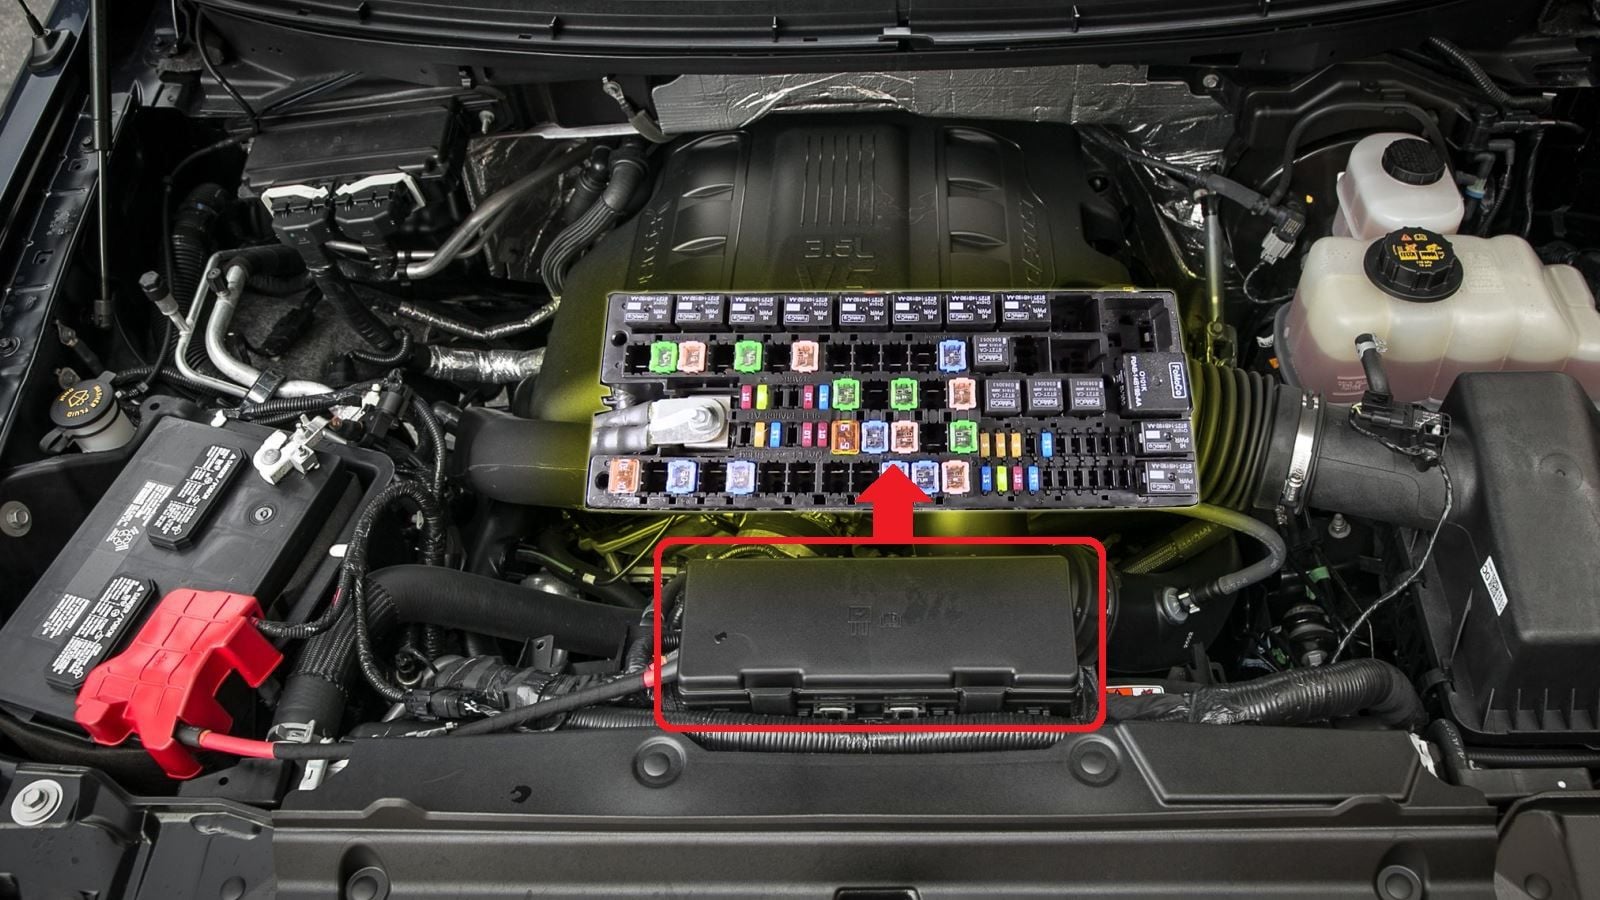
The fastest diagnostic step is swapping the blower motor relay. Located in the under-hood fuse box, it is typically Relay #3, labeled “Blower Motor.”
Swap Relay #3 to Confirm
Follow these steps to test the relay:
- Turn the ignition off.
- Open the engine compartment fuse box.
- Locate Relay #3, which is often identical to Relay #4 for the heated rear window.
- Swap it with Relay #4.
- Turn the key to RUN and test the fan.
If the fan works after swapping, you have confirmed a bad relay. Replace it with an OEM-spec unit costing approximately $18. Avoid cheap aftermarket relays, as some have incorrect pinouts or fail prematurely.
Check Critical Fuses in Two Locations
Before disassembling dash panels, verify power flow through these fuses located in the under-hood and interior fuse boxes.
Inspect F51, F45, F105, and F22
Use a multimeter or test light to check voltage on both sides of each fuse with the key ON. No power on the output side means replace the fuse, even if it looks intact.
| Fuse | Location | Rating | Function |
|---|---|---|---|
| F51 | Underhood (BJB) | 40A | Main blower motor power |
| F105 | Underhood | — | Feeds relay output |
| F45 | Interior (IP junction) | 5A | Powers HVAC control module |
| F22 | Interior (CJB) | — | Powers mode switch |
One user had voltage at both fuse boxes but no power at the motor, indicating a wiring fault downstream.
Bench Test the Blower Motor
Do not assume the motor is bad. Test it independently before tearing into the dash.
Power It Directly to Rule It Out
Remove the blower motor from the passenger footwell. Connect a 12V battery or portable drill battery using two jumper wires. Connect the positive wire to battery positive and negative to battery negative. Observe whether the motor spins. If it spins, the motor is good. If it does not spin, the motor has failed. If the wires heat up during the test, there is an internal short or high resistance.
Inspect the Speed Controller and Connector
For 2003 to 2014 models, the blower motor speed controller mounts behind the glovebox, connected to a bundle of yellow wires.
Locate the Resistor Behind the Glovebox
Squeeze the glovebox sides to release the retaining tabs and lower it gently. Look for a small white or black block with two screws. Check the connector for melted plastic, discolored pins, loose or wiggly terminals, and burnt wire insulation. Fretting corrosion, which is micro-movement in connectors, causes high resistance leading to heat buildup and failure.
Replace Burnt Connectors with Soldered Joints
Replacing just the resistor without fixing the pigtail connector leads to repeat failures within weeks.
Avoid Crimp-Style Repairs
Cut out the damaged connector, strip the wires, and solder new terminals. Seal each joint with heat-shrink tubing, then reconnect and secure. Solder creates a permanent, low-resistance bond, while crimp connectors loosen over time.
Diagnose the HVAC Control Module
If fuses, relay, motor, and resistor all check out, the HVAC control head may not be sending the speed signal.
Check for Signal Output
Signs of failure include buttons lighting up but the fan not responding, no relay click when adjusting speed, and a display that works but the system is unresponsive. Use a multimeter to check for signal voltage from the control head to the speed controller, or swap with a known-good unit if available.
Fix Intermittent Fan Cutoff on PowerBoost Models
For 2021 PowerBoost models, intermittent fan shutdown after idling has been resolved by replacing the blower motor and the control module, followed by dealership-level recalibration. One owner had both parts replaced under warranty with no recurrence after six months.
Follow the Pro Diagnostic Workflow
Use this step-by-step plan to systematically isolate the problem. The entire process takes 20 to 40 minutes.
Step-by-Step Troubleshooting Plan
- Preliminary Check: Confirm the HVAC panel lights up. Set fan to HIGH and listen for a relay click.
- Test Fuses: Check F51 (40A) and F45 (5A) with a multimeter.
- Swap Relay #3: Use Relay #4 as a test unit.
- Check Power at Motor: With key ON and fan on HIGH, the yellow/green wire should read approximately 12V. No voltage indicates a relay or F51 issue.
- Check Ground Signal: Backprobe the yellow/orange wire. Voltage should vary with speed setting, ranging from 3 to 6V at low speed to approximately 12V at high speed. No variation indicates a failed speed controller.
- Inspect Resistor and Connector: Look for melted, loose, or corroded pins.
- Bench Test Motor: Power directly to verify operation.
- Evaluate HVAC Module: This is the last resort if all else checks out.
Replace All Four Parts for Long-Term Fix
Replacing only the speed controller often leads to repeat failure because degraded connectors and motors stress the new part.
Best Practice: Full System Refresh
Replace all four components together: the blower motor, the motor connector (pigtail), the speed controller (resistor or module), and the controller connector (pigtail). This eliminates fretting corrosion points, prevents heat buildup from high-resistance joints, and costs less than repeated repairs. Total parts cost runs approximately $150 to $250, with labor taking 1 to 2 hours.
Prevent Future Failures
Maintenance Tips That Work
Inspect the resistor and connector every 50,000 miles by pulling the glovebox and checking for discoloration or loose pins. Replace the resistor proactively if you notice intermittent low speeds before total failure occurs. Keep the cabin air filter clean, as a clogged filter forces the motor to work harder and increases heat and stress. Avoid installing a toggle switch to ground the motor directly, as this creates a fire risk if unfused. Only use such a bypass as a temporary emergency measure.
Frequently Asked Questions About Ford F150 AC Fan Not Working
Why does my F-150 fan only work on high speed?
This indicates a failed blower motor speed controller (resistor). The resistor handles speeds 1 through 3, while high speed bypasses it via relay. When the resistor fails, only high speed remains functional.
Can I drive my truck with a non-working AC fan?
You can drive, but without cabin airflow from the AC or heater, visibility suffers in humid conditions and comfort decreases. The issue will not resolve itself and typically worsens over time.
How much does it cost to replace the blower motor resistor?
A generic resistor costs approximately $25. OEM modules cost more, depending on your model year and climate control type. Remember to budget for the connector pigtail as well.
What causes the connector to melt or burn?
Fretting corrosion, which is micro-movement in the connector pins over time, creates high resistance. This generates heat, melts the plastic, and causes intermittent or complete failure.
Is the relay swap test safe to perform?
Yes. Swapping identical relays in the fuse box is a standard diagnostic procedure. Just ensure the ignition is off before accessing the relay box.
Do I need to replace all four components at once?
For lasting results, yes. Replacing just one component often leads to repeat failure within weeks because the other degraded parts stress the new component. The four-part refresh eliminates this cycle.
Key Takeaways for Fixing Your Ford F150 AC Fan
The Ford F150 AC fan not working issue is highly diagnosable and fixable with basic tools. Start with the relay and fuses, then move to the resistor and motor. For lasting results, replace all four key components together, including both connectors. Avoid cheap fixes that lead to repeat work. With this guide, you will restore full airflow and avoid dealership prices. The most common fixes that worked for real owners include relay swaps providing instant restoration, resistor plus connector replacements lasting over a year, and full four-part system replacements showing zero recurrence after 18 months.


