

If your Ford F-150’s HVAC fan only works on high speed or not at all, the culprit is likely a failed blower motor resistor. This small component controls fan speeds below maximum by regulating voltage to the blower motor. When it fails, you lose low and medium settings, leaving you with no climate control flexibility. The good news? Replacing the blower motor resistor on a Ford F-150 (2000–2014) is a straightforward DIY repair that takes under 30 minutes and costs less than $40 in parts. In this guide, you’ll learn exactly where the resistor is located, how to remove and replace it safely, and how to avoid common mistakes that lead to repeat failures.
Locate the Resistor Behind Glove Box
The blower motor resistor is tucked behind the passenger-side dashboard, just above the footwell. Knowing its exact position saves time and frustration during replacement.
Access the HVAC Housing Area
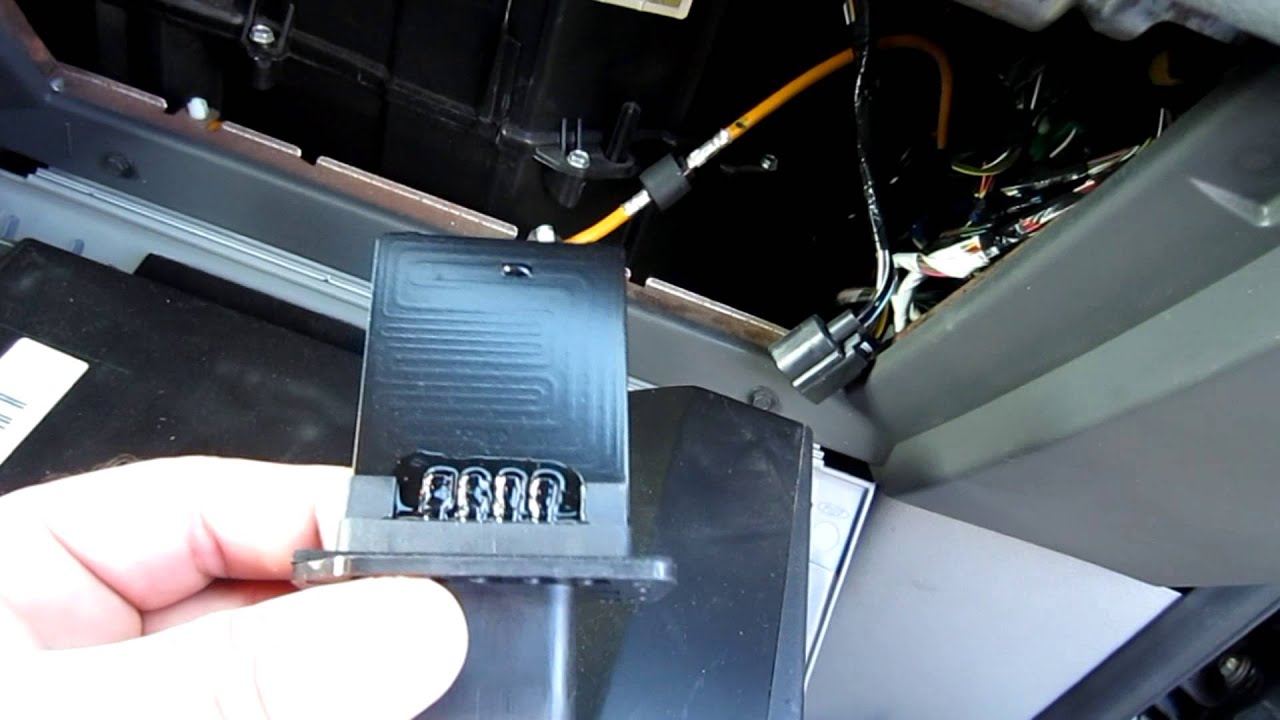
Lie on your back in the passenger footwell with the seat reclined and doors open for better reach. The resistor sits on the side of the HVAC housing, adjacent to the blower motor. On most 2000–2014 F-150s, you need to lower or remove the glove box to see it clearly. Once accessed, you’ll spot a flat, rectangular module with an electrical connector.
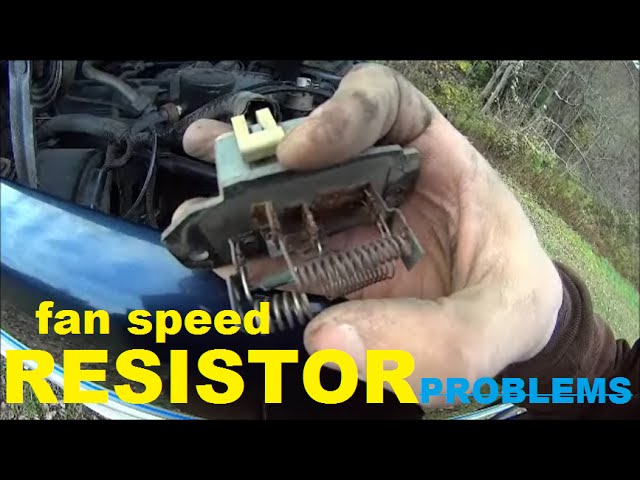
Identify Resistor Appearance and Orientation
Look for a black plastic unit about the size of a matchbox, secured with two 8 mm bolts. It has a multi-wire connector and a chamfered (beveled) corner. This corner must face up and toward the rear of the truck when installing the new part. The unit also includes a rubber gasket and foam insulation to protect against heat and moisture.
Disconnect Battery and Remove Glove Box
Safety first. Prevent electrical shorts by disconnecting power before touching any HVAC components.
Disconnect Negative Battery Terminal
For 2000–2004 models especially, disconnect the negative battery cable. Use a wrench to loosen the nut and tuck the cable aside. This step is not always required on newer models, but it eliminates the risk of shorting circuits during repair.
Remove Glove Box for Full Access
Open the glove box fully and remove all contents. Locate three 7 mm bolts holding it to the dash (two on the sides, one at the top). Remove them, then gently slide the box downward and out at an angle. Do not force it. Unhook the damper rod if needed. Next, remove the felt liner by popping out two plastic clips with a trim tool. Set everything aside.
Pro Tip: Keep the glove box latched during removal to prevent it from sagging and breaking internal hinges.
Unplug and Remove Old Resistor
With clear access, focus on disconnecting and extracting the failed unit.
Disconnect Electrical Connector Safely
Find the wiring harness plugged into the resistor. Press the locking tab and pull straight back. Do not yank from the wires. If the connector is stuck, use a plastic trim tool to gently pry it loose. Inspect the prongs for melting, discoloration, or corrosion. Burnt terminals mean the harness may need replacement to prevent new resistor failure.
Remove Mounting Bolts and Extract Unit
Use an 8 mm socket and ratchet to remove the two bolts securing the resistor. One bolt is usually visible from the front. The second may require reaching from behind the glove box opening. Once both are out, pull the resistor straight out of the HVAC housing. It might feel tight. Wiggle gently if necessary. Retain the rubber gasket if it stays attached.
Warning: Forcing the unit can damage the housing. Confirm both bolts are fully removed first.
Inspect Old Resistor for Damage
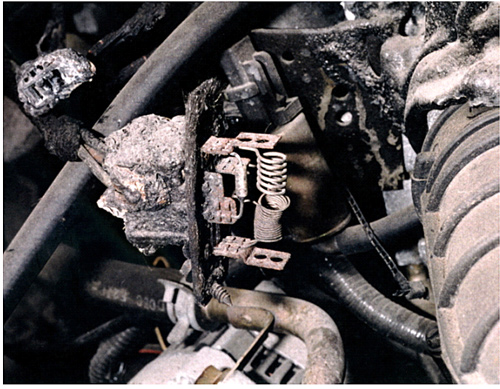
Examining the old part helps confirm the diagnosis and reveals underlying issues.
Check for Thermal and Moisture Damage
Look for these signs of failure:
- Burnt circuit traces on the board
- Warped or melted housing
- Rust or corrosion on terminals
- Discolored or deformed connector prongs
Many resistors fail due to heat buildup or water intrusion from a clogged HVAC drain. If you see moisture damage, clear the evaporator drain tube under the hood (near the firewall) to prevent future failures.
Install New Blower Motor Resistor
Now install the replacement with precision to ensure long-term reliability.
Align Chamfered Corner Correctly
Match the beveled corner of the new resistor to the top-rear position, facing up and toward the back of the truck. This keyed design prevents incorrect installation. Align the guide pin or slot with the housing opening.
Insert and Secure with 8 mm Bolts
Slide the unit straight in until it seats flush. Start one bolt by hand to hold it in place, then insert the second. Tighten both until snug, but do not over-tighten. The threads are in plastic and can strip easily. A quarter-turn past finger-tight is sufficient.
Expert Note: Cross-threading is common. Always start bolts by hand before using the ratchet.
Reconnect Wiring and Reassemble Interior
Reassembly is quick but must be done carefully to avoid new issues.
Reattach Electrical Connector Firmly
Plug the harness back into the new resistor. Press until the locking tab clicks. Tug lightly to confirm it is secure. Route the wire away from sharp edges or moving parts to prevent chafing.
Reinstall Glove Box and Liner
Snap the felt liner back into place. Align the metal guide tab with the slot on the back panel. Bend it slightly if needed for a tight fit. Reconnect the two plastic clips. Slide the glove box back in at an angle, align the mounting ears, and reinstall the three 7 mm bolts. Reconnect the battery if disconnected.
Test All Fan Speed Settings
Verify the repair by testing HVAC performance across all modes.
Confirm Low, Medium, and High Operation
Turn the ignition to ON and activate the HVAC system. Test each fan speed:
- Speed 1 (Low): Should produce a soft, steady airflow
- Speeds 2–3 (Medium): Airflow increases smoothly
- Speed 4 (High): Maximum output, motor runs without hesitation
Listen for grinding, clicking, or delayed response. If any speed fails, double-check resistor seating and connector security.
Success Signal: All speeds work consistently with no flickering or dropouts.
Prevent Future Resistor Failures
Extend the life of your new resistor with simple maintenance steps.
Clear HVAC Drain Tube Regularly
A clogged evaporator drain allows condensation to pool in the HVAC box, soaking the resistor. Locate the drain tube on the firewall (passenger side under the hood) and blow compressed air through it annually.
Replace Damaged Wiring Harnesses
If the connector showed melting, replace the harness. Aftermarket kits include updated insulation and locking clips to prevent overheating. Never install a new resistor into a damaged harness. It will fail again quickly.
Avoid Dust and Debris Buildup
Change the cabin air filter every 12,000–15,000 miles. A clogged filter forces the blower motor to work harder, increasing heat and electrical load on the resistor.
Troubleshoot Common Post-Replacement Issues
Even a proper install can have hiccups. Use this quick guide to fix them.
New Resistor Fails Immediately
This is usually caused by a damaged wiring harness or poor connection. Inspect and replace the connector if prongs are melted. Ensure full insertion and click-lock engagement.
Fan Only Works on High Speed
This indicates the resistor is misaligned or not fully seated. Remove and recheck orientation. The chamfered corner must face up and rear. Ensure both bolts are tight and the unit is flush.
No Fan Operation at All
This is not a resistor issue. Check the blower motor, fuse, or relay instead. Test fuse #13 (20A) in the interior fuse box. Jump power directly to the blower motor to verify function.
Intermittent Fan Behavior
This is caused by a loose ground or poor electrical contact. Inspect the ground wire near the blower motor. Clean connections and ensure tight fit at resistor and motor.
Choose the Right Replacement Part
Use a high-quality resistor to avoid repeat work.
Recommended Aftermarket Options
These brands offer reliable replacements:
- TRQ HCA40068 ($34.95): Exact fit for most F-150s, includes foam insulation
- TRQ HCA40089 ($59.95): Enhanced durability with rubberized circuit board
- 1A Auto ABR001 ($39.95): OEM-style design with locking connector
Avoid cheap no-name brands. They often lack thermal protection and fail within months.
Know Estimated Time and Cost
Plan your repair with realistic expectations.
DIY vs Professional Cost
Here is the cost breakdown:
- Part only: $15–$60 (online)
- Labor (shop): $50–$100
- DIY time: 15–30 minutes (beginner: up to 45 minutes)
Most owners save $75 or more by doing it themselves. No special tools are required. Just an 8 mm socket and ratchet will do the job.
Frequently Asked Questions About Replacing Ford F-150 Blower Motor Resistor
How do I know if my blower motor resistor is bad?
The most common symptom is the fan working only on high speed. You might also experience no airflow, intermittent operation, or a burning smell. If high speed works but lower speeds do not, the resistor is likely faulty since high speed bypasses the resistor entirely.
Where is the blower motor resistor on a Ford F-150?
The resistor is located behind the glove box, on the passenger side of the dashboard. It mounts to the HVAC housing above the front passenger footwell. You need to remove or lower the glove box to access it.
Can I replace the blower motor resistor myself?
Yes. This is a beginner-level DIY repair that takes 15–30 minutes. You only need an 8 mm socket and ratchet. The job involves removing the glove box, unplugging the electrical connector, swapping the resistor, and reassembling everything.
What causes blower motor resistors to fail?
The most common causes are heat buildup from prolonged use and moisture intrusion from a clogged HVAC drain tube. Corrosion, damaged wiring harnesses, and excessive dust buildup can also lead to premature failure.
Should I replace the wiring harness when replacing the resistor?
Inspect the harness first. If you see melted prongs, corrosion, or burn marks, replace the harness. Installing a new resistor into a damaged harness will cause immediate failure.
Key Takeaways for Replacing Your Ford F-150 Blower Motor Resistor
Replacing the blower motor resistor on your Ford F-150 restores full climate control with minimal effort. By following these steps, especially the correct orientation (chamfered corner facing up and rear) and harness inspection, you will avoid repeat failures and enjoy reliable fan operation for years. Always test all speeds after reassembly and clear the HVAC drain annually to prevent moisture damage. With the right part and proper installation, this repair is a permanent fix that saves you $75 or more compared to professional labor.


