Your F-150’s brake lights aren’t working, but your tail lights and reverse lights still do. That’s a classic sign of an electrical issue isolated to the brake light circuit, not a total lighting failure. When you press the pedal and nothing happens, it’s a safety hazard that could get you pulled over. The good news is most cases, especially 2015-2017 models, have a simple fast fix you can do yourself in under an hour.
This guide walks you through every possible cause ranked by likelihood. You’ll learn why Fuse #16 is the prime suspect, how to test the brake light switch, and when to suspect deeper issues like the FJB module.
Check Fuse #16 First
For 2015-2017 F-150s, Fuse #16 (10A) in the engine bay is the most common cause of total brake light failure. It powers the entire brake light circuit, including the third center brake light. When this fuse blows, all brake lights go dark, but tail lights and reverse lights stay on because they’re on separate circuits.
Locate and Test Fuse #16
Open the hood and find the engine compartment fuse box on the driver’s side, near the battery, facing the windshield. Remove the cover and check the diagram inside. Fuse #16 is labeled “Brake/Cruise” or similar.
Do not rely on visual inspection because many blown fuses look fine. Use a test light or multimeter instead:
• Set multimeter to continuity or voltage
• Probe both ends of the fuse with ignition ON
• No continuity or 12V means the fuse is blown and needs replacement
Replace with Correct Fuse
Use a 10A fuse only. Never upgrade to 15A or 20A because higher amperage can damage wiring. If the new fuse blows immediately, you have a short circuit, likely in trailer wiring or a damaged harness.
Test the Brake Light Switch
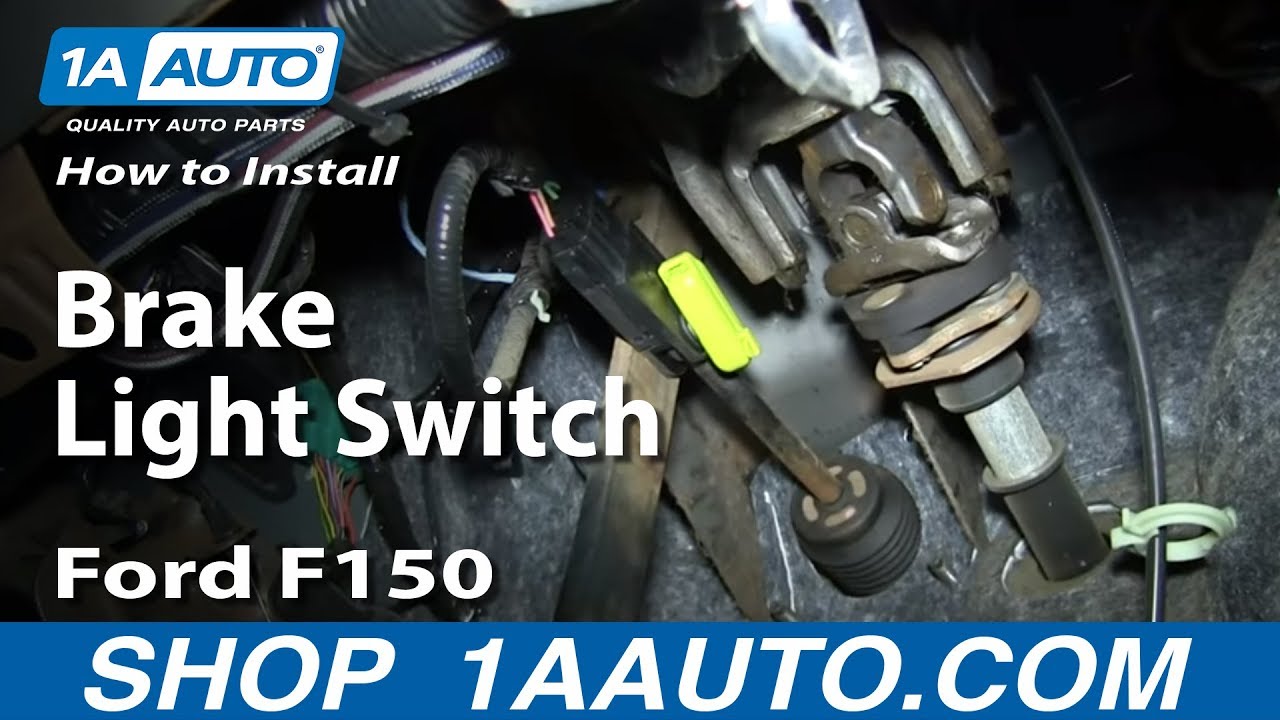
The brake pedal position switch is a small plunger switch mounted above the brake pedal. It closes the circuit when you press the pedal, sending power to the brake lights. If it fails, no signal gets sent and lights stay off.
A bad switch can also prevent shifting out of Park due to the brake-to-shift interlock sharing the same component.
How to Test It
Turn ignition ON and disconnect the switch connector. Use a multimeter to probe the Green/Red wire, which should have 12V power coming in. Press the pedal and check the Green wire, which should now have 12V power going out. No output means the switch is faulty.
Quick Jumper Test
Insert a paperclip or fuse tap into the connector terminals. If brake lights turn on, the switch is bad and needs replacement.
Replace and Adjust
After installation, ensure the plunger contacts the pedal when slightly depressed, about 1/4 inch travel. If lights stay on, the switch is too far out. If they don’t turn on, it’s too far in.
Diagnose the Hazard/Turn Signal Switch
The multifunction switch on the steering column routes brake light power to the left and right tail lamps. If it fails, side brake lights go out but the center CHMSL may still work.
Key Diagnostic Clue
If the third brake light works but side lights don’t, the fault is after the brake switch, likely the hazard switch. This is a common failure pattern in 2005-2010 models.
Test the Outputs
With brake pedal pressed, back-probe the hazard switch connector on the driver’s side of the column. Check the Orange/Light-Blue wire for right brake light and Light-Green wire for left brake light. No 12V on either wire means the switch is faulty.
Inspect Relays on 2010-2014 Models
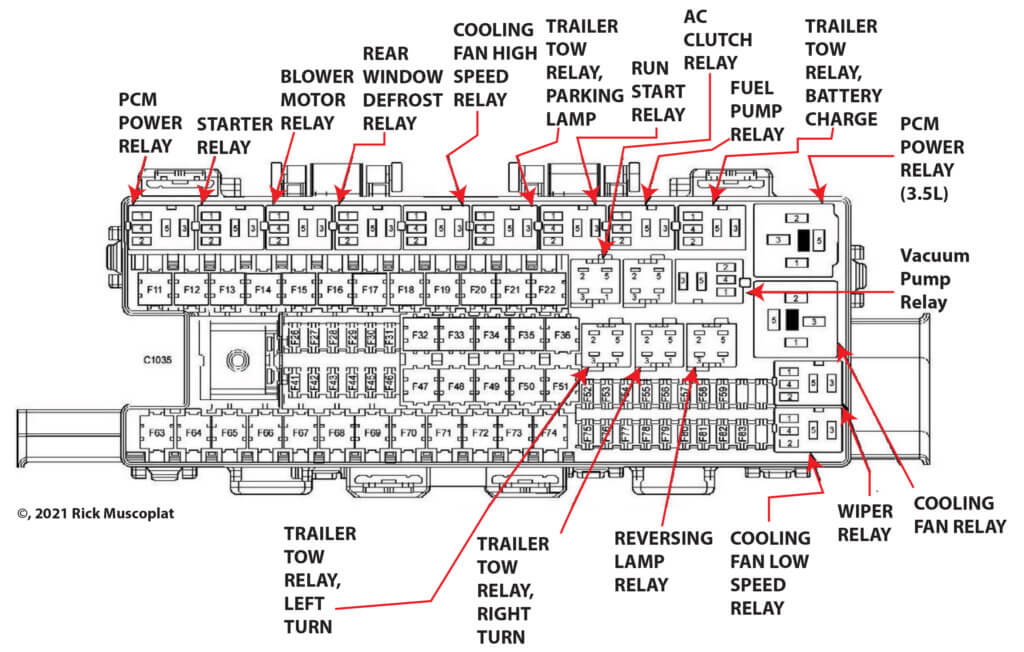
In 2010-2014 F-150s, brake light operation can depend on relays housed in the Totally Integrated Power Module (TIPM) or fuse box.
Which Relays to Check
• Turn Signal Relay: Controls flasher and brake light routing
• Tail Light Relay: Powers tail and brake circuits
• Trailer Tow Relay: May share circuitry
Swap to Test
Find the relay using the fuse box diagram. Swap it with a known-good one like the horn relay. Press the brake pedal and listen for a click while checking lights.
Examine Wiring and Connectors
High-Risk Areas
The frame rail harness under the driver’s seat is exposed to water, mud, and road salt. Check for swollen connectors, loose or corroded pins, and disconnected plugs.
Tail light assemblies can develop corrosion on socket contacts, burnt terminals, and moisture inside the housing. Test with known-good bulbs.
Ensure the brake switch connector is fully seated. Look for bent pins or melted insulation.
Check ground points near the rear bumper or frame rail. Clean to bare metal with sandpaper, tighten securely, and test continuity: less than 1 ohm resistance between ground and battery negative.
Verify Third Brake Light (CHMSL)
The center high-mount stop lamp gets power directly from the brake switch before the hazard switch. This makes it a powerful diagnostic tool.
What Each Result Means
If CHMSL works, the brake switch is good and the fault is after it, such as the hazard switch. If CHMSL fails, the problem is before or at the brake switch, meaning fuse, power feed, or switch issues.
Back-probe the Green wire at the CHMSL connector. It should have 12V when brake pedal is pressed. No power means go back to fuse and switch testing.
Check Other Fuses by Model Year
| Model Year | Fuse to Check | Location | Rating |
|---|---|---|---|
| 2015-2017 | #16 | Engine bay | 10A |
| 2010-2014 | Fuse 46 | Engine bay (BJB) | 10A |
| 2005-2008 | F02 / Fuse 2 | Interior box | 20A |
| All Models | L/R Brake Fuses | Interior box | 10A each |
Use a test light because it draws load and reveals weak connections a multimeter might miss. Check both engine bay and cabin fuse boxes.
Suspect FJB/BCM Module as Last Resort
Only consider the FJB or BCM after ruling out fuses, brake switch, hazard switch, relays, and wiring. If all test good but lights still don’t work, the module may be faulty.
What It Controls
The module controls lighting circuits, anti-theft, shift interlock, and TIPM functions on 2010 and newer models.
How to Replace
It’s a plug-and-play unit in most cases. Cost is $50-$150 for used or remanufactured units. Match the part number to your VIN and trim.
Use the Right Tools
A multimeter shows precise voltage readings but can lie on high-resistance circuits. A test light draws real current and reveals weak connections that a meter misses.
Recommended Tools
• Test light ($10)
• Digital multimeter ($20)
• Fuse puller (included in fuse box)
• Pin probes for back-testing
• Dielectric grease for connectors
Follow This Diagnostic Order
- Check bulbs and sockets first
- Test Fuse #16 (2015-2017) or Fuse 46 (2010-2014) with test light
- Verify brake switch input and output with 12V checks
- Check CHMSL to locate fault before or after switch
- Test hazard switch outputs on Orange/Light-Blue and Light-Green wires
- Inspect and swap relays on 2010-2014 models
- Examine wiring and grounds at frame rail and tail lights
- Replace FJB/BCM only after all else fails
This order resolves 90% or more of cases without guesswork.
Avoid Common Mistakes
Do not skip the test light. A multimeter may show voltage but miss a high-resistance connection that can’t carry current.
Do not assume the fuse is good. Many blown fuses look fine, so always test with a tool.
Do not overlook trailer wiring. Aftermarket trailer harnesses are a common source of shorts and backfeeding that keeps blowing fuses.
Do not confuse ABS and brake light issues. In some cases, both lights come on due to a loose ABS connector, not the brake circuit.
Prevent Future Failures
Apply dielectric grease to fuse box terminals and connectors annually. Inspect brake switch operation if the pedal feels loose. Seal trailer wiring with heat-shrink tubing.
Keep spare 10A fuses, a brake light switch, and a test light in your truck. A working brake light system is required by law.
Frequently Asked Questions About F-150 Brake Lights
Why do my brake lights work but not my tail lights?
These are separate circuits. Brake lights receive power through the brake switch and hazard switch, while tail lights use a different fuse and circuit. If only tail lights are out, check the tail light fuse instead.
Can I drive my F-150 with broken brake lights?
Driving without functioning brake lights is illegal and dangerous. You risk being pulled over and causing an accident. Fix it before driving.
How much does it cost to fix F-150 brake lights?
Most repairs cost $15-$50. A 10A fuse costs under $5. A brake switch runs $15-$40. The FJB/BCM module is the most expensive at $50-$150, but that’s rare.
Why does my brake light stay on all the time?
A stuck brake switch is the most common cause. The plunger gets stuck in the closed position, keeping the circuit active. Replace the switch to fix it.
Do 2015-2017 F-150s have a common brake light problem?
Yes. Fuse #16 in the engine bay is the most common failure point for these model years. It’s a 10A fuse that powers the entire brake light circuit.
What if my third brake light works but sides don’t?
This indicates the brake switch is good and the fault is after it. The hazard multifunction switch on the steering column is likely faulty. This is common in 2005-2010 models.
Key Takeaways for Fixing F-150 Brake Lights
Start with Fuse #16 on 2015-2017 models. It’s the single most common cause and takes two minutes to check. Use a test light, not just a multimeter, because it draws real current and reveals weak connections that meters miss.
Check the third brake light to determine if the fault is before or after the brake switch. If CHMSL works but sides don’t, suspect the hazard switch. If everything is out, check the fuse and brake switch first.
Keep spare 10A fuses in your truck. Most F-150 brake light issues are simple, cheap, and DIY-friendly. With the right diagnostic steps, you can have your lights working again in under 30 minutes.