If your 2004 F150 reverse lights aren’t working, you’re dealing with a frustrating electrical issue that affects thousands of truck owners. The problem often lies hidden beneath obvious symptoms—bulbs may look fine, fuses can appear intact, yet the lights refuse to illuminate. This happens because the reverse light circuit involves multiple components beyond simple bulb replacement, including the Digital Transmission Range sensor, Central Junction Box, and several wiring paths that can fail silently. This guide provides a systematic diagnostic approach using real-world data from technicians and verified user fixes, so you can identify the exact cause and restore your backup lights without guessing.
Check Reverse Light Bulbs and Sockets
Before assuming the worst, verify that the simplest components are functioning properly. Many owners replace bulbs only to discover the sockets themselves were the problem.
Inspect Bulbs for Damage
Remove both reverse light bulbs from the rear lamp assemblies. Look for these telltale signs of failure:
• Broken or sagging filaments visible through the glass
• Blackened or fogged glass indicating burnout
• Corroded or moisture-damaged bases
Even bulbs passing visual inspection can be weak. Test each bulb with a 12V power source or bulb tester to confirm it illuminates properly under load.
Examine Lamp Sockets
Inspect the socket connections for common issues:
• Melted or warped plastic from heat exposure
• Corroded or discolored contact terminals
• Loose terminals that fail to grip the bulb base securely
Clean socket contacts using electrical contact cleaner and a small wire brush. Apply dielectric grease after reassembly to protect against future corrosion and ensure consistent electrical contact.
Test Fuse #10 and Fuse #14
Fuses are the most common source of reverse light failure, but visual inspection often fails to reveal the problem. Internal breaks can be invisible to the naked eye.
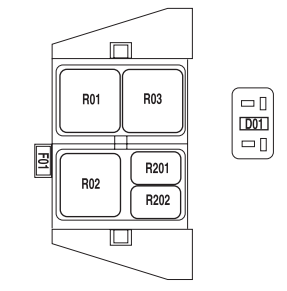
Locate the Critical Fuses
Both fuses reside in the interior Central Junction Box on the driver’s side dash. Here are the specifications you need:
| Fuse | Amperage | Function |
|---|---|---|
| #10 | 20A | Powers reverse lights, parking lamps, trailer tow relay |
| #14 | 10A | Supplies power to TR sensor (Circuit 295) |
Test with a Multimeter
Follow this testing sequence for accurate results:
- Turn ignition to the ON position
- Set multimeter to DC voltage
- Probe both metal caps on each fuse
- Expect battery voltage on both sides of a good fuse
If either side reads zero voltage, the fuse is blown even if it appears intact. Replace with exact amperage ATC or mini blade fuses—never substitute with a higher rating.
Listen for CJB Relay Click
The reverse light relay is integrated directly into the Central Junction Box, meaning there is no external relay to access or replace.
Perform the Shift Test
Use this method to verify relay operation:
- Turn ignition ON without starting the engine
- Have an assistant shift the transmission into and out of reverse
- Place your ear near the driver-side dash panel
You should hear a distinct click each time the transmission enters or exits reverse gear. A click confirms the TR sensor is sending the correct signal to the CJB. No click indicates either TR sensor failure or lack of power reaching the sensor.
Test the Transmission Range (TR) Sensor

The TR sensor, also called the neutral safety switch, sits on the driver-side of the transmission and sends the reverse signal to the CJB.
Access and Disconnect C167 Connector
Locate the 3-wire connector on the driver-side transmission housing. The wire functions are:
• Pin 9 (Light Blue/Pink) – Input power from Fuse #14
• Pin 11 (Dark Green/Yellow) – Output signal to CJB
• Pin 10 – Ground connection
Voltage Test Procedure
Perform these steps to verify sensor function:
- Turn ignition ON
- Disconnect the C167 connector
- Measure voltage between Pin 9 and chassis ground—expect more than 10V
- Shift transmission into reverse
- Measure voltage between Pin 11 and ground—expect battery voltage
No input voltage means checking Fuse #14. Input present but no output indicates a failed TR sensor requiring replacement.
Bypass the TR Sensor (Pinpoint Test)
This test confirms whether the TR sensor is actually defective by bypassing it entirely.
Use a Fused Jumper Wire
Create or obtain a 10A fused jumper wire to prevent circuit damage during testing.
- Connect Pin 9 directly to Pin 11 at the C167 connector
- Keep ignition ON
- Do not shift into reverse
If the reverse lights illuminate with this bypass in place, the TR sensor is definitely faulty and must be replaced. No illumination means the problem lies elsewhere in the wiring or CJB.
Inspect Ground Circuit (Circuit 57)
A poor ground connection can prevent reverse lights from working even when all power supplies test correctly.
Test Socket Ground Continuity
Use your multimeter set to ohms for this check:
- Remove the rear lamp assembly
- Connect one lead to the socket ground pin
- Attach the other lead to clean bare chassis metal
- Expect less than 5 ohms resistance
Readings above 5 ohms indicate corroded ground wires, loose connections, or broken harness wiring. Repair by cleaning the ground point with sandpaper or splicing in a new ground wire secured to bare metal with a stainless steel bolt.
Diagnose Wiring: Circuit 140 (BK/PK)
The black/pink wire carries power from the CJB to both reverse lamp sockets. This wire commonly suffers from high resistance or partial breaks.
Check for Voltage Under Load
Use a test light or 12V bulb with leads for accurate diagnosis:
- Connect one lead to chassis ground
- Touch the other lead to the Circuit 140 wire at the lamp socket
- Have an assistant shift into reverse
A test light that flickers or dims dramatically indicates high resistance in the wire. No illumination suggests an open circuit or failed CJB output. Back-probe at CJB connector C270e-20 to compare voltage readings—if voltage exists at the CJB but not at the socket, a wire break is confirmed.
Unplug and Inspect Trailer Wiring Harness
Trailer plug misuse ranks among the top causes of reverse light failure on the 2004 F150. Incorrect connections can back-feed power or blow fuses instantly.
Common Failure Scenarios
Documented cases show several typical problems:
• Sparking during plug-in due to misalignment causing instant fuse failure
• Short circuits developing in unused trailer harness wiring
• Corroded connectors creating phantom voltage readings
Take Action
Locate the 7-pin trailer connector at the rear of the truck and unplug it completely. Inspect for melted pins, moisture intrusion, or corrosion. Disconnect the harness entirely and replace Fuse #10, then test reverse light function. Some users report that plugging in a factory trailer relay restores function, suggesting the CJB requires complete circuit feedback to operate properly.
Evaluate Central Junction Box (CJB) Health
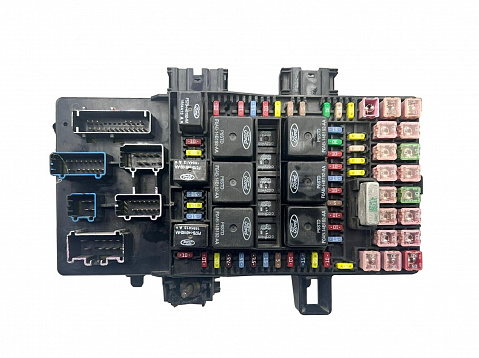
If all other tests pass but reverse lights remain inoperative, the CJB itself may be faulty. This component houses the non-replaceable reverse light relay.
Signs of CJB Failure
Watch for these indicators:
• Relay clicks audibly when shifting but no voltage reaches the lamps
• Multiple electrical issues affecting parking lamps, trailer relay, and reverse lights
• Burnt smell or visible discoloration on the CJB housing
Repair Options
Two primary solutions exist for CJB-related failures:
Option 1: Install External Relay (Recommended)
Use a 5-pin SPDT relay to bypass the failed internal relay. Wire Pin 30 to fused battery power, Pin 85 to ground, Pin 86 to the TR sensor output (DG/YE wire), and Pin 87 to the reverse lamp output (BK/PK wire). This costs $10–$25 and provides a permanent fix.
Option 2: Replace Entire CJB
OEM replacement units run $200–$400 and may require dealer programming. This option carries higher cost but ensures complete system integrity.
Decode Abnormal Behaviors
Some owners report unusual symptoms that require special interpretation.
Reverse Lights Only Work When Headlights Are On
This abnormal behavior indicates a grounding fault where tail lights provide an alternate ground path. Causes include compromised ground circuit (Circuit 57), back-feed through the trailer harness, or aftermarket modifications creating unintended cross-connections. Diagnose by isolating and repairing the ground circuit and disconnecting all aftermarket devices.
Fuse #10 Blows Repeatedly
Repeated fuse failure points to a persistent short. Common causes include damaged trailer wiring harness, rodent-damaged wires under the vehicle, or aftermarket accessories overloading the circuit. Test by disconnecting the trailer connector and replacing the fuse—if it holds, inspect the harness for damage.
Tools You Will Need
Gather these essential tools before starting diagnostics:
• Digital multimeter for voltage, continuity, and resistance testing
• 10A fused jumper wire for TR sensor bypass testing
• Test light or 12V bulb with leads for load testing
• Socket wrench set for TR sensor removal
• Dielectric grease for socket protection
• Replacement fuses, bulbs, and optional relay components
Prevent Future Failures
Protect your reverse light system from future problems with these maintenance practices:
• Disconnect trailer harness when not in use
• Install protective covers on trailer connectors
• Seal undercarriage entry points with steel wool or mesh to deter rodents
• Keep spare fuses and bulbs in the glove box
• Clean and apply dielectric grease to sockets annually
• Use dedicated trailer wiring harnesses with diodes to prevent back-feed
Frequently Asked Questions About 2004 F150 Reverse Lights Not Working
Why do my reverse lights not work even when the bulbs are fine?
The issue likely lies beyond the bulbs themselves. Common causes include blown Fuse #10, failed TR sensor, poor ground connections, or wiring damage. The 2004 F150 reverse light circuit involves multiple components that must all function correctly for illumination.
Can I drive my 2004 F150 without working reverse lights?
While legally drivable in most jurisdictions, non-functional reverse lights create safety hazards when backing up, especially at night. Additionally, some states will fail vehicle inspection for inoperative backup lamps.
How much does it cost to fix reverse lights on a 2004 F150?
Costs vary widely based on the cause. A fuse costs under $5, a TR sensor runs $60–$120, an external relay kit costs $10–$25, and a complete CJB replacement runs $200–$400 plus potential programming fees.
Why does my reverse light fuse keep blowing?
Repeated fuse failure indicates a short in the circuit. Suspect damaged trailer wiring harness, rodent-damaged wires, or aftermarket accessories overloading the circuit. Disconnect the trailer harness and test to isolate the cause.
Do I need to replace the entire CJB if the reverse light relay fails?
Not necessarily. Installing an external 5-pin SPDT relay bypasses the failed internal relay at a fraction of the cost. This solution runs a new wire from the CJB output to the lamps, completely bypassing the faulty internal relay while maintaining proper function.
How do I know if my TR sensor is bad?
Test the TR sensor by checking voltage at the C167 connector. With ignition ON, Pin 9 should show over 10V input. When shifted into reverse, Pin 11 should show battery voltage output. No output despite good input indicates a failed TR sensor requiring replacement.
Key Takeaways for Fixing Your 2004 F150 Reverse Lights
The 2004 F150 reverse lights not working issue typically stems from one of several identifiable causes, and systematic testing pinpoints the exact problem efficiently. Always test fuses with a multimeter rather than relying on visual inspection, since internal breaks are invisible to the eye. The TR sensor and trailer wiring harness represent the two most common failure points after fuses, so check these early in your diagnostic process. If the Central Junction Box proves to be the culprit, an external relay installation provides a cost-effective permanent fix without requiring expensive dashboard removal or dealer programming. With the systematic approach outlined in this guide, you can diagnose and repair your reverse lights confidently, saving both time and money compared to dealership visits.