
If your F-150 bounces excessively over speed bumps, bottoms out on potholes, or feels unstable when towing, worn rear shocks are likely the culprit. The rear suspension on these trucks takes a beating from heavy loads, rough roads, and miles of off-road use, causing the damping performance to degrade over time. Replacing the rear shocks yourself saves money and restores that factory-fresh ride quality you remember from when the truck was new.
This guide covers everything you need to know about how to change rear shocks on F150 models from 2009 to 2020. You’ll learn to identify failing shocks, gather the right tools, complete the installation safely, and get back on the road with improved handling and stability.
Recognize Symptoms of Worn Rear Shocks
Excessive Bounce and Instability
Your F-150 should settle quickly after hitting a bump. If the bed keeps bouncing after speed bumps, railroad tracks, or potholes, the damping inside the shocks has worn out. This oscillation means the hydraulic fluid can no longer control the spring movement effectively.
Rear Wheel Hop During Braking
Worn shocks fail to keep the rear tires planted. You might feel the rear end skip or hop during hard braking or acceleration, especially when towing a trailer. This instability compromises traction and increases stopping distances, creating a safety concern.
Clunking Noises and Visible Leaks
Knocking sounds from the rear, particularly over bumps, often indicate loose shock mounts or failed bushings. Check the shock body for shiny oil residue, which signals internal seal failure. Uneven tire wear with cupping or scalloping patterns also points to poor damping.
Vehicle Sits Lower in the Rear
If your truck appears to sag in the back, the shocks may be worn out and no longer supporting the suspension properly. This lowered ride height affects handling and may indicate it’s time for replacement.
Pro Tip: Trucks used for towing or heavy hauling wear out shocks faster. Consider replacement every 50,000 to 100,000 miles, even before symptoms appear.
Gather Essential Tools for the Job
Required Hand Tools
You can complete this job with standard hand tools available in any garage. The specific sizes you need include a 15 mm socket for the mounting bolts and an 18 mm open-end wrench for the lower nut. A torque wrench is critical for achieving the 66 ft-lbs specification that prevents both over-tightening (which crushes bushings) and under-tightening (which causes bolt failure).
You will also need a hydraulic floor jack and at least two jack stands, though four provides better stability. Keep penetrating oil like PB Blaster handy for rusted bolts, along with safety glasses and gloves for protection.
Optional Tools That Save Time
A breaker bar helps break loose stubborn bolts on high-mileage trucks. A pry bar assists with alignment when the shock won’t slide out easily. A magnetic pickup tool catches hardware that inevitably drops near the axle, and a rubber mallet frees corroded components without damaging them.
User Hack: Spray the mounting bolts with PB Blaster the night before working on trucks with over 80,000 miles. This soaks into rust and makes removal dramatically easier.
Follow Critical Safety Protocols
Secure the Vehicle Properly
Park on a flat, solid surface like concrete and engage the parking brake. Chock the front wheels to prevent any rolling. For 2009-2014 models, lift the rear end using the frame rail or axle as the jacking point, then secure it on jack stands. For 2015-2020 models, you can work on the ground without lifting, though removing the wheels still requires jack stands.
Loosen Hardware Before Full Removal
Loosen the lug nuts slightly while the truck is still on the ground to prevent the wheel from spinning once it’s in the air. Never work under a vehicle supported only by a jack. The suspension components are under tension, so loosen bolts gradually to avoid sudden component drops that could cause injury.
Identify Where the Rear Shocks Mount
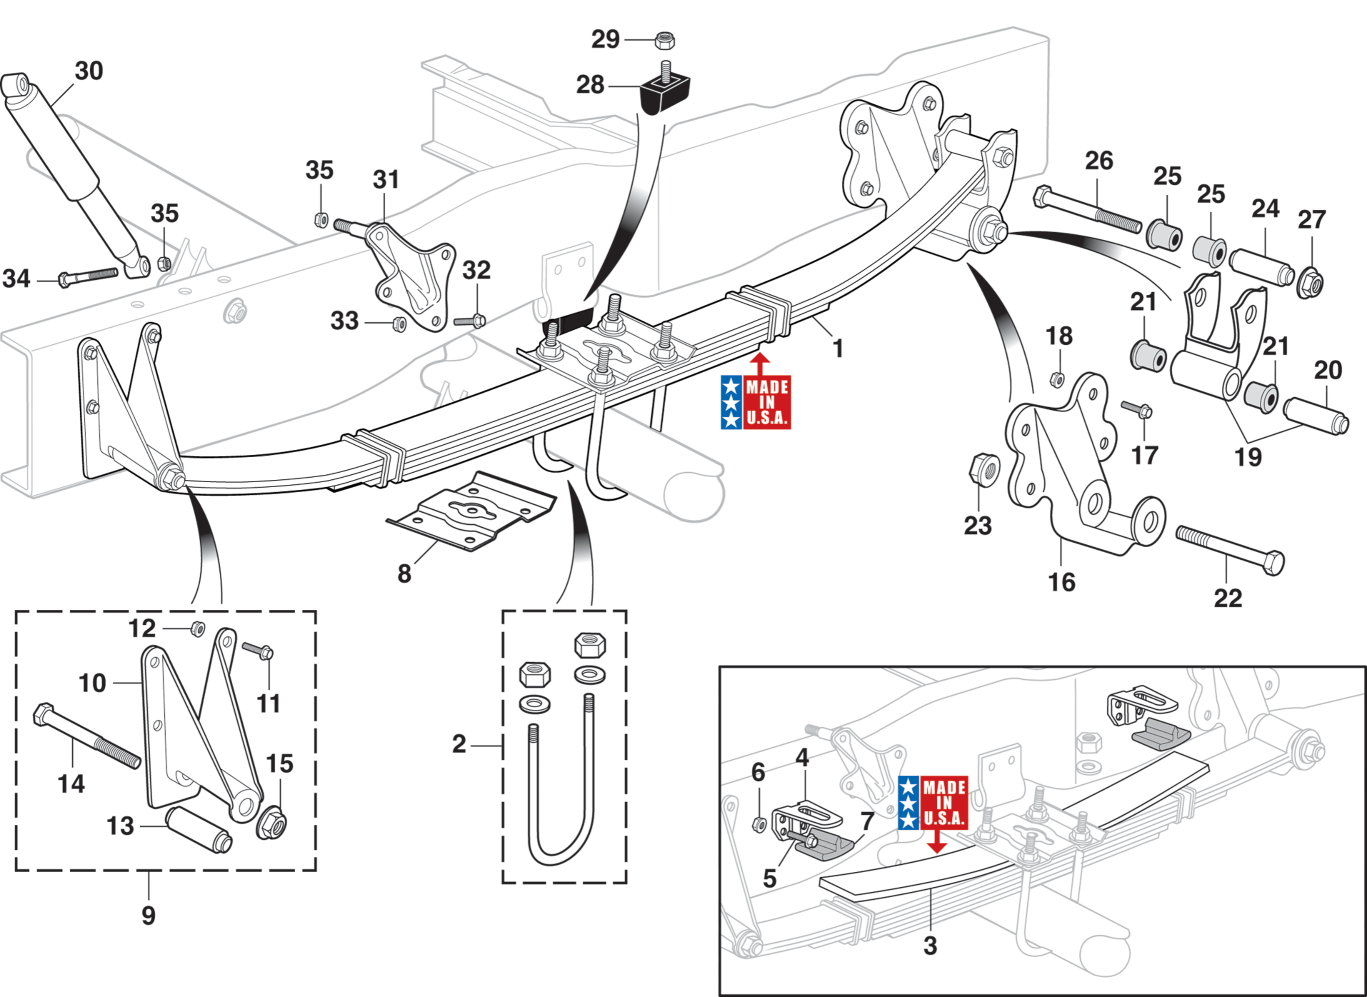
Each rear shock connects between two points. The upper mount attaches to the frame near the rear wheel well, while the lower mount secures to the rear axle housing directly above the wheel. The orientation differs between sides: the driver’s side shock faces toward the rear of the truck, and the passenger side faces forward. Compare the old shock to the new one before installing to confirm correct positioning.
Prepare Your F-150 for the Repair
For 2009-2014 Models
Loosen the rear lug nuts, then lift the truck at the frame or axle. Place jack stands under secure points and remove the rear wheels for better access. The suspension will be slightly compressed, which is normal and safe.
For 2015-2020 Models
You can skip the lift entirely since all bolts are accessible from underneath. The wheels can stay on, though removing them improves visibility and working space. Working on the ground avoids pre-loading the bushings and reduces complexity.
Best Practice: The 2015-2020 models are significantly easier since no jacking is required.
Remove the Old Rear Shocks Step by Step
Apply Penetrating Oil First
Spray PB Blaster on both the upper and lower mounting bolts. Let it soak for 5 to 10 minutes to penetrate rust and corrosion. On trucks with heavy mileage, applying it the night before makes a huge difference.
Take Out the Lower Bolt First
Hold the 18 mm nut with an open-end wrench while using a 15 mm socket to break loose the bolt. Don’t remove it completely yet. Once you break the free, unscrew it fully and set it aside. The shock may swing downward once this bolt is out, so support it to prevent damage or injury.
Remove the Upper Mount
For 2009-2014 models, use a 15 mm socket and 18 mm wrench to loosen the upper bolt and nut. Keep the bolt partially threaded until fully loose, then remove it carefully. For 2015-2020 models, the upper mount uses a winged finger nut that turns counterclockwise by hand or with pliers. Watch the bolt during removal since it may rotate forward and create a pinch point.
Pull Out the Old Shock
Gently pull the shock out from the wheel well. Use a pry bar at the lower mount if it’s stuck. Let the shock extend naturally rather than forcing it. Before discarding the old unit, lay it next to the new one to confirm identical length, eyelet size, and bushing type.
Prime New Shocks Before Installing
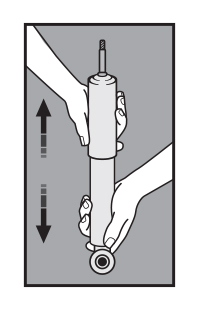
New shocks arrive compressed and need proper preparation to work correctly. Remove any plastic wrap or shipping straps, then hold the shock upright with the rod pointing up. Compress the shaft fully by hand, then let it extend on its own without assisting. Repeat this cycle 3 to 5 times, finishing with the shock fully extended.
This process mixes the internal hydraulic fluid and prevents the clunking, bouncing, or poor performance that can occur if you install an unprimed shock. Never invert or tilt the shock during priming, as this damages the internal seals.
User Feedback: “I primed mine five times and had zero bounce or noise after installation.”
Install the New Rear Shocks
Secure the Upper Mount First
Slide the upper eyelet into the frame bracket and insert the bolt from outside to inside. For 2015-2020 models, hand-tighten the winged nut. Don’t fully tighten yet; just get it snug. This method gives better control, especially when working alone.
Attach the Lower Mount Next
Insert the lower bolt through the axle bracket and shock eyelet, then install the 18 mm nut loosely. Allow the shock to pivot upward to align with the top mount. Use this approach when upper access is tight or alignment is tricky.
Complete Final Bolt Installation
Once both ends are in place, confirm washers and brackets are seated properly. Apply Loctite 242 to the lower bolt threads for added security, particularly with Bilstein or heavy-duty shocks. Tighten both mounts gradually to avoid misalignment.
Apply Correct Torque Specifications
Both the upper and lower mounting bolts require 66 ft-lbs (89.5 Nm) of torque. Use a half-inch drive torque wrench for accuracy. Tighten the lower nut first to 66 ft-lbs, then the upper nut or bolt to the same specification.
Over-tightening crushes the rubber bushings and causes premature failure. Under-tightening allows bolts to loosen during driving, which creates dangerous instability. The torque wrench is not optional for this step.
Warning: Never skip the torque wrench. Hand-tightening is unreliable and risks catastrophic failure.
Replace Both Shocks Together
Always replace both rear shocks at the same time, even if only one shows visible wear. Mismatched damping between sides leads to uneven handling, poor cornering stability, and accelerated tire wear. The cost of two shocks is far less than the problems caused by an unbalanced suspension.
The process on the opposite side is identical. No different tools or procedures are needed.
Perform Final Checks Before Driving
Reinstall Wheels and Lower the Truck
If you removed the rear wheels, mount them and hand-tighten the lug nuts. Remove the jack stands and carefully lower the vehicle using the hydraulic jack. Torque the lug nuts to 150 ft-lbs using a star pattern to ensure even clamping.
Road Test the Truck
Drive over smooth pavement, bumps and potholes, and test cornering and braking zones. Listen for knocking or clunking that indicates loose bolts or misalignment. Check for oil leaks at the seals and confirm the ride feels stable under load.
If problems occur, re-inspect the torque values, alignment, and bushing condition. Most issues trace back to insufficient torque or improper priming.
Select the Right Replacement Shocks
Top-Performing Options
| Brand | Model | Best For | Warranty |
|---|---|---|---|
| Bilstein | 5100 Series | Towing, off-road, durability | Lifetime |
| KYB | Excel-G 562544 | Smooth daily driving | 1-3 years |
| Monroe | MA822 | Budget-friendly | 3 years |
| Rancho | RS999496 | Off-road tuning | 3 years |
| Motorcraft | W7076 | OEM replacement | Varies |
For towing or off-road use, choose monotube shocks like the Bilstein 5100. They resist overheating and virtually eliminate wheel hop. Always verify fitment using your VIN, year, trim, and engine configuration before purchasing.
Fix Common Problems After Installation
Stuck Bolts
If a bolt won’t budge, soak it thoroughly with penetrating oil and use a breaker bar or impact driver. On high-mileage trucks, let the oil soak overnight for best results.
Shock Alignment Issues
If the shock won’t align, manually compress it further or use a pry bar gently to guide it into position. The shock must be fully compressed for the lower mount to line up.
Winged Nut Spinning
On 2015-2020 models, the bolt may rotate with the winged nut. Hold the bolt with pliers during tightening to prevent this.
Noise After Installation
Clunking or noise usually means loose bolts or misaligned bushings. Re-torque both mounts to 66 ft-lbs and inspect the washers.
Vehicle Sits Uneven
If the truck appears uneven after installation, compare the old and new shock lengths. Mismatched units must be corrected before driving.
Keep Your New Shocks Performing Longer
Inspect your shocks every 20,000 to 30,000 miles for oil leaks, cracked bushings, and loose hardware. Avoid overloading the truck beyond its rated capacity and drive smoothly over rough roads to extend shock life. With proper care, OEM shocks last 80,000 to 120,000 miles, while quality aftermarket units like Bilstein often exceed 100,000 miles.
Frequently Asked Questions About Changing Rear Shocks on F150
How long does it take to replace rear shocks on an F-150?
The entire job takes 2 to 3 hours for both sides if you have basic mechanical experience. Plan for slightly longer if you’re working on a high-mileage truck with rusted bolts.
Do I need to lift my F-150 to replace the rear shocks?
For 2009-2014 models, yes. You must lift the truck and remove the wheels for access. For 2015-2020 models, you can work on the ground without lifting, though wheel removal is still helpful.
Can I replace just one rear shock?
No. Always replace both shocks in pairs. Mixing worn and new shocks creates uneven damping, leading to poor handling, uneven tire wear, and unstable braking behavior.
What happens if I don’t torque the shocks correctly?
Under-torqued bolts loosen during driving, causing dangerous instability and potential collapse of the suspension. Over-torqued bolts crush the rubber bushings, reducing ride quality and causing premature failure. The correct specification is 66 ft-lbs for both upper and lower mounts.
Do I need to prime new shocks before installing them?
Yes. Priming the shock by compressing and extending it 3 to 5 times mixes the hydraulic fluid and prevents initial clunking, bouncing, or soft feel. Skipping this step commonly causes noise and poor performance in the first few hundred miles.
Key Takeaways for Successfully Changing Your F-150’s Rear Shocks
Replacing rear shocks on your F-150 is a rewarding DIY project that restores ride quality, improves safety, and saves money compared to shop labor. The process requires basic tools, careful attention to torque specifications, and proper priming of the new components. Always work in pairs by replacing both shocks simultaneously, and don’t skip the critical safety steps of using jack stands and torquing bolts to the correct 66 ft-lbs specification.
With quality replacement shocks like the Bilstein 5100 or KYB Excel-G installed, you’ll notice reduced bounce, better stability when towing, and improved cornering confidence. Your F-150 will feel like new again, and you’ll have the satisfaction of completing the work yourself.


