
Grinding noises or a soft pedal on your heavy-duty truck means you need to learn how to change brakes on F350 dually models immediately. The massive weight and dual rear wheels create unique challenges that standard pickup repairs do not address.
This guide walks you through every step from safe lifting to final bleeding procedures. You will gain specific torque specs, seal replacement techniques, and troubleshooting tips for 2017 to 2023 Ford F-350 Dually trucks.
Essential Safety Steps Before Repairing Your F350 Dually
Your truck weighs over 7,000 lbs so proper lifting equipment is mandatory for safety. Never rely on suspension components or the axle to support the vehicle weight during repair.
Lift and Secure the Vehicle Correctly
Use a floor jack rated for at least 6,000 lbs to raise the truck frame. Place high-strength jack stands under the frame rails on both sides of the axle. Put 2×12 wooden boards under the stands if working on asphalt or dirt to prevent sinking.
Remove Hubcaps and Wheels Safely
Start by taking off the hubcaps to access the lug nuts and brake assembly.
* Front Hubcaps: Remove two slotted nuts using a 1-1/8 inch socket.
* Rear Hubcaps: Use an 11/16-inch socket on the two nuts near the valve stem.
* Lug Nuts: Remove all eight 21 mm lug nuts per wheel using penetrating oil if seized.
* Wheel Removal: Pull the wheel straight off and clean any burrs from the hub bore.
Rear Brake Replacement Steps for Dual Rear Wheels
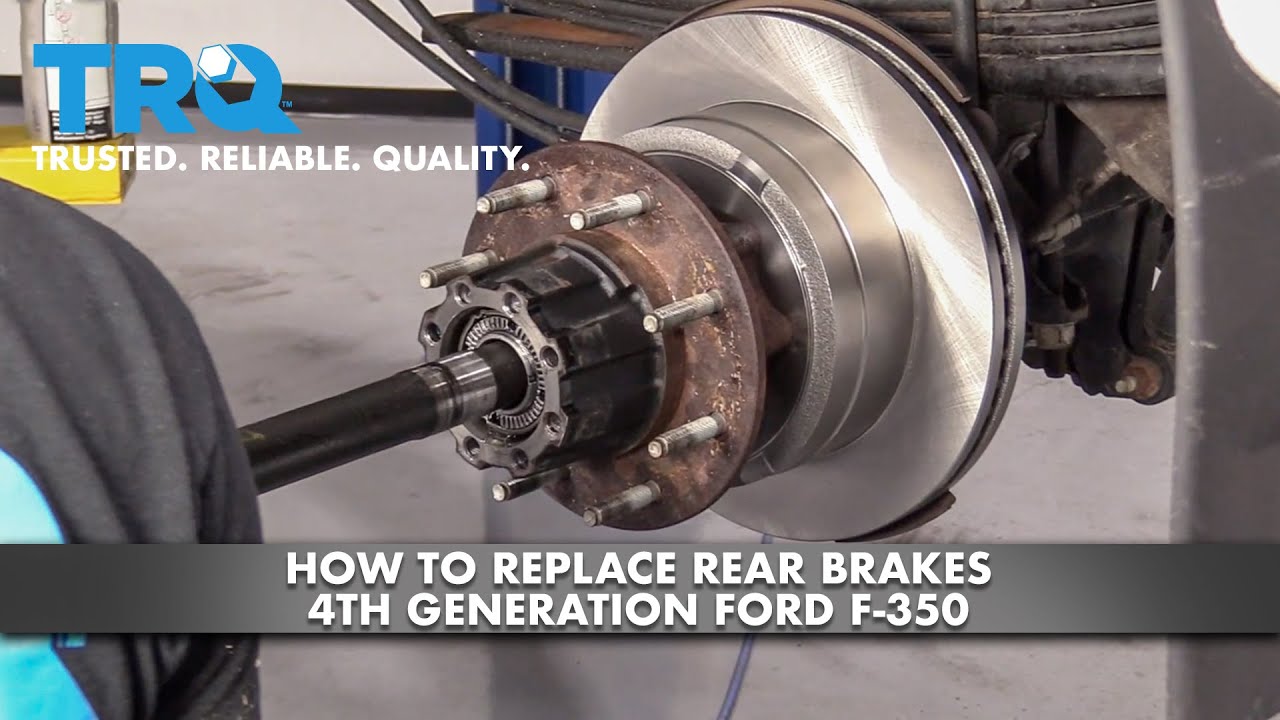
Replacing rear brakes requires removing the axle to access the rotor behind the hub. This process involves managing gear oil and adjusting the internal emergency brake shoes.
Remove Caliper and Bracket Bolts
Detach the caliper assembly to expose the rotor mounting hardware.
* Loosen the two 16 mm bolts holding the caliper to the bracket.
* Hang the caliper from the suspension with wire or a bungee cord.
* Remove the 24 mm bolt securing the caliper bracket to the rotor assembly.
* Inspect the brake line for cracks before proceeding further.
Disconnect Axle to Access Rotor
Many Dually models hide the rotor behind the axle shaft requiring removal.
* Remove the two 18 mm bolts securing the axle to the hub.
* Tap the axle ridge gently with a hammer to loosen the connection.
* Pull the axle out with a pry bar while catching draining gear oil in a pan.
* Replace the axle seal immediately as it always breaks during removal.
Retract Emergency Brake Shoes
You must shrink the emergency brake shoes to remove the rotor.
* Remove the rubber boot on the backing plate to expose the adjuster.
* Turn the star adjuster counterclockwise until the rotor spins freely.
* Use a four-piton socket to loosen the large locking nut slightly.
* Keep the locking nut threaded on loosely to prevent the rotor from falling.
Extract Rotor and Catch Bearings
The rotor often sticks due to rust and requires force to remove.
* Tap the rotor edge with a hammer to break the rust seal.
* Use an inverted 18 mm torque socket if the rotor remains stuck.
* Catch the outer bearing as it may drop out when the rotor frees up.
* Tip the hub carefully to drain remaining gear oil into your container.
Replace Hub Seal and Inspect Wheel Bearings
A failed hub seal causes gear oil leaks that destroy bearings quickly. Always replace this seal whenever the hub is opened.
Remove Old Seal Safely
Soak the old seal with penetrating oil to soften the rubber. Secure the hub in a vise and use a long pry bar to gently lever the seal out. Wear safety glasses because metal shavings can fly during this process.
Inspect Bearings for Damage
Check both inner and outer bearings closely for signs of failure. Look for pitting, scoring, or loose metal particles in the grease. Replace the entire bearing assembly if you see any wear marks.
Install New Hub Seal Properly
The new seal features a two-piece design with a spring-loaded lip. Coat the spring and sealing edge with Vaseline to prevent tearing during installation. Position the seal in the hub and use a wood block and punch to drive it in evenly until flush.
Reassemble Rear Rotor and Hub Assembly

Proper torque and lubrication ensure your brakes last and perform safely under heavy loads.
Clean and Prepare Mounting Surfaces
Clean the hub and rotor mounting surfaces with brake cleaner thoroughly. Remove all old thread locker from the four 18 mm rotor-to-hub bolts before reinstallation.
Install Rotor with Thread Locker
Apply fresh thread locker to the bolts to prevent vibration loosening. Install the rotor and tighten the bolts in a crisscross pattern for even seating. Torque to 215 ft-lbs exactly as this step is critical for safety.
Lubricate Hub and Emergency Brake
Clean all contact points with parts cleaner to remove debris. Apply gear oil to the hub cavity and emergency brake pivot points generously. Fill the hub completely to ensure bearings stay lubricated.
Torque Locking Nut and Adjust Emergency Brake
Incorrect torque on the locking nut leads to bearing failure or dangerous brake drag. Follow the sequence precisely for proper preload.
Execute Three-Stage Locking Nut Torque
Use the four-piton socket and follow this specific sequence.
1. Torque the nut to 70 ft-lbs initially.
2. Loosen the nut exactly 90 degrees to reset bearings.
3. Retorque the nut to 180 ft-lbs for final setting.
Adjust Emergency Brake Drag
Rotate the hub using a pry bar on the caliper bracket stud. The rotor should spin with minimal drag that you can feel but not hear. Too tight causes heat buildup while too loose risks brake failure.
Reinstall Axle and New Seal
Reconnecting the axle requires a fresh seal and precise bolt torque.
Prepare and Install New Axle Seal
Clean the differential tube surface and smooth any burrs with sandpaper. Apply a thin layer of Vaseline to the gasket surface of the new seal. Align the axle with the hub and tap it in gently.
Torque Axle Bolts
Install the two 18 mm bolts and apply thread locker. Torque these bolts to 188 ft-lbs in a crisscross pattern to ensure even clamping force.
Rebuild Rear Caliper and Install New Pads
Fresh pads and lubricated sliders prevent noise and uneven wear patterns.
Clean Caliper Components Thoroughly
Remove slider pins and rubber boots from the bracket. Clean the bore with a wire brush and remove rust from all slide surfaces. Replace boots if they show any cracking or tearing.
Lubricate and Reassemble Slider Pins
Apply synthetic moly grease to slider pins and boot lips. Apply caliper grease to pad contact points and piston surfaces only. Avoid getting grease on the rotor face.
Compress Pistons and Install Pads
Use a ratcheting caliper piston tool because standard C-clamps will not fit dual pistons. Compress both pistons fully before installing new pads. Insert pads with the long side down and hook facing away from the rotor.
Reattach Caliper and Bracket
Reinstall the bracket and torque bolts to 203 ft-lbs. Hang the caliper back on the bracket and tighten 16 mm bolts to 255 ft-lbs.
Front Brake Replacement Procedure for F350
Front brakes are more accessible but still require specific tools and torque values.
Remove Front Caliper and Bracket
Turn the wheel to access the two 18 mm caliper bolts. Remove bolts and hang the caliper securely from the suspension. Disconnect the ABS wire from the brake hose carefully.
Retract Pistons and Remove Bracket
Use a caliper piston tool to compress both pistons evenly. Pull out old pads and remove the two 21 mm bracket bolts slowly. Back them out gradually to avoid stripping threads.
Remove Hub Extension
Use a 21 mm socket and extension to remove the hub extension nuts. Apply penetrating oil if they are stuck. Tap from behind with a hammer to break the extension loose.
Install New Front Rotor and Hub Extension
Proper rotor seating prevents vibration and ensures even pad wear.
Clean Knuckle Surface Flat
Use a file or sandpaper to flatten the hub surface completely. Remove all rust and debris where the rotor contacts the knuckle to prevent warping.
Compare and Clean New Rotor
Confirm identical hat depth, diameter, and 8 lug holes between old and new rotors. Clean the new rotor with brake cleaner to remove factory oil coating.
Apply Copper Grease and Mount Rotor
Apply a thin layer of copper grease to the hub area only. Install the rotor backwards briefly to clean the surface then flip to correct orientation. Reattach hub extension nuts and torque to 165 ft-lbs.
Rebuild Front Caliper Bracket and Sliders
Clean sliders ensure even pad wear and prevent sticking calipers.
Clean Slider Bores and Pads
Remove old rubber boots and clean slider bores with a wire wheel. Pay special attention to the boot lip where debris traps moisture.
Reinstall Boots and Slider Bolts
Wipe new boots with parts cleaner before installation. Reinstall slider bolts and torque to 203 ft-lbs. You may apply thread locker optionally for extra security.
Install Front Pads and Caliper
Final assembly includes proper greasing and ABS wire reconnection.
Insert Brake Pads Correctly
Place inner and outer pads in correct positions as marked on the backing plate. Apply brake grease to piston surfaces and caliper fork contact points.
Reinstall Caliper and ABS Wire
Lower caliper over the rotor and pads carefully. Reconnect the ABS wire ensuring it is not pinched. Install 18 mm bolts and torque to 255 ft-lbs.
Alternative Method for Full Caliper Swap
Use this method for catastrophic failures like disintegrated pads on 2019+ 4×4 models.
Assess Damage and Clean Surfaces
Replace caliper, rotor, pads, and hardware if metal-on-metal contact occurred. Use red Scotch-Brite pads on hub and extender surfaces. Wipe with brake cleaner and dry completely.
Install Rotor with Correct Torque
Secure rotor with two 21 mm hub nuts and torque to 129 ft-lbs. Tap lightly with a 3-pound sledge to seat the rotor properly. Torque in a star pattern while holding the rotor with a pry bar.
Install Replacement Caliper
Note that some aftermarket calipers use 17 mm bolts instead of 16 mm. Wire-wheel threads and apply red Loctite before installing. Torque to 50–60 ft-lbs or follow specific manufacturer specs.
Disconnect and Reconnect Brake Line
Proper fluid handling prevents air introduction into the braking system.
Remove Banjo Bolt and Washers
Disconnect the brake line at the caliper carefully. Remove the banjo bolt and copper crush washers. Discard old washers as they cannot be reused safely.
Reassemble with New Hardware
Clean both surfaces thoroughly before reassembly. Install new copper crush washers on both sides of the banjo bolt. Reconnect the banjo bolt and tighten slightly if leaks appear later.
Bleed Brakes for Firm Pedal Feel
Air in the lines causes a soft or spongy brake pedal that feels dangerous.
Top Off Brake Fluid Reservoir
Use DOT 4 brake fluid or the type specified in your manual. Fill the reservoir before starting and cap it immediately to prevent air entry.
Perform Two-Step Bleeding Process
- Gravity Bleed: Start at Passenger Rear and crack the bleeder valve. Let fluid run until clear then move to Driver Rear, Passenger Front, and Driver Front.
- Pump-and-Bleed: One person pumps pedal 10 times and holds it down. A second person opens the bleeder then closes it before the pedal rises. Repeat until no bubbles appear.
Check and Fill Differential Fluid

Ensure proper lubrication after axle removal to prevent bearing damage.
Check Fluid Level
Remove the fill plug with a 3/8-inch ratchet. Add manufacturer-specified gear oil until the level reaches the plug hole exactly.
Distribute Fluid Evenly
Lift the rear axle 5–6 inches with a jack stand. Let it sit for 5 minutes to lubricate bearings. Switch the jack stand to the opposite side and repeat the process. Lower the truck and recheck the fluid level.
Final Assembly and Test Brakes
Verify everything works correctly before driving the truck on public roads.
Reinstall Wheels and Hubcaps
Clean hub and rotor mating surfaces before mounting wheels. Align dual wheel valve stems and torque 21 mm lug nuts to 165 ft-lbs in a crisscross pattern. Reinstall front and rear hubcaps aligning slots with valve stems.
Test Brakes Before Driving
Start the engine and pump brakes 3–5 times to build pressure. The pedal should feel firm immediately. Test the emergency brake to ensure it engages halfway. Check for leaks at banjo bolts and caliper seals. Verify fluid level is between MIN and MAX marks.
Frequently Asked Questions About F350 Dually Brakes
What torque specs are needed for F350 Dually rear caliper bolts?
Rear caliper bolts require 255 ft-lbs of torque using a 16 mm socket. Always use new thread locker on these bolts to prevent vibration loosening under heavy loads.
Do I need special tools to change F350 Dually brakes?
Yes, you need a four-piton socket for the locking nut and a ratcheting caliper piston tool for dual pistons. Standard C-clamps will not work on these heavy-duty calipers.
How often should I replace rear axle seals on my Dually?
Replace rear axle seals every time you remove the axle shaft for brake service. These seals break during removal and reusing them causes gear oil leaks.
Why is my F350 brake pedal soft after changing brakes?
A soft pedal usually means air remains in the lines requiring a two-step bleeding process. Start with gravity bleeding then follow with pump-and-bleed until no bubbles appear.
Can I use regular brake pads on my F350 Dually?
No, you must use heavy-duty pads designed for dual rear wheel applications. Regular pads cannot handle the weight and heat generated by the Dually configuration.
Key Takeaways for Changing Brakes on F350 Dually

Changing brakes on an F350 Dually requires specific tools like a four-piton socket and strict adherence to torque specifications. Always replace axle and hub seals during rear brake service to prevent costly gear oil leaks.
Proper lubrication of slider pins and emergency brake components ensures long-lasting performance. Follow the bleeding procedure carefully to eliminate air and restore firm pedal feel.
Gather all required tools and fluids before starting this job. Take your time with each step and double-check all torque values before driving your truck again.


