

If your Ford F-150 struggles to start, sputters under load, or won’t crank at all, a failing fuel pump could be the culprit. The how to change a fuel pump on a Ford F-150 process is critical for restoring performance and preventing roadside breakdowns. Whether you drive a 1995 model or a 2020 F-150, replacing the fuel pump involves depressurizing the system, safely dropping the fuel tank, removing the old in-tank assembly, and installing a new pump with fresh seals. This guide delivers a complete, step-by-step walkthrough covering safety, tools, model-specific variations, and pro tips so you can complete the job confidently and correctly.
Safety First: Fuel System Precautions for Your F-150
Before touching any fuel line, depressurize the system to prevent dangerous fuel spray. The method varies by model year, but the goal remains the same.
Depressurize the Fuel System
For 1995-2008 models, locate the inertia switch on the passenger kick panel and press it down to cut power to the pump. Start the engine and let it stall, then turn the key off and disconnect the negative battery terminal using an 11mm wrench. For 2009-2014 models, disconnect the battery and remove the fuel pump relay from the fuse box, then crank the engine until it dies. For 2015-2020 models, open the fuel door, locate the fuel pump control module connector under the vehicle, and disconnect it before attempting to start the engine to drain residual pressure.
Ventilation and Fire Safety
Work in a well-ventilated outdoor area and never in a garage with pilot lights or heaters. Keep sparks, flames, and cigarettes far away from the work area. Wear safety glasses and nitrile gloves at all times, and have a Class B fire extinguisher within reach. Avoid using power tools that generate sparks near the fuel tank.
Fuel Level and Tank Handling
Never work on a full tank. Run the fuel level below 1/4 tank or siphon fuel safely using a hand pump into a UL-approved container. Support the tank with a transmission jack or floor jack with a wood block, and never let the tank hang by its hoses or wires. A dropped tank can crack, leak fuel, and create a fire hazard.
Tools and Parts Needed for F-150 Fuel Pump Replacement
Having the right tools ensures efficiency and prevents mid-job delays that could lead to mistakes or safety issues.
Essential Tools
Gather these tools before starting the job. A transmission jack or heavy-duty floor jack with fuel tank adapter safely supports and lowers the fuel tank. A complete socket set including 8mm, 10mm, 11mm, 13mm, 15mm, and 17mm sizes handles various fasteners. You will also need 6-inch and 12-inch extensions for tight spaces, a torque wrench required for 2015-2020 models, flathead screwdriver or angled pick, needle-nose pliers, brass punch and hammer for lock ring removal without creating sparks, penetrating oil like PB Blaster or WD-40, fuel line disconnect tools in 3/8″ and 5/16″ sizes, EVAP hose removal tool or small pick, wire brush, compressed air, and spill pads or absorbent cloths.
Replacement Parts
Always replace the O-ring or gasket when installing a new pump. Reusing old seals causes leaks and returns you to square one. Stock a new fuel pump assembly from trusted brands like TRQ, Bosch, or OEM-equivalent. Have new fuel hose clamps on hand, a vent tube repair kit or zip ties for common 2004-2008 fixes, anti-seize compound for bolts, and a fuel-safe container for any siphoned gas.
Model-Specific Fuel Pump Access Methods

The Ford F-150 underwent significant changes from 1995 to 2020, affecting how you access and replace the fuel pump.
1995-2004 F-150: Steel vs Plastic Tank
Steel tanks use a lock ring secured with a brass punch and hammer to tap it loose counter-clockwise. Plastic tanks use 6-8 bolts, typically 8mm, instead of a lock ring, making removal easier. Both require dropping the tank. No bed access point exists on most models from this era.
2004-2008 F-150: Dual-Tank Systems and Vent Tubes
Some models have dual fuel tanks, so confirm whether you are replacing the front 17-gallon or rear 19-gallon pump. Cracked vent tubes are common on these models and often require a zip tie repair or tube replacement. Like earlier models, these still require tank dropping with no top-side access.
2009-2014 F-150: Color-Coded Fuel Lines
These models use quick-connect fuel lines with color-coded clips. The white clip indicates the low-pressure fuel line while the red clip marks the high-pressure line. Use a pick or pliers to release each clip before disconnecting. There is no inertia switch on these models, so rely on battery disconnect and relay removal for safety.
2015-2020 F-150: Aluminum Body and Control Module
The fuel pump includes an integrated control module on these models. Fuel lines are smaller with dual-locking tabs that require squeezing both sides to release. Torque tank straps to 30 lb-ft as specified. You will need ignition cycling to prime the system after installation. Dropping the tank remains the standard method for all model years.
Step-by-Step: Remove the Fuel Tank
Lift and Support the Vehicle
Use a floor jack and jack stands or a lift to raise the vehicle. Position a transmission jack under the tank center and use ratchet straps to secure the tank to the jack for safe lowering.
Remove Heat Shield on 1995-2004 Models
Remove the 10mm bolts holding the metal heat shield before loosening tank straps to avoid binding and complicate removal.
Disconnect All Components
Disconnect the EVAP line by pushing the retaining clip backward and separating the rubber hose. For fuel lines, use a fuel line disconnect tool on 1995-2008 models. On 2009-2014 models, squeeze tabs on white clips, push up, twist, and pull out, while prying red clip ends apart with a pick, sliding up, and pulling out. On 2015-2020 models, squeeze both tabs on smaller lines, pull the blue tab down, press the top tab, and pull away. Use pliers to compress top and bottom tabs on larger lines. Press release tabs to disconnect electrical connectors. For the filler neck hose, loosen the 7mm clamp in the rear wheel well or use a pry bar for permanent clamps. Keep the hose attached to the tank during lowering for stability.
Remove Tank Straps
Remove the 13mm front and rear strap bolts, applying penetrating oil if rusted. Lower the tank slowly, guiding it away from the axle. If blocked by the fill tube, loosen the band clamp slightly to free it. Lower one side first if clearance is tight.
Remove the Old Fuel Pump from Your F-150

Clean the Pump Area
Wipe the top of the tank with a paper towel and blow out debris with compressed air. Soak the lock ring or bolts with penetrating oil to loosen them for removal.
Remove Lock Ring or Bolts
Steel tanks from 1995-2004 require a brass punch and hammer to tap the lock ring counter-clockwise. Plastic tanks require removing 6-8 bolts with a socket and extension. Mark the pump orientation with a marker before removal to ensure the float arm aligns correctly during reassembly.
Pull Out the Pump Assembly
Lift the pump straight out of the tank. On 2004-2008 models, align the arrow on the pump with the arrow on the tank. On 2015-2020 models, disconnect two fuel lines and electrical connectors from the top before lifting. Drain residual fuel into a container and discard the old O-ring. Never reuse it.
Install the New Fuel Pump on Your Ford F-150
Prepare the New Pump
Install the new O-ring into the groove on the housing and lubricate it lightly with WD-40 for smoother installation. If the vent tube is cracked, feed a zip tie through the hole and bend it upward as a common DIY fix for 2004-2008 models.
Insert the Pump
Align the locating tab or arrow with the mark you made on the tank. Insert at an angle, starting with the float side, then rotate into position until it sits flat.
Secure the Pump
Steel tanks require placing the lock ring over the pump and tapping it clockwise with a brass punch until it seats fully. Listen for a solid, even sound indicating complete engagement. Plastic tanks require reinstalling bolts and tightening in a criss-cross pattern to 80-100 in-lbs if specified.
Reconnect Top Components on 2015-2020 Models
Reconnect the lower fuel line first by pressing until it clicks, then tug to confirm. Attach the larger fuel line until it clicks into place. Connect the smaller line ensuring both clips engage from opposite sides. Reconnect electrical connectors by pressing the red locking tab on the large harness and inserting until it clicks, or squeeze the locking tab on the small harness and push in. A loose connection causes vapor leaks, poor performance, or no-start conditions.
Reinstall the Fuel Tank and Reconnect Components
Position the Tank
Raise the tank slowly using the jack and guide the filler neck hose over the frame without pinching it.
Reconnect All Lines
Slide the filler neck hose back onto the tank neck and work it back and forth to seat fully. Position the clamp halfway down the hose and tighten until snug but not over-tightened. Reconnect EVAP lines, fuel lines, and electrical connectors. Reinstall the heat shield on 1995-2004 models with 10mm bolts and the tank shield on 2015-2020 models with push clips.
Secure Tank Straps
Install the rear strap first with the shorter bolt in back, then install the front strap. Torque to 30 lb-ft on 2015-2020 models. Apply anti-seize compound to strap bolts to prevent future rust and make removal easier next time.
Prime and Test the Fuel System
Prime the Fuel System
Reconnect the negative battery terminal. Turn the ignition to “On” without starting for 2-5 seconds, then turn off. Repeat 4-5 times to build pressure in the fuel system.
Start the Engine
Attempt to start the engine. Expect a longer crank time as air clears from the lines. The engine may stumble briefly but should run smoothly once pressurized.
Check for Leaks
Immediately inspect all fuel lines, filler neck, electrical connectors, and pump housing for leaks. Shut off the engine immediately if you see any fuel or vapor leaks.
Road Test
Take a short drive to verify smooth acceleration, no hesitation under load, accurate fuel gauge reading, and no warning lights appearing on the dashboard.
Alternative Access Methods: What to Know
When to Consider Bed Access
Extended or regular cab models may have the pump accessible under the rear cab, making this a viable alternative. Crew cabs are not recommended for this method since rear seats block access.
Cutting an Access Hole
This method involves draining the tank completely, purging fumes with an exhaust hose, drilling pilot holes with a step drill bit, cutting the perimeter with an angle grinder, breaking spot welds with a cold chisel, shielding fuel lines with aluminum foil, removing and replacing the pump, then sealing the hole with a removable metal plate and fuel-resistant gasket.
Pros and Cons
This approach avoids tank dropping and provides faster future access while avoiding rusted bolts. However, it creates fire risk from sparks, can allow water intrusion and rust, reduces resale value, and weakens the truck structure. Dropping the tank remains safer, cleaner, and more reliable for nearly all F-150 owners.
Extend Your Fuel Pump’s Lifespan
Maintenance Tips
Keep fuel above 1/4 tank since the fuel cools and lubricates the pump. Avoid running dry as this overheats and wears the pump. Use high-quality gasoline with fewer contaminants. Replace the in-tank strainer when installing a new pump. Use fuel system cleaner every 15,000 miles. Apply anti-seize to all bolts during reassembly. A weak battery can prevent proper priming, so jump-start if needed.
Key Takeaways for Changing Your Ford F-150 Fuel Pump
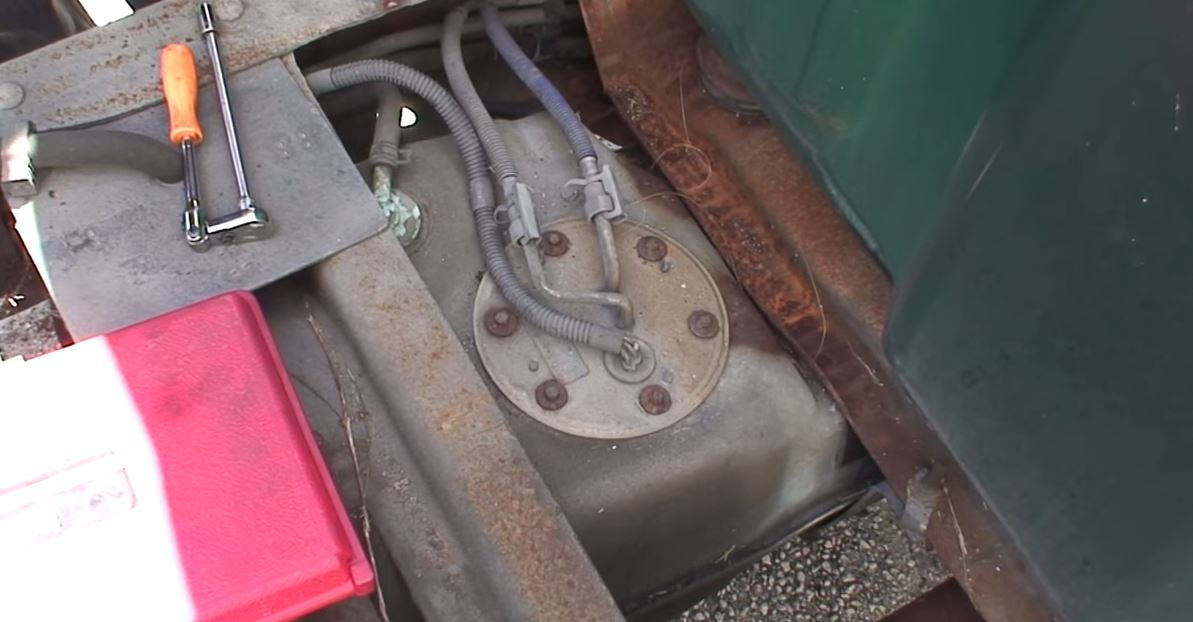
Replacing a fuel pump on a Ford F-150 is a manageable DIY job with the right tools and safety steps. Expect to spend 3-6 hours depending on rust and your experience level. You will save $200-400 in labor costs while gaining peace of mind knowing the repair was done correctly. The most critical steps are depressurizing the system first, supporting the tank properly, and double-checking all connections before testing. With this guide, you are equipped to tackle the how to change a fuel pump on a Ford F-150 project like a professional.
Frequently Asked Questions About Ford F-150 Fuel Pump Replacement
How do I know if my Ford F-150 fuel pump is failing?
Watch for hard starting especially when the engine is hot, engine hesitation or sputtering under load, loss of power during acceleration, longer crank time when starting, complete failure to start, whining or buzzing noise from the tank area when turning the key to run, and fuel gauge inaccuracy. A fuel pressure test showing 35-45 psi confirms normal operation.
Can I replace the fuel pump on my F-150 without dropping the tank?
While possible on extended and regular cab models by cutting an access hole in the bed, this method carries fire risk from sparks, potential water intrusion, and structural concerns. Dropping the tank remains the standard and safest method across all model years.
What tools are required to replace an F-150 fuel pump?
You need a transmission jack or floor jack with adapter, socket set with multiple sizes, torque wrench, brass punch and hammer, fuel line disconnect tools, penetrating oil, and various pliers and screwdrivers. A complete list appears earlier in this guide.
How long does it take to replace a Ford F-150 fuel pump?
The job typically takes 3-6 hours depending on your experience level, whether rust is present on bolts, and which model year you are working on. Plan accordingly and work at a steady pace rather than rushing.
Should I replace the fuel filter when changing the fuel pump?
While not mandatory, replacing the in-tank strainer filter is highly recommended since it is often clogged and contributes to pump failure. The strainer is usually included with new pump assemblies.


