When your Ford F350 wipers not working, you face more than a minor annoyance. This failure creates a serious safety risk by eliminating visibility during rain or snow.
This guide helps you diagnose the exact cause using proven methods for 1992 to 2016+ models. You will learn to test fuses, replace faulty switches in minutes, and fix module failures without expensive dealership visits.
Identify Your Specific Failure Symptoms
Diagnosing the root cause starts with observing exactly how the system fails. Your specific symptoms point directly to the faulty component, saving you time and money on unnecessary parts.
Does the System Activate Randomly?
If your wipers turn on by themselves while the switch is off, the wiper delay switch module is likely failing. This issue is common in 2011 to 2016 Super Duty trucks and indicates internal circuit board degradation.
- Wipers engage without input
- Delay settings act erratically
- Turn signals or high beams glitch
- Washer fluid sprays unpredictably
Cleaning external contacts will not fix this problem. The damage exists inside the sealed Printed Circuit Board (PCB) due to moisture or wear.
Is There Total System Failure?
A complete lack of function across multiple systems suggests a JAM or GEM module failure. This central electronic brain controls wipers, washers, and defrost functions simultaneously.
- No wiper movement at any speed
- Washer pump fails to spray
- Rear defrost remains inactive
- Door open buzzer makes no sound
Check for these combined symptoms before replacing individual parts. If all these systems are dead, the module itself is the primary suspect.
Do Older Models Have Power But No Movement?
Owners of 1992 to 1996 OBS models often face ground or relay issues rather than complex module failures. The motor may receive power but cannot complete the circuit to move the arms.
- Motor hums but arms stay still
- Intermittent mode does not work
- Direct power test spins the motor
- Issues worsen in wet conditions
Focus your troubleshooting on ground wires and relays for these classic trucks. These simple fixes often resolve the issue faster than expected.
Replace Faulty Wiper Switch on Modern Trucks
Replacing the wiper switch is the most common fix for modern Ford F350 wipers not working issues. You can complete this repair in about 10 minutes with basic hand tools.
Gather Your Required Tools
You need only a few specific items to remove the steering column shrouds and access the switch. Having these ready ensures a smooth repair process.
- 6mm or 7/32″ socket
- Torx T5 or T6 bit
- Flathead screwdriver
- Replacement switch module
Search for “2012 Ford F350 wiper switch replacement” to find compatible parts. These units typically cost around $36 and fit various F-Series trucks.
Remove the Lower Steering Shroud
Start by turning off the ignition and removing the key completely. Locate the three black screws under the lower shroud panel and remove them using your socket.
- Turn off ignition and remove key
- Find three screws under lower shroud
- Remove screws with 6mm socket
- Set screws aside safely
This step exposes the lower section of the steering column assembly. You now have better access to the center panel.
Extract Center and Upper Panels
Pull the center panel toward you gently to release the snap tabs holding it in place. Lower the steering column slightly to create more working space for your hands.
- Pull center panel to release tabs
- Lower steering column for clearance
- Split upper panel carefully
- Remove two small Torx screws
These screws secure the switch housing within the column assembly. Keep track of them as they are quite small and easy to lose.
Swap the Switch Module
Press the retaining tabs on the left and right sides of the switch to unlock it. Pull the unit straight out to disconnect the ribbon cable without damaging surrounding wires.
- Depress left and right retaining tabs
- Pull switch module straight out
- Disconnect ribbon cable gently
- Plug in new switch and align flanges
Push the new unit until you hear a distinct click. This sound confirms the module is fully engaged and locked in place.
Test Functions Before Reassembly
Turn the key to the ON position to test all functions before putting everything back together. Verify that turn signals, high beams, and all wiper speeds work correctly.
- Test left and right turn signals
- Activate high beam flasher
- Run wipers at all speeds
- Spray washer fluid
Reinstall the panels and screws only after confirming full functionality. This saves you from taking everything apart again if an issue persists.
Diagnose JAM GEM Module Failure
When wipers, washers, and defrost all fail together, the JAM or GEM module requires immediate attention. This component acts as the central hub for multiple body control systems.
Confirm Multiple System Failures
Look for a specific pattern of failures that indicates module death rather than a simple fuse blow. Multiple unrelated systems failing at once is the hallmark sign.
- Wipers do not move
- Washer pump is silent
- Defrost does not heat
- Door buzzer is mute
If you see this combination, proceed to electrical testing. Do not replace random parts without verifying power and ground first.
Test Ground Connection at Pin 26
Use a test light or multimeter to check the ground integrity at the module connector. Pin 26 carries the pink wire with an orange tracer and must show a solid ground.
- Locate JAM module behind fuse box
- Back-probe Pin 26 with test light
- Connect light to battery positive
- Check for illumination with key off
The light should beep or glow steadily. If the ground is unstable, the module cannot function regardless of other conditions.
Verify Power Input at Pin 18
Check for 12 volts at Pin 18, which carries the red wire with a yellow tracer. Switch your test light to ground mode and probe this pin with the key in the ON position.
- Set test light to ground mode
- Back-probe Pin 18 carefully
- Turn ignition key to ON
- Confirm light illuminates
A bright light confirms power is reaching the module. If power and ground are good but systems remain dead, the module is likely faulty.
Inspect Central Junction Box Fuses
Flip up the central junction box to access the fuses powering the JAM module. Check both Fuse 8 (5A) and Fuse 20 (15A) for continuity and voltage.
- Locate Fuse 8 for primary power
- Check Fuse 20 for secondary line
- Verify Fuse 13 for general health
- Replace any blown fuses found
If fuses are intact and power reaches the module, the internal circuit board is likely burnt. Visual inspection will confirm this diagnosis.
Look for Burn Marks on PCB
Remove the module by disconnecting its two large connectors and one small connector. Loosen the mounting bolt and flip the unit over to inspect the circuit board bottom.
- Disconnect all three connectors
- Loosen mounting bolt
- Remove module from bracket
- Inspect PCB for burn marks
Burnt areas on the board are visual proof of failure. Save the core unit as many vendors require it for remanufactured exchanges.
Install New GEM Module
Clean the mounting surface before installing the new module to ensure a good connection. Reconnect all three connectors securely and reattach the fuse box assembly.
- Clean mounting surface area
- Install new module and bolt
- Reconnect all wiring harnesses
- Secure fuse box in place
Test the system by touching the pink and yellow tracer wire with a jumper. The wipers should activate immediately if the new module is working.
Fix Ground and Relay Issues on OBS Models
Classic 1992 to 1996 Ford F350 trucks often suffer from simpler electrical gremlins. Bad grounds and failed relays are the primary culprits for wiper failure in these years.
Test Motor With Direct Power
Rule out motor failure by applying power directly from the battery. This simple test tells you if the problem lies upstream in the wiring or downstream in the motor.
- Disconnect wiper motor harness
- Connect jumper to battery positive
- Connect jumper to chassis ground
- Observe motor movement
If the motor spins, it is functional. Your problem lies in the switch, relay, or ground wiring.
Inspect Ground Wire at Motor
Loose or corroded ground wires are the number one cause of failure in OBS trucks. Find the ground wire attached to the wiper motor housing and clean the contact points.
- Locate ground wire on motor
- Disconnect and clean terminals
- Remove corrosion from metal
- Reconnect and tighten firmly
Tightening a single loose ground screw has restored full function in many cases. Never overlook this simple fix.
Swap the Wiper Relay
Relays can fail silently without visible damage. Swap the wiper relay with an identical one from another circuit, such as the horn, to test functionality.
- Open fuse box cover
- Locate labeled wiper relay
- Swap with horn relay
- Test wiper operation
If the wipers work with the swapped relay, replace the original unit. These components are inexpensive and easy to replace.
Check Switch and Wiring Harness
Inspect the steering column switch for physical wear or stiffness in operation. Use a multimeter to check for continuity across the switch terminals while operating the stalk.
- Check switch for physical wear
- Test continuity with multimeter
- Trace harness for breaks
- Look for rodent damage
Chafed wires near the firewall are common in older trucks. Repair any broken wires with solder and heat shrink tubing.
Examine Mechanical Linkage
Sometimes the electrical system works perfectly, but mechanical binding prevents movement. Remove the cowl cover and manually move the wiper arms to feel for resistance.
- Remove cowl cover panels
- Move wiper arms by hand
- Feel for binding or misalignment
- Lubricate pivot points
Apply white lithium grease to all joints. Replace any bent or seized linkage rods to restore smooth operation.
Compare Common Failures at a Glance
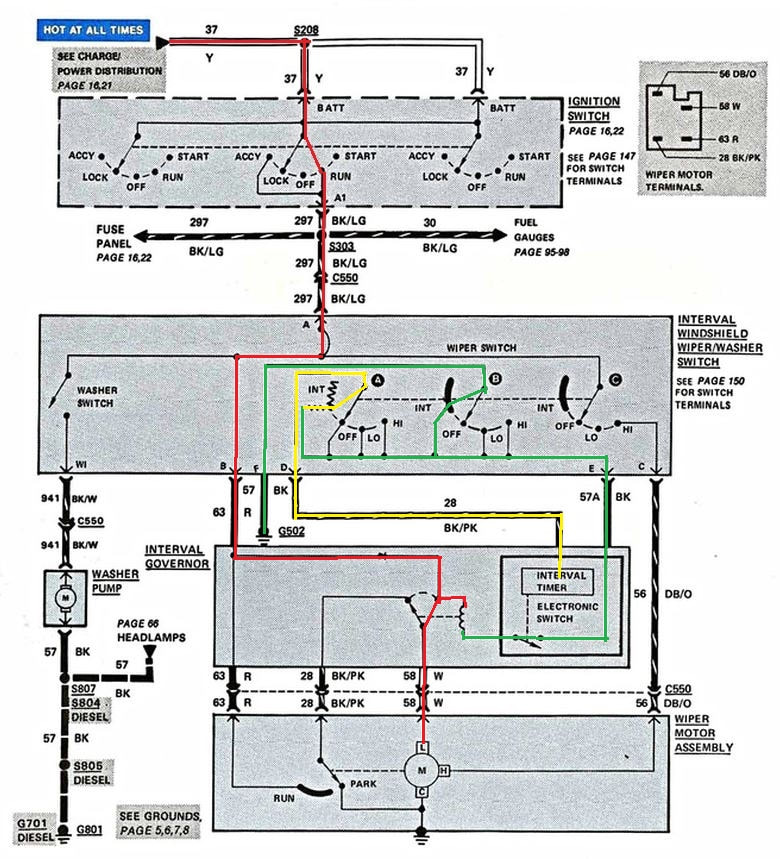
Use this table to match your symptoms with the most likely cause. This comparison helps you choose the fastest and most cost-effective repair path.
| Issue | Key Symptom | Affected Systems | Fix Time | Cost |
|---|---|---|---|---|
| Bad Wiper Switch | Random activation | Wipers, signals, washers | 10 min | $36 |
| Failed JAM/GEM | No wipers, washer, defrost | Multiple alerts fail | 45 min | $100+ |
| Loose Ground | Motor has power but won’t run | Wipers only | 5 min | $0 |
| Blown Relay | No response at any speed | Wipers only | 5 min | $15 |
| Seized Linkage | Motor hums, arms stuck | Mechanical only | 20 min | $20 |
Select the row that matches your situation to begin your repair. Most of these fixes are DIY-friendly and require minimal tools.
Pro Testing Tips You Need

Professional technicians use specific methods to isolate electrical faults quickly. These techniques help you avoid guesswork and ensure accurate diagnosis.
Master Back-Probing Techniques
Use a paperclip or dedicated tool to pierce wire insulation without cutting. This allows you to test voltage and ground while the circuit remains connected and under load.
- Test Pin 18 for power
- Test Pin 26 for ground
- Keep harness connected
- Avoid damaging wires
This method ensures the circuit behaves normally during testing. Disconnecting wires can sometimes hide intermittent faults.
Perform Direct Power Tests
Bypass all vehicle wiring by applying 12 volts directly to the motor terminals. This isolates the motor from the rest of the system completely.
- Apply 12V to motor terminals
- Observe motor rotation
- Confirm motor health
- Focus on upstream issues if good
If the motor runs, the fault is in the switch, relay, or ground. If it does not run, replace the motor itself.
Use Jumper Wire Signal Tests
For JAM diagnosis, touch the pink and yellow tracer wire to ground with a jumper. The wipers should activate if the module is processing signals correctly.
- Locate signal wire
- Touch to ground briefly
- Watch for wiper movement
- Confirm module response
This test verifies the output side of the module. If wipers run, the input signal from the switch is likely missing.
Buy Smart Parts and Pricing
Knowing where to buy parts and what to expect in terms of cost helps you budget effectively. Aftermarket options often provide excellent value for these repairs.
Aftermarket Switch Options
Replacement switches are widely available online and at auto parts stores. Prices typically hover around $36 for quality aftermarket units.
- Price: Approximately $36
- Sources: Amazon, RockAuto, eBay
- Compatibility: F-150 to F-450
- Shipping: Often next-day
Verify the part number matches your specific model year. These units are generally plug-and-play with no programming required.
JAM GEM Module Sourcing
These modules vary in price depending on whether you buy new or remanufactured. Expect to pay a core charge that is refunded when you return your burnt unit.
- Cost: $100 to $300 range
- Source: Specialized vendors
- Core Charge: Usually required
- Warranty: 1 to 2 years
Return your old module to get the core charge refund. Keep the packaging safe during shipping to avoid damage.
Relay and Fuse Supplies
Relays and fuses are inexpensive insurance against future failures. Keep a few spares in your glovebox for emergency repairs on the road.
- Relay cost: $10 to $15
- Fuse pack: $5 for ten
- Brand: OEM or Bosch
- Availability: Universal
Replacing a $15 relay is far cheaper than towing your truck. These small parts make a huge difference in reliability.
Prevent Future Failures
Proactive maintenance prevents unexpected breakdowns during bad weather. Addressing small issues early stops them from becoming major failures.
Replace at First Sign of Trouble
Do not wait for total failure if you notice intermittent issues. Random activation or delay failures are precursors to complete system loss.
- Watch for intermittent operation
- Note delay setting failures
- Act on random activation
- Replace switch immediately
Early replacement prevents being caught in a storm with no visibility. The cost of a switch is low compared to the risk of an accident.
Protect Against Moisture Intrusion
Moisture accelerates the degradation of electronic components in the steering column. Avoid directing high-pressure water near the steering column during car washes.
- Avoid high-pressure sprays
- Use dielectric grease on connectors
- Check for water leaks
- Seal column openings
Dielectric grease creates a barrier against humidity. This simple step extends the life of your new switch significantly.
Check Charging System Health
Voltage spikes from a failing alternator can kill JAM modules. Test your battery and alternator output regularly to ensure stable voltage levels.
- Test alternator output
- Check for 13.8 to 14.7V
- Clean battery terminals
- Secure ground straps
Fix overcharging issues before installing new electronics. A stable power supply protects your investment in new parts.
Who Should Do This Repair
This repair suits a wide range of users from daily drivers to fleet managers. The difficulty level varies slightly depending on the specific failure vector.
Daily Drivers and Work Trucks
Downtime costs money for those who rely on their truck for work. Fixing this issue quickly gets you back on the road safely and efficiently.
- Minimize vehicle downtime
- Ensure safety compliance
- Reduce repair costs
- Restore full functionality
Quick action prevents minor issues from becoming major headaches. Your truck is essential, so keep it running smoothly.
DIY Mechanics and Enthusiasts
Switch replacement is beginner-friendly and requires only basic tools. JAM module replacement is moderate but achievable with careful attention to detail.
- Low difficulty for switches
- Moderate for modules
- Save on labor costs
- Gain mechanical confidence
Follow the steps carefully and you will succeed. The satisfaction of fixing it yourself is an added bonus.
Fleet Managers and Owners
Stocking one switch part number covers most F-Series trucks in a fleet. This standardization simplifies inventory and speeds up repairs across multiple vehicles.
- Standardize parts inventory
- Cover F-150 to F-450
- Reduce repair time
- Lower maintenance costs
One part number solves 90% of wiper switch failures. This efficiency is vital for large fleet operations.
Frequently Asked Questions About Ford F350 Wipers
Why do my wipers turn on randomly when the switch is off?
Random activation usually means the wiper delay switch module has failed internally. Moisture degrades the PCB traces, causing erratic signals that trigger the wipers unexpectedly.
How do I know if my JAM module is bad?
A bad JAM module typically causes simultaneous failure of wipers, washer pump, and defrost. If all three systems are dead, test power and ground at the module before replacing it.
Can I drive my Ford F350 if the wipers are not working?
Driving without functional wipers is dangerous and illegal in many areas during rain. You should repair the system immediately to ensure safe visibility and avoid traffic citations.
How much does it cost to fix Ford F350 wipers not working?
Costs range from $15 for a relay to over $100 for a JAM module. Switch replacements average $36, while labor costs are eliminated if you perform the repair yourself.
Do I need special tools to replace the wiper switch?
You only need a 6mm socket, a Torx T5 or T6 bit, and a flathead screwdriver. These common tools allow you to complete the switch replacement in about 10 minutes.
Will a blown fuse cause total wiper failure?
Yes, a blown fuse can stop the wipers from working entirely. Check Fuse 8 and Fuse 20 in the central junction box before assuming the module is dead.
Key Takeaways for Fixing Ford F350 Wipers Not Working
Fixing Ford F350 wipers not working issues often comes down to identifying the right failure vector. Whether it is a $36 switch, a loose ground, or a failed JAM module, the solution is within reach for most DIYers.
Start by matching your symptoms to the specific failure types outlined in this guide. Test power and ground systematically to avoid unnecessary part replacements.
Take action now to ensure your visibility and safety on the road. Gather your tools, identify your symptom cluster, and execute the repair with confidence.