Your Ford F-150’s turn signals suddenly stop working, but the hazard lights still flash. Or maybe both have failed completely. You are left stranded on the side of the road, unable to signal a lane change or warn others, a serious safety risk. The good news is that most causes of Ford F-150 signal lights not working are diagnosable and fixable with basic tools, often in under an hour and for less than $30.
This guide delivers a precise, step-by-step breakdown of every possible cause, from blown fuses to faulty multifunction switches, bad grounds, and Body Control Module glitches. You will learn how to use hazards as a diagnostic tool, test connectors without guesswork, and reset modules when hardware fixes fall short.
Check Hazard Lights First
Turn Signals Dead? Test Hazards
Start here: press the hazard switch. Do all four corners flash?
If hazards work, power is reaching the flasher unit. The issue is likely isolated to the turn signal circuit, which includes the multifunction switch, fuse, or ignition-powered side of the flasher. If hazards do not work, suspect the flasher unit, wiring, or power supply to the module.
Why it matters: Turn signals and hazards share bulbs and ground paths but use separate circuits inside the flasher. If hazards work, bulbs are likely fine, so focus on the switch or fuse instead.
Listen for the clicking sound. No click and no lights is a strong sign the flasher unit itself is dead.
Inspect Fuses by Model Year
Find the Correct Fuse
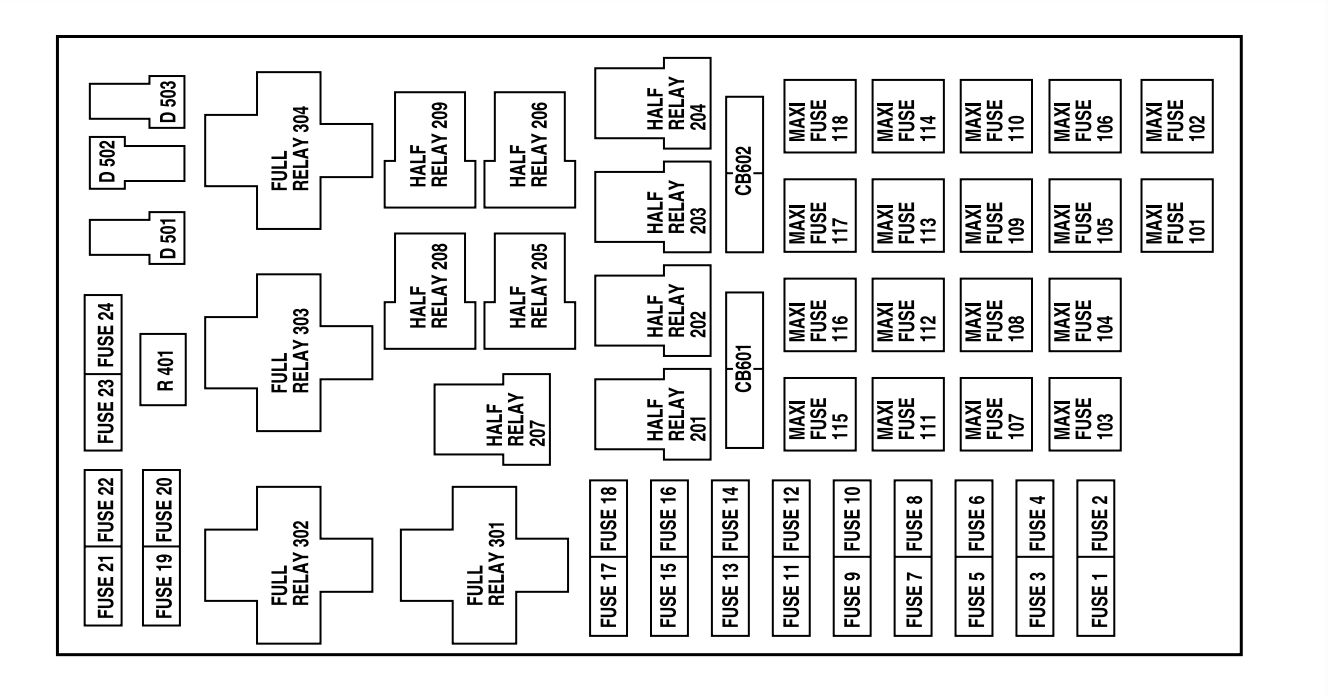
Fuses are the fastest and cheapest check. Use your owner’s manual or fuse box cover diagram, but here are the most common culprits.
2001-2004 Models: Check Engine Bay Fuse #13
Location: Engine compartment fuse box. Fuse: #13, 20-amp blade fuse. Function: Primary turn signal power. Test: Pull it out and inspect for a broken filament. Use a multimeter or fuse tester for certainty.
2004-2008 Models: Check Interior Fuse #2
Location: Cabin fuse panel, driver’s side dash. Fuse: #2, 15A or 20A mini-fuse. Function: Controls turn signal circuit. Tip: These models are notorious for this fuse failing due to switch feedback issues.
Replace only with the correct amperage. A blown fuse after replacement means a short, so do not ignore it.
Test the Flasher Unit
Locate and Replace the Module
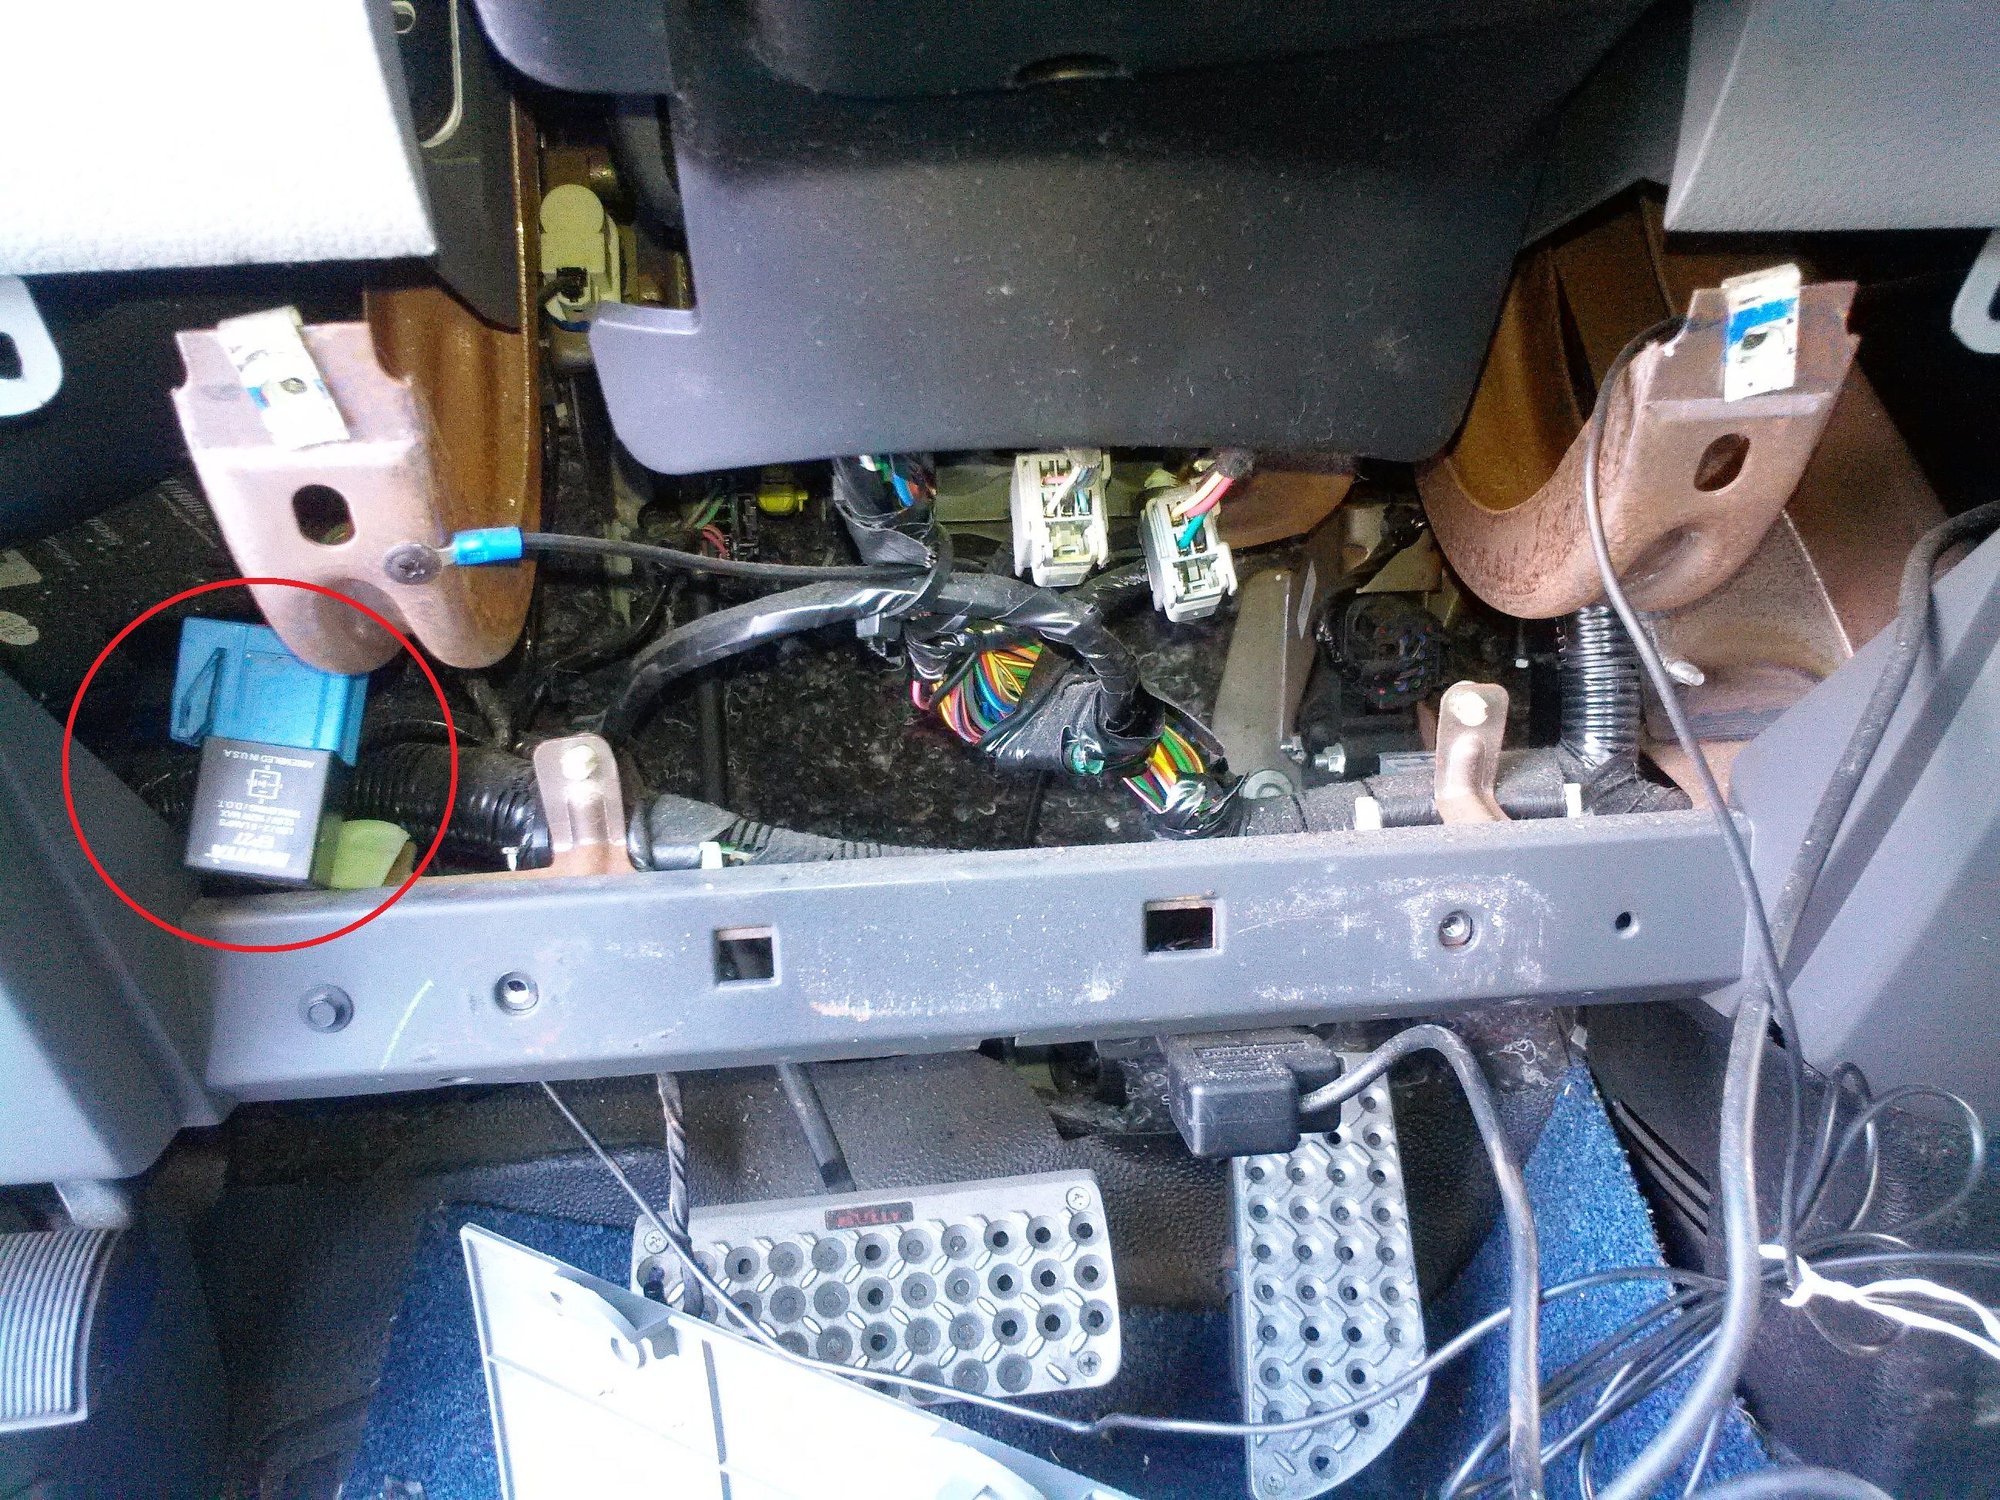
If hazards do not work, the integrated flasher unit is the prime suspect.
Where to Find It
Location: Under the dash, near the steering column. Mounting: On a metal bracket high in the footwell. Appearance: Small black module with a green connector. Access: Remove the lower dash panel and a black plastic shroud. Press side prongs to release.
Signs of Failure
No lights and no click. Dashboard indicator stays solid. Green LED on the unit glows steady instead of blinking.
Replacement Steps
Turn off ignition. Remove the OBD2 cover if blocking access. Unscrew or unclip the lower dash panel. Pry off the black plastic cover over the flasher. Press the release tab and disconnect the harness. Slide the old unit off the bracket. Install the new one. The 5V3T-13350A is the preferred OEM part and works better than older 4L3T-1335-AA. Reconnect and reassemble.
Cost: $22-$28 for aftermarket, about $25 for OEM.
Pro Tip: After install, test both turn signals and hazards. You should hear a crisp, consistent click.
Diagnose the Multifunction Switch
Turn Signal Lever Problems
When hazards work but turn signals do not, the multifunction switch is often to blame, especially in models with tilt steering.
Why It Fails
Vibration and repeated use wear internal contacts. Tilt column movement pulls wires loose over time. Connectors at the base of the column can become mis-seated.
Test the Switch
Remove the steering column cover. Three Phillips screws hold it in place. Snap off the lower half. Remove the tilt lever and ignition lock cylinder. Press the release tab. Inspect the MFS connector at the back of the column. Look for loose, pushed-out, or corroded pins. Reseat the connector firmly.
Hot-Wire Test
Disconnect the switch wiring harness. Apply 12V directly to the turn signal input wire. If lights flash, the switch is faulty, not the flasher or bulbs.
Replace only if testing confirms failure. Some owners replaced the lever unnecessarily. Ford may offer a refund if you contact them for 2004-2008 models.
Check Ground Connections
Fix Fast Blinking, No Rear Lights
A classic symptom: front turn signal blinks fast, rear does not light. This often points to a bad ground, not a dead bulb.
Common Ground Points
Rear tail lamp housings, each side. Frame near the bumper. Chassis near the fuel tank.
How to Test
Use a multimeter set to ohms. Touch one probe to the ground terminal in the socket. Touch the other to a known good ground, like battery negative. Reading should be less than 1 ohm.
Repair steps: Disconnect the rear lamp connector near the bumper. Inspect for corrosion, moisture, loose pins. Clean with electrical contact cleaner and a wire brush. Reconnect firmly until it clicks.
If cleaning does not work, run a new ground wire from the lamp housing to clean metal on the frame.
Inspect Wiring and Connectors
Tilt Column and Trailer Harness Issues
Vibration and movement take a toll on wiring.
Steering Column Harness
Focus on wires near the tilt mechanism. Repeated tilting can fray or pull wires loose. After removing the column cover, gently wiggle the harness. Watch for intermittent signal changes.
Trailer Light Connector
Located under the rear bumper. Prone to corrosion in wet or salty climates. Unplug and inspect for green gunk or bent pins.
Secure loose connectors with a small bead of hot glue. This prevents future vibration damage.
Reset the Body Control Module
Post-Repair Function Not Restored
On 2011+ models, a BCM reset may be required after replacing the MFS or flasher.
Why It Happens
The BCM stores fault codes and may disable circuits after detecting a failure. Even after hardware repair, the module will not restore function until reset.
Tools You Will Need
OBD2 adapter, Bluetooth preferred. Avoid $15 WiFi ELM327 clones. FORScan app, free for Android and iOS. Compatible device like a smartphone or tablet.
Reset Steps
Plug the OBD2 adapter into the port under dash, left of column. Pair with your device via Bluetooth. Open FORScan and connect to the vehicle. Go to Body Controls, BCM, Reset/Initialization. Follow prompts to reset.
Model-Specific Fixes
Tailor Diagnosis by Year
Electrical systems evolved, so use the right approach for your model.
1978-2000 Models
Mechanical MFS, possible dual flasher units. Fix: Remove steering wheel to access switch. Test: Hot-wire the flasher circuit to confirm switch failure.
2001-2008 Models
Fuse #13 in engine bay or #2 in cabin often at fault. Relay: Upgrade to 5V3T-13350A for better reliability. Tilt column: Check for loose pins at MFS.
2011-2018 Models
BCM-controlled lighting. LED options and CAN bus communication. Must reset BCM after physical repairs. Use FORScan for diagnostics. Do not skip this step.
Older models fail mechanically. Newer ones fail electronically. Diagnostic tools are essential.
Diagnostic Flow in 8 Steps
Follow This Order
Test hazards to determine circuit scope. Check bulbs and sockets to rule out simple failures. Inspect fuses #13 or #2. Listen for flasher click. No click means replace the unit. Examine MFS connector. Reseat and test for loose wires. Test rear grounds using multimeter for continuity. Scan with FORScan and reset BCM if needed. Replace flasher as the final hardware fix if all else fails.
Performance data: Flasher replacement fixes about 75% of total failures. Connector reseating fixes about 15% of intermittent issues. Ground repairs solve about 10% of one-sided problems.
Prevent Future Failures
DIY Maintenance Tips
Keep your signals reliable with these simple habits.
Annual inspection: Test all lights monthly. Listen for clean relay clicking. Check steering column connectors for looseness.
Protect connectors: Apply dielectric grease to lamp and trailer connectors. Seal rear lamp gaskets to keep out moisture. Use hot glue to secure connectors. This stops vibration loosening.
Invest in quality tools: Skip cheap OBD2 adapters. They fail to pair. Use Bluetooth ELM327 units from trusted brands.
Keep records: Note flasher replacements, BCM resets, and wiring fixes. This helps spot recurring issues early.
Summary: Fix Signal Lights Fast
| Symptom | Likely Cause | Solution |
|---|---|---|
| Turn signals dead, hazards work | MFS or fuse issue | Check fuse #13 or #2, inspect MFS connector |
| Both signals and hazards dead | Failed flasher unit | Replace under-dash module |
| Fast blink on one side, rear dark | Bad ground | Test and clean rear ground |
| Intermittent with column tilt | Loose wiring | Reseat harness, secure with hot glue |
| No click, solid green LED | Dead flasher | Replace immediately |
| Bulbs good but no function | BCM fault | Reset with FORScan |
| Hazards work but one bulb out | Corroded connector | Clean and reseat |
| Post-repair not working | BCM memory | Perform module reset |
Frequently Asked Questions About Ford F-150 Signal Lights Not Working
Why do my turn signals stop working but hazards still function?
When hazards work but turn signals do not, the problem is usually isolated to the turn signal circuit. This typically points to a faulty multifunction switch, a blown turn signal fuse, or issues with the ignition-powered side of the flasher unit. The hazard circuit uses battery power directly, so it often remains functional even when turn signals fail.
How do I know if the flasher unit is bad?
A bad flasher unit usually shows three signs. First, no lights flash and no clicking sound when activating turn signals or hazards. Second, the dashboard indicator light stays solid instead of flashing. Third, the green LED on the flasher module glows steady rather than blinking. You can test by pressing the hazard switch rapidly. No click and no lights indicate a failed flasher.
Can a bad ground cause turn signal problems?
Yes, a bad ground is a common cause of turn signal issues. A classic symptom is fast blinking on the front lights with no activation in the rear lights. This happens because poor ground affects the circuit path. Test ground continuity with a multimeter. Reading more than 1 ohm indicates a bad ground that needs cleaning or a new ground wire.
Do I need to reset the BCM after replacing the turn signal switch?
On 2011 and newer Ford F-150 models, yes. The Body Control Module stores fault codes and may disable circuits after detecting a failure. Even after physically repairing the switch or flasher, the BCM will not restore function until you perform a reset using FORScan and an OBD2 adapter. Skipping this step is a common reason repairs appear to fail.
What is the best diagnostic tool for Ford F-150 signal issues?
FORScan software combined with a reliable Bluetooth OBD2 adapter is the best choice. Avoid cheap $15 WiFi ELM327 adapters because many users report pairing failures. Trusted brands like Jdiag and BAFX work reliably. The app connects to the BCM, allowing you to run diagnostics and perform resets that generic code readers cannot handle.
Key Takeaways for Fixing Ford F-150 Signal Lights
Most Ford F-150 signal light failures are simple and affordable to fix. Start with fuses and hazards to narrow the problem quickly. The flasher unit fixes about 75% of complete signal failures, while connector reseating and ground repairs handle most intermittent issues. Always test grounds when one side blinks fast but the rear stays dark.
For 2011 and newer models, do not skip the BCM reset after hardware repairs. Use quality diagnostic tools and avoid cheap OBD2 adapters that fail to pair. With the right approach, you will restore full signaling in under an hour and avoid a costly tow or repair bill.