
Your F250 4×4 not working when you need it most is more than an inconvenience. It can leave you stranded in snow, mud, or a worksite with no warning. Many drivers see the 4×4 light on the dashboard and assume the system is engaged, only to discover the front wheels never received power. This confusion is the most common complaint with Ford’s Electronic Shift On the Fly (ESOF) system.
The good news is that most F250 4×4 not working issues trace back to a few specific components. Vacuum leaks, a single blown fuse, or worn hub seals cause the majority of failures. This guide walks you through professional diagnostic steps you can perform at home, including vacuum pressure testing, electrical checks, and repair strategies. By the end, you will know exactly how to restore four-wheel drive or decide if an upgrade makes more sense.
Decode Your Dashboard Light Behavior
Lights On But No Front-Wheel Power
Seeing the 4×4 High, 4×4 Low, and generic Four-Wheel Drive warning lights all illuminated at once signals a system fault. In 2014 F250 6.7L Powerstroke models, this combination often indicates a communication error between the PCM and the 4×4 control module. The system has detected a problem and disabled engagement as a safety measure.
More frequently, only your selected mode (like 4×4 High) lights up, yet the truck still drives in rear-wheel drive. This scenario is misleading. The light confirms the transfer case shifted gears, but it tells you nothing about the front hubs. If vacuum pressure failed, the hubs stayed unlocked, and power never reached the front axle.
No Lights and No Response
If pressing the dash switch produces no light change and no sound, the fault is electrical. The 4×4 system requires power to operate. Start by checking fuse F45, because a blown fuse cuts all power to the 4WD module and leaves the system blind to your input.
Listen for a click near the transfer case when you toggle modes. Silence suggests the actuator is not receiving power. If the switch feels dead but the fuse tests good, your next step is checking voltage at the module connector.
Test Vacuum System Pressure Like a Technician

Why Vacuum Controls Your Front Hubs
The F250 ESOF system uses vacuum to lock the front hubs. When you select 4×4, a vacuum solenoid routes pressure to the hubs, pulling them into engagement. If vacuum is weak or lost, the hubs will not lock, even if the transfer case shifts correctly.
Vacuum issues are the leading cause of F250 4×4 not working complaints. Rubber hoses crack from heat cycles, O-rings dry out, and solenoids fail internally. The fix begins with a straightforward pressure test.
Run the Vacuum Hold Test
You will need:
– A calibrated vacuum gauge
– Jack and jack stands (front wheels off the ground)
– A running engine at idle
Steps:
1. Set the hubs to Auto.
2. Switch the dash control to 2WD and wait 15 seconds.
3. Disconnect the vacuum line at the right front knuckle.
4. Attach the vacuum gauge directly to the line.
5. Switch the dash control to 4×4.
Check the reading:
– Must hit 10 in-Hg or higher and hold steady for 45 seconds.
Then switch back to 2WD:
– Vacuum should drop and stabilize between 5.8 and 7.3 in-Hg for 15 seconds.
Repeat the entire process on the left front knuckle.
Interpret Your Results
- Fails on one side only: A bad hub seal, cracked line, or clogged hose to that specific wheel.
- Fails on both sides: A bad vacuum solenoid, split main line, or low engine vacuum.
- Passes the test but 4×4 still fails: The hubs may be mechanically worn. Even with perfect vacuum, they will not lock.
Pro Tip: If your A/C blows only through the defrost vents, you have a major vacuum leak. The HVAC and 4×4 systems share the same vacuum source. Fix the leak, and both systems return to normal operation.
Check Fuse F45 and Power Supply
Locate the Critical Fuse
Fuse F45 is a 10-amp fuse that powers the entire 4×4 electrical system. It lives in the Central Junction Box (CJB) beneath the steering column, not under the hood. A blown F45 means no power reaches the 4WD module, and the system cannot activate.
To test:
1. Pull fuse F45 from the CJB.
2. Inspect the metal strip for a visible break.
3. Confirm continuity with a multimeter.
4. Test for 12 volts at the fuse slot with the ignition on.
If you find no voltage at the slot, the CJB itself may be damaged. Check the wiring feeding the fuse block before replacing components.
Test Pin 5 on Connector C281A
This connector feeds power directly to the 4WD module. Pin 5 carries a Red/Yellow wire and must show 12 volts with the key in the Run position.
Steps:
1. Locate Connector C281A near the CJB.
2. Back-probe Pin 5 with a multimeter.
3. Turn the ignition to Run.
Results:
– No voltage: The fault is upstream. Look for a blown fuse, broken wire, or damaged junction box.
– Voltage present: Power is reaching the module. The fault lies in the module, actuator, or output circuit.
Warning: Never assume a fuse is good based on appearance alone. Vibration can create hairline breaks invisible to the eye. Always verify with a meter.
Diagnose the Vacuum Solenoid and Hub Seals
Test the Vacuum Solenoid
The solenoid controls vacuum flow to the front hubs. You will typically find it mounted on the firewall or inner fender.
Check operation:
1. Disconnect the vacuum lines from the solenoid.
2. Apply 12 volts directly to the terminals.
3. Listen for an audible click.
4. Blow air through the ports. Flow direction should change when powered.
No click or no flow change confirms a failed solenoid. Replace it with an OEM unit for reliable operation.
Also inspect the vacuum reservoir if your truck is equipped with one. A cracked reservoir will not hold pressure, causing delayed or failed engagement even with good lines and a working solenoid.
Inspect Hub O-Rings and Internal Seals
Even with perfect vacuum, bad O-rings inside the hubs prevent locking.
Signs of failure:
– Hubs will not engage in Auto mode
– Vacuum test fails at the knuckle
– Hubs leak fluid or produce grinding noises
Repair process:
1. Remove the hub assembly from the knuckle.
2. Disassemble the hub and inspect internal O-rings.
3. Replace any cracked, shrunk, or brittle seals.
4. Reassemble with a light coat of grease on moving parts.
For trucks with recurring vacuum issues, replacing the entire hub assembly often proves more cost-effective than repeated seal replacements.
Use Manual Hubs as a Permanent Fix

Switch to Manual Locking Hubs
The most reliable solution for chronic F250 4×4 not working problems is eliminating the vacuum system entirely. Install aftermarket manual locking hubs from Warn or Mile Marker.
Benefits:
– No more vacuum leaks to chase
– 100% mechanical engagement every time
– Works even if the electrical system fails
– Lower long-term maintenance costs
How it works:
1. Remove the factory automatic hub assembly.
2. Install the manual hub per manufacturer instructions.
3. Before off-road or snow conditions, turn the dial to Lock.
4. Engage 4×4 via the dash switch as normal.
Note: You must manually lock and unlock the hubs. Leaving them locked on dry pavement causes premature tire wear and unnecessary driveline stress.
Use OEM Hubs in Lock Mode
If you prefer not to buy new hubs, simply switch your existing ones to Lock whenever you need 4×4. This bypasses the vacuum system and forces mechanical engagement. It serves as a free workaround if your vacuum system is dead but the hubs themselves remain functional.
Just remember to switch back to Auto afterward for normal driving.
Scan for 4×4 Trouble Codes
Why Basic Scanners Miss the Problem
Generic OBD2 tools cannot read 4×4 system codes. You need a professional scanner such as Ford IDS, Snap-on, or Autel to access the GEM or Transfer Case Control Module. Without one, you are working blind.
What Advanced Scanners Reveal
Plug in and check the following data points:
– Live status of the 4×4 switch input
– Commanded versus actual position of the transfer case actuator
– Front axle engagement status
– Communication errors between modules
Common diagnostic trouble codes include:
– C1910: Transfer case actuator fault
– U0101: Lost communication with 4WD module
– B2440: Hub position sensor failure
These codes tell you whether the problem is electrical, mechanical, or software-related.
Tip: Check for Technical Service Bulletins specific to your model year. Ford has released software updates that address known 4×4 communication glitches.
Replace or Reprogram the GEM Module
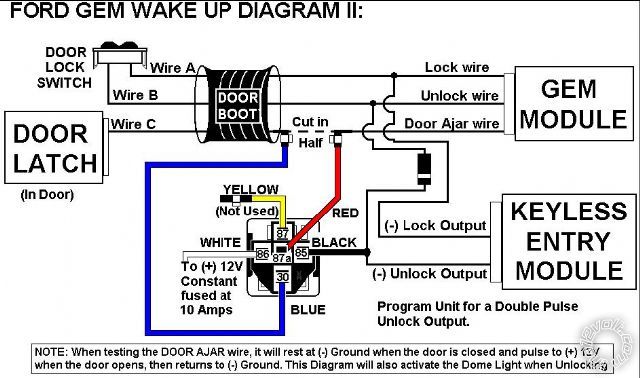
GEM Module Failure Signs
The Generic Electronic Module (GEM) controls 4×4 logic in older F250s, including the 2005 6.0L Diesel. If power is good but nothing happens, the GEM may be dead.
Symptoms:
– No response from the 4×4 switch
– Fuse F45 tests good and voltage is present at C281A
– No actuator clicks
– No codes with an advanced scanner
Reprogramming Is Mandatory
A replacement GEM is not plug-and-play. It must be programmed to your specific VIN using Ford IDS or an equivalent dealer-level tool.
Buying a used module? It will not function until reprogrammed. A new unit from the dealer requires the same setup process.
Never install a GEM without programming access. You will waste both money and time.
Prevent Future 4×4 Failures
Annual Vacuum System Check
Make this part of your pre-winter routine:
1. Perform the vacuum hold test (10 in-Hg for 45 seconds minimum).
2. Inspect all vacuum lines for cracks and brittleness.
3. Ensure the solenoid clicks when powered.
4. Test A/C vent function. Defrost-only airflow confirms a vacuum leak.
Cold weather stiffens rubber seals and accelerates failures. Test before the first snowfall.
Protect Electrical Connections
Corrosion destroys 4×4 systems faster than any other factor. Clean and grease the following connectors:
– Transfer case actuator
– Front axle actuator
– C281A and CJB connectors
Apply dielectric grease to seal out moisture and prevent future corrosion.
Upgrade for Long-Term Reliability
If you depend on 4×4 regularly, consider these upgrades:
– Install manual hubs for the most effective permanent fix
– Replace vacuum lines with braided nylon hose that resists heat
– Add a vacuum check valve to maintain system reserve
Off-road enthusiasts should consider manual hubs essential equipment. You cannot afford a vacuum failure miles from help.
Frequently Asked Questions About F250 4×4 Not Working
Why does my F250 say 4×4 is on but only the rear wheels drive?
The dashboard light confirms the transfer case shifted, but it does not verify that the front hubs locked. If vacuum pressure failed, the hubs stayed disengaged and power never reached the front axle. Test vacuum pressure at each knuckle to confirm.
Where is fuse F45 located on a Ford F250?
Fuse F45 is a 10-amp fuse in the Central Junction Box beneath the steering column. It is not under the hood. This fuse supplies power to the 4WD module, and a failure here disables the entire system.
Can I drive my F250 with the 4×4 not working?
Yes. The truck will operate normally in rear-wheel drive. The 4×4 system simply will not engage. Address the issue promptly if you need four-wheel drive for snow, towing, or off-road conditions.
How much does it cost to fix F250 4×4 problems?
Costs vary widely. A blown fuse or cracked vacuum line might cost under $50 to repair. A failed GEM module with dealer programming can exceed $500. Manual hub conversion typically runs $200 to $400 for parts.
What does it mean if my A/C only blows through the defrost vents?
Your HVAC and 4×4 systems share a common vacuum source. If the A/C defaults to defrost-only mode, you have a major vacuum leak that also prevents the front hubs from locking. Fixing the vacuum leak restores both systems.
Should I convert to manual hubs?
If you rely on 4×4 for work, winter driving, or off-road use, manual hubs offer the best reliability. They eliminate the most common failure point and provide guaranteed mechanical engagement regardless of electrical or vacuum system health.
Key Takeaways for Restoring Your F250 4×4
Start with the simplest checks when your F250 4×4 not working. Test fuse F45 with a multimeter, perform the vacuum hold test at both front knuckles, and verify whether your A/C vents function normally. Most failures trace back to vacuum leaks or power loss, and both are fixable with basic tools and patience.
If you want a permanent solution, converting to manual locking hubs eliminates the entire vacuum system and removes the most common source of failure. This upgrade pays for itself the first time you avoid a roadside repair in bad weather.
Your next step: gather a vacuum gauge and multimeter, then run the diagnostic tests in order. You will likely identify the problem within an hour and have your four-wheel drive restored before the next storm hits.


