

If your 2017 Ford F-250’s AC compressor isn’t engaging and the cabin stays hot, you’re not alone. This issue affects multiple 6.7L diesel Super Duty trucks, some with under 20,000 miles. The problem often isn’t a failed compressor or low refrigerant, but one of two hidden culprits: a broken wire in the clutch harness or abnormally high system pressure due to air contamination or a stuck expansion valve.
What makes this frustrating is that there are usually no diagnostic trouble codes (DTCs), and basic electrical tests can miss the real issue. Standard test lights won’t catch high-resistance breaks, and pressure readings might look normal at first glance. But once you know where to look, specifically at connector C1046 and the wiring take-out near the compressor, you can diagnose and fix it fast.
In this guide, you’ll learn the exact steps technicians use to identify both the wiring defect and refrigerant anomalies, including load testing, wiggle checks, and proper evacuation procedures. You’ll also discover how to avoid common misdiagnoses and confirm a full repair with accurate pressure and vent temperature benchmarks.
Check Clutch Harness for Broken Wires
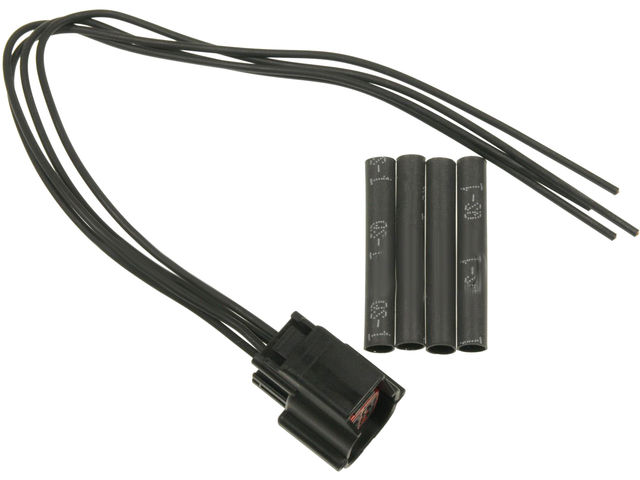
The most frequent cause of a non-working AC compressor on a 2017 Ford F-250 is a broken wire in the clutch harness, specifically where the wires exit the main loom near the compressor. This isn’t a random break; it’s a known design flaw caused by tight zip ties creating stress points.
Access Connector C1046
Start by removing the air cleaner housing. This gives you clear access to connector C1046, located on the compressor clutch. Unplug the connector and visually inspect for corrosion or bent pins. While some suspect rear HVAC connectors, field reports confirm that in these cases, rear connectors are typically clean, so focus on the front.
Test Circuits CH401 and GD131
Use a multimeter to measure resistance across the clutch coil through C1046:
- CH401 (Violet-White): Power circuit to clutch coil
- GD131 (Black-Gray): Ground circuit
A healthy clutch coil should read 3–5 ohms. If you get an open circuit (OL), don’t assume the coil is bad. Many coils test fine until you perform a dynamic test.
Perform the Wiggle and Tug Test
Here’s where most DIYers and even some shops go wrong: visual inspection isn’t enough. The break is often hidden inside the convolute (protective loom). While monitoring resistance or attempting to engage the clutch, vigorously wiggle the harness and focus on the section where the wires exit the main loom.
From underneath the truck, physically pull the wire take-out section. In confirmed cases, the wires literally pull apart due to internal fractures. If the resistance jumps or the connection drops during this test, you’ve found the issue.
Pro Tip: Do not use a standard test light. It draws too little current and can give false “good” readings. Use a power probe or high-load incandescent test light to verify the circuit can carry real amperage.
Repair Damaged Harness Wiring
Once you confirm broken wires, repair them with durable materials and proper technique. A temporary splice won’t last because this area flexes with engine movement.
Strip and Inspect the Loom
Cut away the convolute around the wire exit point. Fully expose the VT-WT (CH401) and BK-GY (GD131) wires. Perform a tug test on each conductor. If they separate easily, the metal is fatigued.
Splice in New Wire
Cut out the damaged sections. Go back into the main harness as far as needed to reach solid, unbroken copper.
- Install 7 inches of new 18-gauge wire for both power and ground.
- Use solder and heat-shrink tubing with adhesive lining for waterproof, vibration-resistant connections.
- Avoid crimp-only connectors, as they can fail under engine heat and movement.
Route the new wires smoothly, avoiding sharp bends. Re-secure the harness with nylon ties, but do not overtighten. Leave slack at the take-out point to reduce stress.
Verify Before Reassembly
Reconnect C1046 and repeat the wiggle and load test. Turn the AC on and confirm the clutch engages reliably. Only after passing this test should you reinstall the air cleaner housing.
Expert Note: There is mention of a known Technical Service Bulletin (TSB), possibly SSM 46878, covering this issue. Check Ford’s official service portal for updated repair guidance and potential warranty coverage.
Diagnose Abnormal Refrigerant Pressures
If the clutch wiring checks out, the problem may lie in the refrigerant system. Some 2017 F-250s show extreme static pressures, like 380 PSI on the high side and 175 PSI on the low side, shortly after cooling fails. These aren’t normal operating values; they indicate a serious system imbalance.
Measure Static and Operating Pressures
Connect a manifold gauge set with the engine off:
- Normal static pressure at 70–80°F: ~80–100 PSI on both sides
- Faulty reading (failure state): Up to 380 PSI high side, 175 PSI low side
Such high static pressures suggest non-condensable gases (like air) are trapped in the system, or the thermal expansion valve (TXV) is stuck closed.
Understand Air Contamination vs. TXV Failure
Two competing theories explain high pressures:
Air/Moisture Entered During Assembly
Recovery machines on affected vehicles reported purging air for extended periods. One tech pulled 1 lb 12 oz of material from a system rated for 1 lb 11 oz, with notes of significant air presence. Since the system should be sealed from the factory, this points to a possible assembly-line breach.
Even if the machine overestimates air volume, prolonged purging time supports contamination.
Stuck Expansion Valve (TXV)
In other cases, replacing the TXV solved the issue, even though no debris was found. The valve was internally stuck, likely due to manufacturing defect or thermal stress, restricting refrigerant flow and spiking pressures.
Key Insight: No debris doesn’t mean the TXV is good. A clean but malfunctioning TXV can still cause high head pressure and compressor lockout.
Fix Refrigerant System Anomalies
When pressures are off, a full recovery, evacuation, and recharge is required. Skipping steps risks recurrence.
Recover and Inspect Refrigerant
Use a recovery machine capable of detecting non-condensables. Note:
- Specified charge: 1 lb 11 oz (for 6.7L diesel models)
- Recovered amount: If you pull more than spec, especially with long air purge cycles, air contamination is likely
Don’t rely solely on the machine’s air percentage reading. Older units vary in accuracy. Instead, trust the duration of the purge cycle. Extended purging means more air.
Replace TXV if Pressures Stay High
If high pressures persist after evacuation:
- Replace the thermal expansion valve
- Confirm the old unit moves freely; if it’s seized, that’s your culprit
- Install a new accumulator or receiver-drier (always replace when opening the system)
Pull Deep Vacuum and Recharge
- Vacuum level: Pull to at least 29 inches Hg for 30–45 minutes
- This removes moisture and trapped air
- Seal the system and check for stability over 10 minutes
Then recharge to exactly 1 lb 11 oz. Overcharging by even a few ounces can mimic the original symptoms.
Confirm Full System Operation
After electrical or refrigerant repairs, validate performance with real-world metrics.
Monitor Operating Pressures
With the engine running, AC on max, and doors open:
- Ambient temp: ~93°F, 80% humidity
- Target pressures:
- Low side: ~36 PSI
- High side: ~225 PSI
Pressures outside this range suggest incomplete evacuation, incorrect charge, or a lingering restriction.
Check Vent Temperature
Use a digital thermometer in the center dashboard vent:
- Working system: Should reach 44°F within 10–15 minutes
- If above 50°F, recheck for air, moisture, or blockages
Rule Out Other Issues
Before finalizing:
- Test blower motor on all speeds. No airflow isn’t a compressor issue
- Inspect rear HVAC connectors for moisture, though most wiring failures are up front
- Remove A/C clutch relay to isolate circuits during amp draw tests
Prevent Future Failures
This isn’t just a repair. It’s a chance to prevent repeat visits.
Inspect Harness During Routine Service
On any 2017 F-250 or F-550 with the 6.7L diesel, check the AC compressor harness take-out during oil changes or air filter replacements. Look for:
- Tight zip ties pinching the VT-WT or BK-GY wires
- Cracked insulation or exposed copper
- Signs of prior flexing or abrasion
Loosen or replace any over-tightened ties.
Avoid Over-Tightening Wire Ties
When securing harnesses, snug is enough. Overtightening creates stress points that lead to wire fatigue. Use vibration-resistant clamps or split loom sleeves for added protection.
Frequently Asked Questions About 2017 F250 AC Compressor Issues
Why is my 2017 F250 AC compressor not engaging?
The most common cause is a broken wire in the clutch harness at the take-out point near the compressor. Tight zip ties create stress fractures in the VT-WT or BK-GY circuits, causing an open or intermittent connection.
What are the normal AC pressures for a 2017 Ford F250 6.7L diesel?
At 93°F ambient with 80% humidity, normal operating pressures are approximately 36 PSI on the low side and 225 PSI on the high side. Static pressure at 70–80°F should be around 80–100 PSI on both sides.
How much refrigerant does a 2017 F250 6.7L diesel take?
The specified charge is 1 lb 11 oz of R-134a. Overcharging by even a few ounces can cause high head pressure and prevent proper cooling.
Is there a Ford TSB for the 2017 F250 AC compressor wiring issue?
Yes, there is a confirmed Technical Service Bulletin covering this harness defect. Technicians have referenced SSM 46878 as a possible identifier. Check Ford’s official service portal for warranty coverage and repair procedures.
Can a stuck expansion valve cause high AC pressure on a 2017 F250?
Yes. A stuck thermal expansion valve (TXV) can restrict refrigerant flow, causing both high-side and low-side pressures to spike abnormally. In some cases, the TXV is internally seized without any debris present.
Key Takeaways for Fixing Your 2017 F250 AC Compressor
The 2017 Ford F250 AC compressor not working issue is often misdiagnosed as a bad compressor or low refrigerant. The real causes, harness wire breaks and air-contaminated systems, are fixable with the right process.
Start by testing circuits CH401 and GD131 at connector C1046 using a load tester, not a standard test light. If those check out, measure static pressures. Readings above 150 PSI on either side indicate a refrigerant system problem requiring recovery, evacuation, and possible TXV replacement.
After any repair, confirm success with a vent temperature of 44°F and operating pressures of 36 PSI (low) and 225 PSI (high) at 93°F ambient. If your readings match, the system is fully restored.


