

Your Ford F350 diesel engine demands clean fuel to protect the sensitive CP4 high-pressure pump from catastrophic failure. Performing a regular ford f350 fuel filter change prevents rough idling, hard starts, and expensive repairs caused by water or debris in your system.
This guide walks you through replacing both upper and lower filters in under thirty minutes using simple tools. You will learn the exact steps to drain, swap, and prime your fuel system safely while avoiding common mistakes that lead to leaks.
Locate Both Fuel Filters on Your Truck
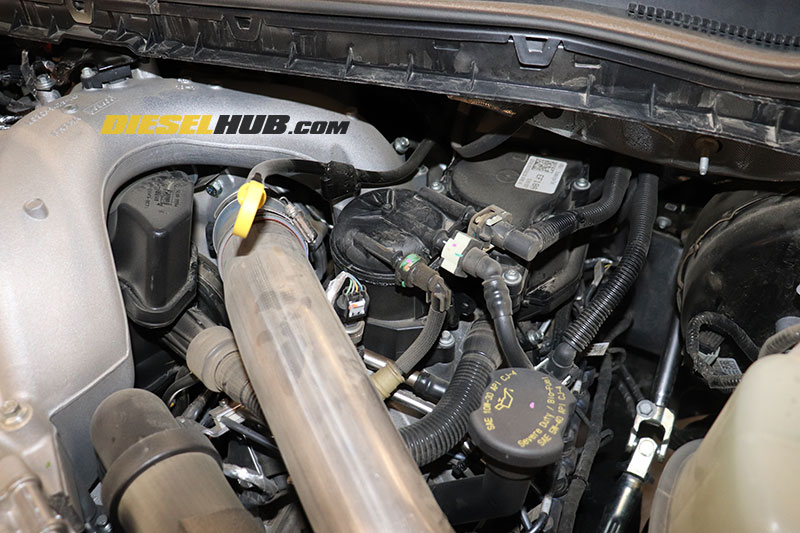
Your 6.7L Power Stroke uses a dual-filter system to ensure maximum protection against contaminants. Identifying both locations correctly is the first step before gathering your tools or lifting the hood.
Find the Upper Filter in the Engine Bay
The upper filter serves as the final filtration stage before fuel reaches the high-pressure pump. You will find this sealed plastic canister at the front of the engine compartment with three high-pressure fuel lines attached.
Locate the Lower Water Separator
The lower filter acts as the primary water trap and sits on the driver’s side frame rail. Depending on your model year, look near the rear cab or above the differential for a large rectangular housing.
Gather Tools and OEM Parts
Using the correct parts is non-negotiable for the longevity of your common rail fuel system. Aftermarket options often fail to meet the strict flow and filtration specifications required by Ford.
Why You Must Use Motorcraft OEM Filters
Always install Ford Motorcraft OEM fuel filter kits designed specifically for your engine. These kits include both the upper spin-on canister and the lower slide-in element plus a new rubber gasket. Reusing the old lower gasket is a leading cause of post-service fuel leaks.
Essential Tools for the Job
You need specific tools to complete this job efficiently without damaging plastic components.
* 8 mm socket (mini-socket works best for tight spaces)
* Ratchet with a 6-inch extension
* Torque wrench (optional but recommended)
* Small flat-blade screwdriver or pick tool
* Drain pan with at least one-gallon capacity
* Lint-free paper towels and brake cleaner
* Fresh diesel fuel for lubricating gaskets
An impact gun can remove bolts faster but requires extreme caution to avoid cracking the plastic housing.
Replace the Upper Fuel Filter
The upper filter replacement involves working with high-pressure lines that require careful handling. Proper technique ensures you do not damage the quick-connect fittings during removal.
Disconnect High-Pressure Fuel Lines
Place rags under the housing to catch any residual fuel before touching the lines. Your truck may use one of three connector styles that require different release methods.
* Pinch-Tab: Squeeze the rear tab while pulling the line straight out.
* Double-Tab: Press both sides inward simultaneously and pull.
* Twist-Lock: Rotate the connector counterclockwise until it stops, then pull.
Use a pick tool for lines hidden behind the engine block and tuck them aside gently.
Remove Old Filter and Install New Unit
Grasp the housing firmly and twist counterclockwise to remove the entire sealed unit. Fuel will spill out, so keep your drain pan ready.
- Remove the center protective cap from the new filter.
- Insert the new filter at a slight angle to align the threads.
- Rotate clockwise until fully seated and the eyelet aligns with the housing.
Reconnect Lines with a Click
Push each fuel line onto its fitting until you hear a distinct click sound. Press down the retaining clip firmly and perform a tug test on every line. A loose connection here can spray diesel with enough force to pierce skin.
Drain and Replace Lower Fuel Filter

The lower housing collects water and sediment first, making it the dirtiest part of the system. Draining it properly minimizes mess and prevents contamination during the swap.
Drain Fuel and Water Safely
Position your drain pan under the lower housing before starting. Disconnect the water-in-fuel sensor by squeezing the tab and pulling straight off without yanking wires.
Turn the petcock valve a quarter-turn counterclockwise to open it. Allow up to a gallon of fuel and water to drain into your pan. You do not need to wait for every drop, as closing the valve early reduces spillage during housing removal.
Remove Housing and Extract Element
Close the petcock valve tightly before removing the perimeter bolts with your 8 mm socket. Support the housing as you remove the final bolt to prevent it from dropping.
On a clean workbench, note the orientation of the old filter. The arrow or orange nozzle usually points toward the rear. Slide the filter to the right to release it, then lift it out. Pry out the old rubber gasket with a screwdriver and never reuse it.
Install New Filter and Seal Properly
Clean the housing interior with lint-free towels and brake cleaner if debris is present. Lubricate the new gasket and the square base of the new filter with fresh diesel fuel.
Insert the new filter into the right side with the orange nozzle facing right. Slide it left until the L-shaped clips engage with an audible click.
Reinstall and Tighten Lower Housing
Proper tightening of the lower housing is critical to prevent leaks without cracking the plastic. Follow the correct sequence to ensure an even seal around the new gasket.
Align and Secure Housing Bolts
Place the housing back into position and thread all bolts by hand to prevent cross-threading. Tighten them evenly using one of two accepted methods.
* Torque Method: Tighten to 84 Nm (61 ft-lbs) in a star pattern.
* Hand-Tight Method: Tighten until seated, then give a quarter-turn snug.
Never over-tighten as cracked plastic housings cause major fuel leaks.
Reconnect Sensor and Final Check
Reattach the water-in-fuel sensor until it clicks into place. Ensure the petcock valve is fully closed and the wiring is secure before moving to the priming phase.
Prime the Fuel System Correctly
Skipping the priming process can starve the CP4 pump of lubrication and cause immediate damage. Air in the system must be purged before the engine ever cranks.
Perform Key-On and Off Cycles
Do not crank the engine yet. Turn the key to the ON position so dash lights illuminate but the engine stays off. Listen for the fuel lift pump humming near the tank for 30 to 60 seconds.
Turn the key OFF and repeat this cycle 3 to 6 times total. The priming noise will shorten with each cycle as air is purged from the lines.
Check for Leaks During Priming
Inspect all connections while cycling the key to catch issues early. Look closely at the upper fuel line clips, lower housing bolts, and the petcock valve. Any dripping or hissing indicates a faulty seal that must be corrected before starting.
Start Engine and Final Inspection
A successful filter change results in immediate startup with no hesitation. Your final checks ensure the system is leak-free and ready for the road.
Verify Smooth Startup
Start the engine after completing your priming cycles. A proper job yields immediate firing with a smooth, strong idle. If the engine cranks but fails to start, repeat the priming cycles to remove trapped air.
Inspect for Leaks and Clean Up
Let the engine run for two to three minutes while performing a final leak check. Examine the upper housing line clips, lower housing bolts, and drain valve for any seepage. Clean spilled fuel immediately with brake cleaner since diesel is flammable and attracts dirt.
Prevent Common Mistakes
Avoiding simple errors saves you from costly repairs and dangerous situations. Awareness of these pitfalls ensures your maintenance job lasts.
Avoid Reusing the Lower Gasket
The number one cause of post-change leaks is reusing the old rubber gasket. It loses elasticity over time and fails to seal properly. Always install the new gasket included in your kit.
Do Not Skip Priming Cycles
Running the engine with air in the fuel rails can destroy the CP4 high-pressure pump. This pump relies on diesel for lubrication, and air causes metal-on-metal contact.
Watch Filter Orientation
Installing the lower filter backward prevents proper seating and locking. Double-check that the nozzle faces right and the arrow points forward before locking it in.
Keep Everything Clean
Debris entering the housing can clog injectors or damage the pump instantly. Work in a clean area, cap open ports, and use only lint-free towels.
Follow Maintenance Best Practices
Sticking to a regular schedule extends the life of your entire fuel system. Proactive care prevents minor issues from becoming major failures.
Stick to the Service Interval
Replace both filters every 15,000 to 20,000 miles under normal conditions. Consider changing them at 10,000 miles if you drive in dusty conditions or suspect poor fuel quality.
Drain Water Regularly
Check the water separator monthly even between filter changes. Open the petcock and drain any accumulated water to prevent corrosion and microbial growth in your fuel tank.
Listen to Your Truck
Symptoms like hard starting or rough idle after a change usually mean air remains in the system. Re-prime and recheck all fittings before assuming a larger mechanical issue exists.
Frequently Asked Questions About Ford F350 Fuel Filter Change
How often should I change the fuel filters on my Ford F350?
You should replace both filters every 15,000 to 20,000 miles under normal driving conditions. If you tow heavy loads or use questionable fuel sources, consider changing them every 10,000 miles for added protection.
Can I use aftermarket fuel filters instead of Motorcraft?
It is strongly recommended to use only Ford Motorcraft OEM filters. Aftermarket options may not meet the precise flow and filtration specs required by the high-pressure common rail system.
What happens if I do not prime the system after changing filters?
Failing to prime leaves air in the fuel rails which can destroy the CP4 high-pressure pump. The pump requires diesel fuel for lubrication and air causes catastrophic metal-on-metal contact.
Why is my truck hard to start after a filter change?
Hard starting usually indicates air trapped in the fuel system due to insufficient priming. Perform additional key-on and off cycles until the lift pump noise shortens significantly.
How do I know if my fuel lines are connected correctly?
Push each line until you hear a distinct click and then tug gently to verify it is locked. A loose connection will pull off easily and can cause dangerous high-pressure fuel sprays.
Key Takeaways for Your Ford F350 Fuel Filter Change

Performing a ford f350 fuel filter change yourself saves money and protects your engine from costly damage. Remember to always use OEM parts, replace the lower gasket, and prime the system thoroughly before starting.
Take your time to inspect all connections for leaks and stick to the recommended maintenance intervals. Your truck will reward you with reliable performance and extended engine life.


