If your Ford F-150 door sensor is not working, you’re not alone. Thousands of owners across model years 1997–2023 report the same issue: a persistent “door ajar” warning even when all doors are closed. This isn’t just a dashboard annoyance. It leads to real problems like interior lights staying on, battery drain, false alarms, and an inability to lock doors while driving.
This guide cuts through the noise, using verified user reports, mechanic insights, and technical data to show you exactly how to diagnose and fix a faulty door sensor. You’ll learn where wires break, how to test the integrated switch, and whether to splice or replace. No fluff. Just actionable steps that work.
Decode the “Door Ajar” Warning
What the Dashboard Tells You
The “door ajar” message on your instrument cluster means the body control module (BCM) detects one or more doors as open. This triggers interior lights that stay on, horn honking or alarm activation, an inability to lock doors automatically, and FordPass app alerts showing “door opened.”
If the light appears only when driving over bumps, it’s likely an intermittent wire break. If it’s constant, the issue is probably a fully severed wire or failed latch switch.
Why It Matters Beyond Annoyance
A false “door ajar” signal isn’t just distracting. It’s dangerous. A 2013 owner reported a dead battery after just 12 hours due to unremitting courtesy lights. Others cannot lock doors while driving, creating safety risks. Cold mornings worsen the problem, with thermal contraction exposing weak connections.
Pro Tip: Use the FordPass app to remotely check door status. If it shows a door open when you know it’s closed, you’ve confirmed a sensor fault.
Locate the Faulty Door Fast
Isolate the Problem Door
Start by closing all doors firmly and watching the dashboard. Then open and close each door one at a time. Watch for the “door ajar” message to clear or reappear. The last door to trigger the warning is likely the culprit.
Common offenders include the left rear door (most frequent), the driver’s door (high use), and the passenger rear door in SuperCrew models.
User Insight: One 2020 F-150 owner found the driver’s side triggered alarms in cold weather, exactly when reliability matters most.
Use Live Data to Confirm
For accurate diagnosis, use an OBD-II scanner that reads BCM data (e.g., Autel, Forscan). Access the “Body” or “Convenience” menu and monitor door ajar switch status in real time.
If the left rear door shows “open” when closed, you have a hard fault. Perform a wiggle test by moving the door harness at the jamb while watching live data. If the status flickers, you’ve found an intermittent break.
Mechanic Note: Live-data review showed the left rear door ajar switch reporting open despite a closed door. Cycling the lock didn’t clear it, indicating a hard fault.
Inspect the Wiring Harness
Why Door Wires Break
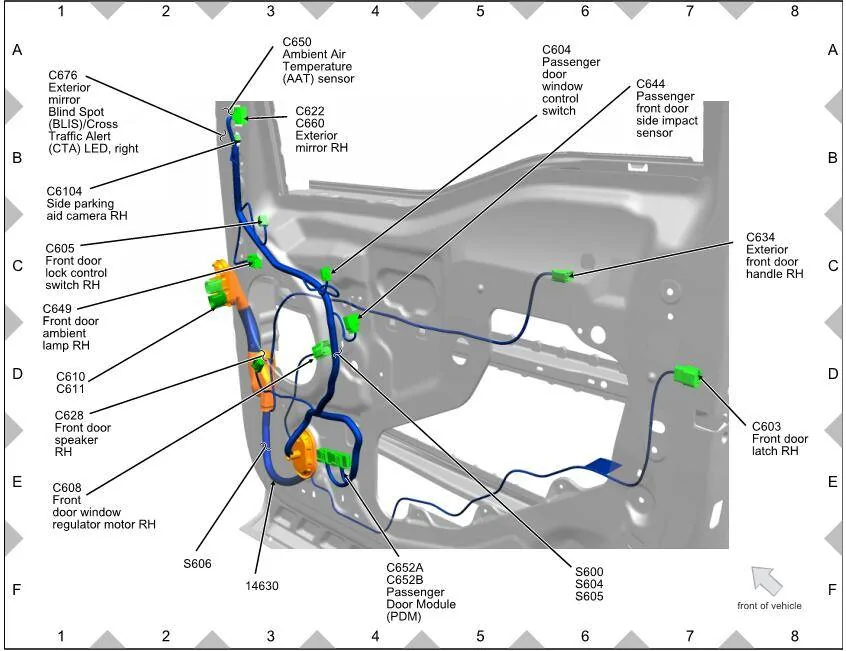
Every time a door opens, the wiring harness flexes inside the rubber boot. Over time, this motion causes wire fatigue and microfractures, insulation cracking, corrosion from moisture, and work-hardened copper strands.
The root cause is a rigid plastic guide tube inside the boot that forces the harness into a “V” bend instead of allowing accordion-style flexing. This design flaw is factory-installed and affects models from 2009 to 2023.
Find the Damage in 3 Steps
Remove the interior door panel first. Remove 3 screws (near handle, armrest, hinge). Use a plastic trim tool to release clips. Disconnect wiring for handle, speaker, and lock. Peel back the moisture barrier carefully.
Extract the harness from the rubber boot next. Gently pull the bundle from the door frame. Look for kinks, discoloration, or prior repairs.
Inspect each wire last. Check for severed conductors (common in ground wires). Look for cracked insulation exposing copper. Test continuity with a multimeter if unsure.
User Finding: One owner found 6 compromised wires: 1 broken, 3 cracked, 2 showing early fatigue.
Fix Broken Wires Permanently

Splice and Solder (DIY Reliable Fix)
If you’re handy, soldering is better than crimp connectors. Here’s how to do it.
Cut out the damaged section first. Strip insulation from both ends. Solder each wire using rosin-core solder. Cover with heat-shrink tubing. Secure with zip ties to reduce stress. Reinstall the rubber boot.
Why It Works: Soldered joints last longer if strain-relieved. Avoid sharp bends during reassembly.
Warning: Never use electrical tape alone. It fails under vibration.
Replace the Entire Harness (Best Long-Term)
For a permanent fix, install an OEM door wiring harness. The factory part includes proper strain relief, routing, and connectors.
The part number AL3Z-14631 is confirmed for 2014 F-150 and fits many 2009–2017 models. Cost is $80–$150 from Ford dealer, RockAuto, or Amazon.
Installation involves routing new harness through the door channel. Connect to door ajar switch, window regulator, lock actuator, and speaker. Reinstall panel with all clips snapped. Refit weather strip securely.
User Result: Installed a new factory-original harness. Left rear door now correctly reports as closed.
Diagnose the Door Latch Switch
Is the Switch Replaceable?
On 2010 and newer F-150s, the door ajar sensor is built into the latch assembly. It cannot be replaced alone. This means no external micro-switch exists. The entire latch must be replaced if faulty. Two connectors are present: one for lock, one for ajar signal.
Contradiction Alert: Some guides show an external switch (#1 on diagrams), but post-2010 models integrate it into the latch.
Test the Switch with a Jumper
To confirm the switch is bad, disconnect the 2-pin ajar switch connector at the latch. Use a paperclip or jumper wire to short the two terminals. Close the door.
If the “door ajar” warning disappears, the switch is faulty. If the warning stays, the issue is in the wiring or BCM.
Mechanic Tip: Jump the pins. If the message disappears, the switch is bad.
Replace the Door Latch Assembly
When to Choose This Fix
Replace the latch if the wiring harness is intact, lubrication only works temporarily, live data shows intermittent signal, or the jumper test clears the warning.
Step-by-Step Replacement
Remove the interior door panel first (as described earlier). Unbolt the latch from the door edge (3–4 bolts). Disconnect electrical connectors. Install new latch (OEM recommended). Reassemble and test.
Common Question: Which connector signals door open/closed? The smaller 2-pin connector typically handles the ajar signal, but check a wiring diagram.
Cost: $100–$200 for OEM latch, 60 minutes labor.
Try Lubrication (Quick Temporary Fix)
Spray and Cycle the Latch
For intermittent issues, especially in cold weather, open the door. Spray WD-40 into the latch mechanism. Follow with silicone or graphite lubricant. Open and close the door firmly 10–20 times.
User Success: Sprayed WD-40, opened/closed 20 times, fixed for a week.
Why It Fails Long-Term: Lubrication only frees stuck parts. It won’t fix a broken wire or failed switch.
Pro Tip: Avoid oil-based sprays. They attract dirt. Use dry silicone or graphite for lasting protection.
Prevent Future Failures
Upgrade Your Seals and Connections
Replace cracked rubber boots immediately. Apply dielectric grease to all connectors. Ensure moisture barrier is resealed. Avoid over-tightening door panels.
Prevention Tip: Inspect harnesses every 3–5 years, especially on trucks with over 80,000 miles.
Monitor for Door Misalignment
A sagging door or worn hinge bushing can prevent full latch engagement. If slamming the door temporarily fixes the warning, check striker alignment, hinge pin wear, and door gap consistency.
User Note: Slammed the door hard. Error was gone a week later.
Repair Options Compared
| Repair Method | Time | Cost | Longevity | Skill Level |
|---|---|---|---|---|
| Lubricate Latch | 10 min | Under $10 | Days to weeks | Easy |
| Solder Wires | 45–60 min | $10–$20 | Months | Intermediate |
| OEM Harness | 60 min | $80–$150 | Years | Intermediate |
| Replace Latch | 60 min | $100–$200 | Years | Intermediate |
Battery Drain Risk: Unfixed, interior lights can kill a healthy battery in 12–48 hours.
Frequently Asked Questions About Ford F-150 Door Sensor Issues
Why does my Ford F-150 say “door ajar” when all doors are closed?
The body control module is receiving a false signal from a faulty door sensor. This is usually caused by broken wires in the door harness, a failed latch switch, or corrosion at the connector. The issue is mechanical or electrical, not software-related.
Can I drive with the door sensor warning on?
You can, but it’s not recommended. The persistent warning is distracting, and the interior lights will stay on, potentially draining your battery. Some owners also report issues with locking doors while driving.
How much does it cost to fix a door sensor on a Ford F-150?
Costs vary by repair type. Lubrication runs under $10 and takes 10 minutes. Soldering damaged wires costs $10–$20. An OEM harness replacement runs $80–$150. A new door latch assembly costs $100–$200.
Which door sensor fails most often on the F-150?
The left rear door is the most common culprit, followed by the driver’s door. These doors see the most use and have the most wiring flex cycles.
Does Ford offer a recall for this issue?
Ford has not issued a formal recall for door sensor failures. However, the problem is well-documented in owner forums and technical service bulletins. Check with your dealer if your truck is still under warranty.
Can I fix the door sensor myself at home?
Yes. Most DIYers can handle lubrication or harness inspection with basic tools. Soldering requires intermediate skills. Harness and latch replacement are straightforward for those comfortable with automotive repairs.
Key Takeaways for Fixing Your Ford F-150 Door Sensor
The Ford F-150 door sensor not working issue is rooted in a known design flaw involving the wiring harness at the door jamb. The rigid plastic guide tube forces wires into a sharp bend, causing fatigue and breakage over time. Focus your diagnosis on the wiring harness and integrated latch switch rather than software resets.
Start with lubrication for temporary relief if the problem is intermittent. For a lasting solution, invest in an OEM harness replacement (part AL3Z-14631) or a new door latch assembly. Use live data scanning with an OBD-II tool to confirm which door is faulty before disassembly.
With the right tools and this guide, you can fix it in under an hour and stop the battery drain for good. Inspect your door harnesses proactively if you own a 2009–2023 F-150 with over 80,000 miles.