If your F-150’s cup holder lights are not working, you are dealing with a frequent problem affecting 2017-2021 Lariat, Platinum, Limited, and Raptor trims. The issue typically begins subtly: lights illuminate briefly after startup, then shut off after 10-60 seconds, or stop working entirely. Other ambient lights like door panels or rear footwells may still function, making the problem appear random and frustrating.
This guide covers the diagnostic process, repair methods, and prevention strategies to restore your cup holder lighting. You will learn how to pull hidden trouble codes, clean corroded LED boards, and fix the issue often for under $10 in parts.
Check Ambient Lighting Settings
Before examining hardware, verify the simplest cause: your lighting settings. The F-150 ambient lighting can be disabled or set too dim through the instrument cluster, leading to apparent failures.
Access Lighting Controls
Press the MENU button on your steering wheel and navigate through the following options:
• Settings
• Vehicle Settings
• Ambient Light
Once there, confirm these settings:
• Ambient lighting is turned ON
• Brightness is set to MAX
• Color is selected if you have RGB lights
On 2021 and newer models, Ford updated BCM logic to automatically disable cup holder lights while driving to reduce distraction. If your lights turn off after a few seconds, this may be intentional behavior rather than a defect. Test with the vehicle off, doors open, and ignition in RUN mode.
Pro Tip: If other ambient zones like footwells and dash work normally but cup holders do not, the setting is not the issue. Proceed to diagnostic steps.
Perform BCM Reset
A temporary BCM glitch can cause lights to cut out unexpectedly. Resetting the module clears transient faults and may restore functionality without further intervention.
Reset Steps
- Turn off your vehicle and remove the key or fob
- Open the hood and disconnect the negative battery terminal
- Wait 5-10 minutes to fully discharge BCM memory
- Reconnect the terminal and tighten securely
- Wait 1-2 minutes for modules to reinitialize
- Test your ambient lighting
Note: This may restore lights temporarily, but if a short circuit exists in the LED assembly, the BCM will detect it again and shut down the circuit within seconds or minutes. A reset alone rarely fixes hardware faults.
Retrieve DTCs with ForScan

If lights remain off after a reset, pull Diagnostic Trouble Codes from the BCM using ForScan. These codes reveal whether a short to ground or LIN bus failure is present, guiding your repair path.
Tools Needed
Obtain these items before starting diagnostics:
• OBD2 adapter (ELM327-compatible, OBDLink EX recommended)
• ForScan software (forscan.org for Windows, App Store for iOS)
• Vehicle with stable battery voltage
Scan Procedure
Plug your OBD2 adapter into the diagnostic port and launch ForScan on your device. Select BCM (Body Control Module) from the vehicle menu and run a DTC scan. Look for these specific codes:
| Code | Meaning |
|---|---|
| B143B | Autolamp On Input — Circuit Short to Ground |
| B143C | Headlamp Off Input — Circuit Short to Ground |
Both codes indicate a ground fault in the ambient lighting circuit, commonly triggered by a shorted cup holder LED. If these codes appear, proceed to physical inspection of the LED assemblies. If no codes appear, check ground connections and wiring harness integrity.
Expert Insight: A Ford technician confirms that no fuse is involved in factory ambient lighting. The BCM, light switch, and sun load sensor all play a role in the system.
Inspect and Clean Cup Holder LEDs
Liquid-induced corrosion ranks as the number one cause of cup holder light failure. Coffee, soda, or water residue creates a conductive path that shorts the LED board, forcing the BCM to shut down the entire circuit for protection.
Disassembly Steps
- Disconnect the battery first for safety
- Fully open the center console storage
- Use a plastic trim tool to gently pry up the cup holder surround
- Remove the cup holder inserts (they snap out easily)
- Locate the LED rings beneath (usually glued or clipped in place)
- Disconnect the wiring harness from the LED board
Warning: Do not force connectors. If stuck, wiggle gently side-to-side to avoid breaking plastic tabs.
Clean Corroded Boards
Mix baking soda and water into a paste and apply with a cotton swab to corroded areas. This neutralizes acidic drink residue effectively. Scrub gently with a soft brush, then wipe clean with 90%+ isopropyl alcohol to remove moisture and remaining residue. Let the board dry completely for at least one hour before reconnecting and reassembling.
Real Success: A 2017 F-150 owner cleaned corroded LED boards and restored cup holder, footwell, and dash lighting completely. No parts were replaced. Total repair time was 1.5 hours.
Pro Tip: If one cup holder shows corrosion, clean both units. Residue often spreads to the adjacent assembly.
Check Fuses (Aftermarket Kits Only)
Factory ambient lights have no fuse because power is controlled by the BCM’s internal FET. However, aftermarket lighting kits like those from F-150 LEDs often tap into a 10-amp accessory fuse, introducing a potential failure point.
Locate Fuses
Check these locations for aftermarket fuse installations:
• Passenger-side trim panel (right of glovebox): Look for a small circular fuse holder
• Interior fuse box (driver side): Check fuse #39 or #43 (10-amp Mini Blade, labeled “AUX Power Point” or “Cigar Lighter”)
• Under-hood fuse box: Some kits tap into battery-fed circuits
Inspect for Failure
Examine each fuse carefully for these signs:
• Burn marks on the plastic housing
• Gapped metal strip (interrupted circuit)
• Melted ends (“balling” from heat overload)
Replace any failed fuse with an exact 10-amp ATO or Mini blade fuse. If the main 10-amp fuse is blown, simply replacing the small console fuse will not restore function. Replace both fuses to ensure complete circuit integrity.
User Experience: One owner lost cup holder lights, dash lighting, and power windows simultaneously. The root cause was a blown 10-amp fuse from an overloaded aftermarket kit.
Secure Wiring and Grounds
Loose wiring or poor grounding can mimic a failed LED or create intermittent BCM issues. Thorough inspection prevents repeat failures after repair.
Inspect Ground Connection
Find the chassis ground bolt near your center console, often hidden under trim panels. Check for these problems:
• Looseness (bolt can spin freely)
• Corrosion (white or green buildup)
• Paint or debris blocking metal-to-metal contact
Clean with a wire brush and re-tighten to manufacturer specifications.
Check Wiring Integrity
Trace wires from your fuse panel (aftermarket) or BCM harness. Look for these issues:
• Pinched or frayed insulation
• Loose connectors (shake test)
• Heat damage (melted or discolored plastic)
Use a multimeter to test continuity if you have one available.
Aftermarket Tip: Tape connectors and use heat-shrink tubing on splices to prevent vibration damage from loosening connections over time.
Replace Failed Components
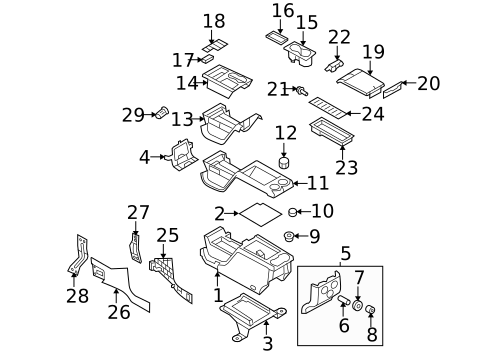
If cleaning and fuse replacement fail, replace the hardware directly. This ensures reliable long-term operation without反复 troubleshooting.
Cup Holder Assembly
• Part Number: HC3Z-14A318-E
• Fits: Lariat, Platinum, Limited trims (2017-2021)
• Includes: LED ring and housing as a complete assembly
• Cost: $80-$150 from dealership or online retailers
Contact Ford parts specialists for better pricing and availability on obscure components.
Aftermarket LED Kits
Reputable suppliers like F-150 LEDs offer strong customer support:
• 1-year warranty coverage
• Free replacement fuse and holder
• Up to two full kit replacements if needed
Retain your receipt and contact the manufacturer before attempting DIY repairs. They often provide troubleshooting assistance that can save you from unnecessary part purchases.
Prevent Future Failures
Ambient lighting failures are largely preventable with simple habits and regular maintenance.
Avoid Spills
• Do not place open drinks directly over LED rings
• Use spill-proof lids on all beverages
• Clean spills immediately, even small amounts
Reinforce Aftermarket Installs
Replace weak adhesive tape with Gorilla Glue or epoxy for secure mounting. Add duct tape over glued sections for additional mechanical hold. Secure all wires with zip ties and avoid pinch points where wiring bends sharply.
Maintenance Routine
Every three months, perform these checks:
• Remove cup holder inserts and inspect for residue or moisture
• Wipe exposed surfaces with isopropyl alcohol
• Check that all connectors remain securely seated
• Keep spare 10-amp fuses in your glovebox for emergencies
Frequently Asked Questions About F-150 Cup Holder Lights
Why do my cup holder lights turn off after a few seconds?
This behavior is normal on 2021 and newer F-150 models with updated BCM logic. Ford programmed the system to disable cup holder lights while driving to reduce distraction. Test with the ignition in RUN and doors open to verify proper function.
Can I fix cup holder lights without special tools?
Yes. Many failures stem from liquid corrosion on LED boards. Cleaning with baking soda paste and isopropyl alcohol resolves the issue in most cases. Fuse replacement for aftermarket kits also requires no special tools.
Why are my other ambient lights working but cup holders are not?
This indicates a localized problem in the cup holder LED assembly rather than a system-wide BCM issue. The daisy-chained LIN bus design allows one failed component to affect specific zones while others remain functional.
Do factory F-150 cup holder lights have a fuse?
No. Factory ambient lighting uses BCM-controlled FET switching rather than traditional fuses. Only aftermarket installations introduce fuse dependencies. Check your fuse box only if you added an aftermarket kit.
How much does professional repair cost?
Dealership labor for this repair runs approximately $400 or more. DIY cleaning costs under $10 in supplies. Replacement parts (LED assembly) run $80-$150 if cleaning does not resolve the issue.
Will disconnecting my battery reset the BCM permanently?
No. Disconnecting the battery for 5-10 minutes clears temporary faults, but if a hardware short exists (corroded LED), the BCM will detect it again and shut down the circuit. You must repair the underlying issue for a permanent fix.
Key Takeaways for Fixing F-150 Cup Holder Lights
F-150 cup holder light failures typically stem from liquid contamination causing corrosion on LED circuit boards. The factory system uses BCM-controlled FET switching rather than fuses, meaning standard fuse checks will not help. Using ForScan to pull DTC codes B143B or B143C confirms a short-to-ground fault requiring physical repair.
Cleaning LED boards with baking soda paste and isopropyl alcohol resolves the majority of failures at minimal cost. Aftermarket kit owners should check both primary and secondary 10-amp fuses as part of troubleshooting. With the right approach, you can restore full lighting for under $10 in supplies and avoid $400+ dealer labor charges.