

Your Ford F-150’s overdrive isn’t engaging. You’re stuck at high RPMs on the highway, burning extra fuel and straining the engine. The “O/D OFF” light won’t come on when pressed, or it blinks like a warning signal. No Check Engine Light appears, but something’s clearly wrong. You’re not alone: overdrive failure ranks among the most common transmission complaints in F-150s from 1992 to 2008. The good news? Most causes are diagnosable and fixable without a full transmission rebuild, if you know where to look.
This guide cuts through the confusion. We’ll walk you step-by-step through the real-world root causes: blown fuses, broken wires in the steering column, failed servo components, and more. You’ll learn how to test each system, interpret blinking lights and hidden codes, and make repairs that last. Whether you’re dealing with a 1992 E4OD or a 2008 4R75E transmission, this is your complete roadmap to restoring smooth highway cruising.
Decode the O/D Light Behavior
The overdrive light on your shifter isn’t just an indicator. It’s your transmission’s built-in warning system. Understanding what it tells you saves diagnosis time and points you directly to the problem.
Blinking O/D Light Meaning
A blinking overdrive light isn’t a glitch. It’s your transmission’s built-in warning system. Unlike the Check Engine Light, the O/D light speaks directly to transmission issues. When it blinks, the Transmission Control Module (TCM) has stored a diagnostic trouble code (DTC), even if no CEL appears.
Use an OBD2 scanner with live data capability to retrieve codes. The most telling is P1734: “No 4th Gear Achieved.” This code confirms that 1st through 3rd gears work, reverse functions, but overdrive fails, pointing squarely to internal mechanical failure in 4R70E/4R75E transmissions.
No Light When Pressing O/D Button
If the O/D light doesn’t illuminate at all when pressed, the problem is likely electrical. Start with fuse checks before tearing into the column. A dead circuit can mimic switch failure.
Check the Overdrive Fuse First
Blown fuses are the easiest and most overlooked cause of overdrive failure. Two key circuits control the O/D system depending on model year.
Locate and Test Critical Fuses
Blown fuses are the easiest and most overlooked cause of overdrive failure. Two key circuits control the O/D system depending on model year:
2003–2004 F-150: Check fuse #29 (5A) in the under-dash panel (driver’s side knee bolster).
1999–2008 models: Inspect fuse #19 or #42 (10A) in the dash fuse box.
These fuses protect not just the overdrive switch, but also the instrument cluster, autolamp module, seat-belt chime, and central security system.
Cross-System Function Test
If your autolamp headlights, dashboard indicators, or seat-belt warning chime aren’t working, fuse #29 is likely blown, especially in 2003–2004 trucks. That’s a strong clue the overdrive circuit is down due to a shared power source.
Pull the fuse and inspect for a broken filament. Test with a multimeter for continuity. Replace only with the correct amperage. Never jump to a higher rating.
Pro Tip: Use a spare 5A fuse from a non-critical circuit (like power mirrors, fuse #4) for a quick test. If overdrive returns, you’ve found the issue.
Inspect Steering Column Wiring
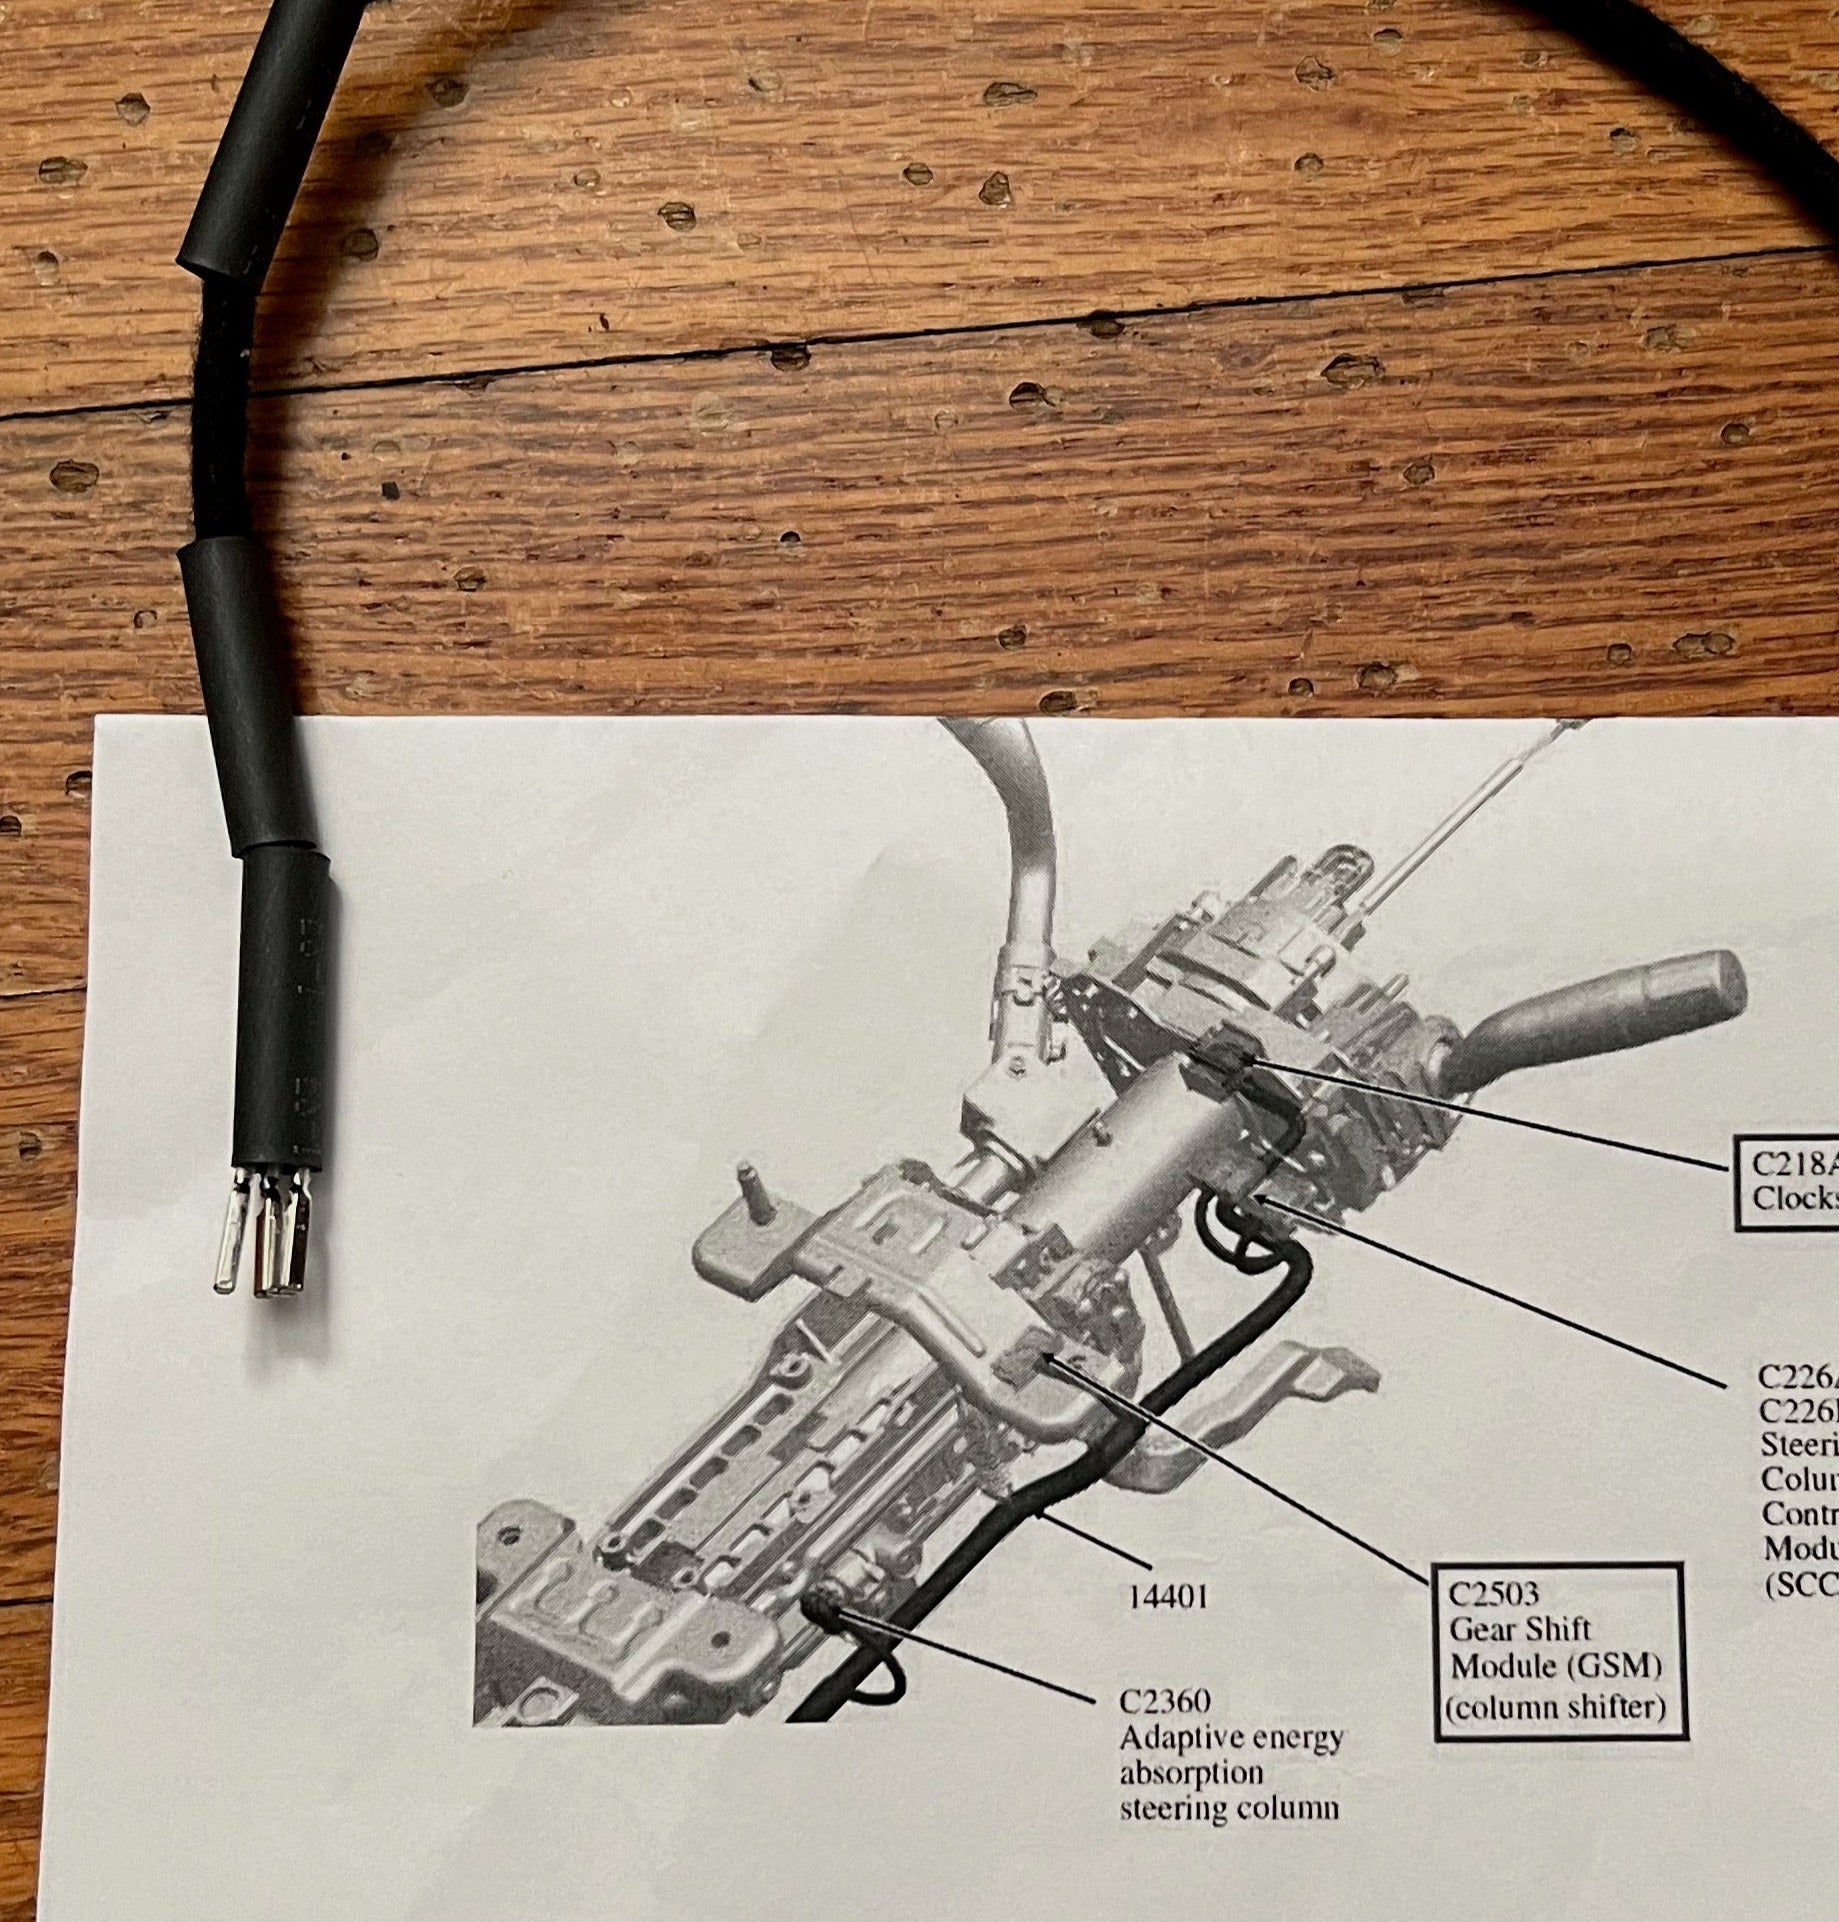
In 1999–2007 F-150s, the shift lever harness inside the steering column is a known failure point. Thin-gauge wires flex every time you move the gear selector. Over years, they fatigue, break internally, or chafe against metal edges, especially at the rubber boot near the lower column.
Why Wires Fail in the Column
In 1999–2007 F-150s, the shift lever harness inside the steering column is a known failure point. Thin-gauge wires flex every time you move the gear selector. Over years, they fatigue, break internally, or chafe against metal edges, especially at the rubber boot near the lower column.
The result is intermittent or complete loss of overdrive function. You might notice it works in Park or Reverse but fails in Drive, because the wire strain changes with shifter position.
Disassemble to Reveal Damage
You need these tools:
- Phillips screwdriver
- 7mm and 8mm sockets
- Adjustable wrench
- Flashlight
- Small ball-release tool (optional)
Follow these steps:
- Remove lower dashboard panel. Unscrew four 7mm/8mm fasteners around the knee bolster. Shift out of Park to free the panel.
- Loosen tilt column bolt and remove shroud screws.
- Turn key to ON, press tumbler release, and pull out ignition switch.
- Pull back rubber boot at base of shift tube.
Look for flattened insulation, exposed copper, or prior tape repairs. Focus on wires exiting the shifter handle, the highest-stress zone.
Repair or Replace the Shifter Harness
Splice and Seal Broken Wires
If conductors are broken but space allows, splice in a jumper wire:
- Cut out damaged section.
- Solder connections (not just crimp).
- Seal with heat-shrink tubing.
Then wrap the entire repair with 3M Temflex Friction Tape (Part #1755). It’s more durable than electrical tape and resists abrasion. Two layers minimum.
Expert Note: Avoid sharp bends when re-routing. Secure the harness with zip-ties to reduce future strain.
Replace Entire Shift Lever Assembly
If wires are frayed beyond repair, replace the whole shifter handle. Pre-wired assemblies cost about $68 and eliminate guesswork.
Installation tips:
- Tilt steering wheel down for access.
- Release retaining pin with a slim screwdriver.
- Slide new harness through lever before mounting.
- Ensure splines engage fully and spacer behind clip is oriented correctly.
- Reconnect electrical plug. Wiggle until it clicks.
Save the push-clip from the old connector. It’s reusable.
Diagnose Internal Transmission Failures
If the O/D light turns on and fuses are good, but overdrive still won’t engage, the problem is likely inside the transmission. Common culprits include:
- Failed overdrive servo diaphragm
- Broken snap ring
- Clogged regulator valve
- Worn check balls
These issues prevent hydraulic pressure from applying the overdrive clutch, even if the TCM sends the correct signal.
Inspect the Overdrive Servo Diaphragm
The rubber servo diaphragm controls hydraulic pressure for overdrive engagement. In 2004–2008 F-150s with the 5.4L 4×4 Triton engine, this part commonly cracks or tears, leading to gradual or complete loss of overdrive.
Failure in 5.4L Triton Engines (2004–2008)
The rubber servo diaphragm controls hydraulic pressure for overdrive engagement. In 2004–2008 F-150s with the 5.4L 4×4 Triton engine, this part commonly cracks or tears, leading to gradual or complete loss of overdrive.
How to check:
- Drain transmission fluid.
- Remove pan.
- Locate diaphragm near valve body.
- Inspect for cracks, soft spots, or deformation.
Replace it as part of a filter kit. While you’re there, clean the pan and replace the filter with an OEM-spec unit.
Find a Broken Snap Ring
A thick steel snap ring holds the overdrive servo in place. Over time, its ears crack, and fragments fall into the valve body, jamming the overdrive servo regulator valve. This blocks pressure, disengages the overdrive band, and causes 4th gear to neutralize.
Snap Ring Failure in 4R70E/4R75E Transmissions
A thick steel snap ring holds the overdrive servo in place. Over time, its ears crack, and fragments fall into the valve body, jamming the overdrive servo regulator valve. This blocks pressure, disengages the overdrive band, and causes 4th gear to neutralize.
Diagnosis clues:
- P1734 code present
- Metal shavings in fluid
- 1st through 3rd gears work, reverse fine, but no overdrive
Inspection steps:
- Remove valve body (8mm detent spring bolt first).
- Lower carefully. Fluid will pour out.
- Look for missing or cracked snap ring.
- Check regulator valve movement. Must slide freely.
Replace the snap ring with a new, high-quality version. Use snap-ring pliers to ensure full, even seating.
Clean Valve Body and Replace Check Balls
Debris from a broken snap ring or worn components can lodge in fluid passages. Clean thoroughly.
Critical cleaning steps:
- Use rags and flashlight.
- Focus on regulator valve area and check-ball seats.
- Remove all 8 check balls. Inspect for cracks, wear, size variation.
- Replace all as a set. Never reuse old ones.
- Ensure wells are clean and unobstructed.
Reassemble Valve Body Correctly
Rebuilding the valve body requires precision. Follow these steps:
- Install overdrive band through case port. Hold in place.
- Seat new servo using a wide, curved tool.
- Use a spring compressor (e.g., OTC 307251) to compress spring for full engagement.
- Install new snap ring. Must snap securely all the way around.
- Reinstall valve body. Align manual valve with shift shaft splines. Hand-tighten bolts in criss-cross pattern. Torque to 89 in-lb.
- Reconnect molded lead frame. Ensure all electrical connectors click.
Refill and Test Transmission
Use Correct Fluid and Procedure
Use Mercon V or Mercon LV only. Never substitute.
Initial fill procedure:
- Add 6 quarts.
- Start engine, idle in Park.
- Shift through all gears, return to Park.
- Recheck level with engine hot and A/C off.
- Add in small increments to reach Hot mark.
Road test:
- Drive at 55–65 mph under light throttle.
- Watch for RPM drop, indicator of overdrive engagement.
- Monitor for smooth shifts and no warning lights.
Prevent Future Overdrive Failures
Regular maintenance keeps your overdrive working longer. Follow these tips:
- Inspect column wiring every 100,000 miles, especially during dash work.
- Avoid excessive wiggling of the shifter. It accelerates wire fatigue.
- Use dielectric grease on switch contacts during reassembly.
- Change fluid every 30,000–60,000 miles. Use only Mercon V or LV.
- Keep spare 5A and 10A fuses in the glove box.
- Address blinking O/D light immediately. Don’t ignore it.
When to Scan for Codes
Even without a Check Engine Light, scan for pending or stored DTCs. Focus on:
- P1734: “No 4th Gear Achieved.” Confirms mechanical overdrive failure.
- Live data: Check VSS accuracy, TPS voltage, gear ratio.
Clear codes after repair and retest.
Frequently Asked Questions About F150 Overdrive Not Working
What causes overdrive to stop working on an F-150?
The most common causes include blown fuses (fuse #29 in 2003–2004 models or #19/#42 in 1999–2008), broken wires in the steering column shift lever, failed overdrive servo diaphragm, and broken snap rings in the transmission valve body. Electrical issues are more common in 1999–2007 models, while mechanical failures dominate in 2004–2008 trucks with 5.4L engines.
Why does my O/D light blink but no Check Engine Light comes on?
A blinking O/D light is the transmission’s own warning system. It indicates the TCM has stored a diagnostic trouble code specifically for transmission faults. Use an OBD2 scanner to retrieve the code. P1734 (“No 4th Gear Achieved”) is the most common code associated with overdrive failure in 4R70E and 4R75E transmissions.
Can I drive my F-150 with overdrive not working?
You can drive short distances, but it’s not recommended for extended periods. Without overdrive, your engine runs at higher RPMs on the highway, burning more fuel and increasing engine wear. Avoid sustained speeds above 60 mph if overdrive is inoperative.
How much does it cost to fix F-150 overdrive issues?
Costs vary widely. A blown fuse costs under $5. Steering column wire repair runs $20–$70 in parts. A complete shifter lever assembly runs about $68. Internal transmission repairs (servo, snap ring, check balls) can run $200–$500 depending on whether you DIY or hire a shop.
Is overdrive failure related to transmission fluid?
Yes. Worn or contaminated fluid can cause shifting problems, including overdrive engagement issues. However, low fluid typically affects all gears, not just overdrive. Use Mercon V or Mercon LV as specified. Change fluid every 30,000–60,000 miles.
Key Takeaways for Fixing Your F-150 Overdrive
F150 overdrive not working is rarely a mystery. Start with the simplest fixes first. Check fuses #29, #19, or #42 depending on your model year. Verify other dash functions (autolamp, seat-belt chime) work, because they share circuits with the overdrive switch.
If fuses are good, move to the steering column. Broken wires in the shift lever harness are the number one cause in 1999–2007 trucks. Repair with solder and 3M Temflex tape, or replace the entire shifter assembly.
When electrical checks pass, the problem is mechanical. In 2004–2008 trucks with 5.4L engines, suspect failed servo diaphragm or broken snap ring. Pull the transmission pan, inspect the valve body, and replace the servo, snap ring, and all check balls as a set.
Address these issues promptly. High RPM driving without overdrive wastes fuel and strains your engine. With this guide, you can diagnose and fix most overdrive problems yourself, saving hundreds in shop fees.


