

A dim or dead marker light on your Ford F-350 reduces your truck’s visibility and invites safety risks on the highway. You might be driving with a blind spot that other drivers cannot see, especially during night shifts or heavy rain.
This guide explains exactly how to replace marker light on F350 models from 1992 through 2024. You will learn specific bulb types, access methods for your generation, and how to upgrade to bright LEDs without damaging your truck.
Identify Your F-350 Generation and Access Point

Your first step is matching your truck’s year to the correct replacement method. Ford changed the mounting location and bulb type significantly across different generations of the Super Duty and OBS lines.
1992–1996 OBS Front Side Markers
These older models feature clear lenses mounted directly on the outer edges of the headlight assemblies. You can often swap the bulb through an inner fender access panel without removing the headlight. If the panel is missing, you must remove the entire headlight assembly to reach the 194 or 168 bulb.
1999–2016 Super Duty Fender Markers
This generation moves the light to the fender side panel, a design common on dually trucks with front amber and rear red markers. Access requires peeling back the plastic fender liner inside the wheel well. These units typically use a 2825 incandescent bulb housed in a bracketed system.
2011+ Models with Integrated Grills
Newer designs hide the side marker socket behind the main headlight assembly. Reaching this bulb often requires partial removal of the front grill and loosening the headlight housing. This applies to many 2011 and newer Super Duties using dual-function W5W or T10 base bulbs.
2017+ Gas Models and LED Upgrades
Recent gas-powered Super Duties allow direct access on the driver side but require air dam removal on the passenger side. These trucks are prime candidates for upgrading to MK2 LED bulbs which offer a deeper amber color and longer life than stock yellow bulbs.
Perform Non-Invasive Bulb Swap on OBS Models
Owners of 1992–1996 trucks should attempt the quick access method before resorting to full disassembly. This saves time and keeps your headlight alignment intact.
Locate and Open Inner Fender Panel
Stand by the front wheel with your door fully open to expose the inner fender area. Look for a small plastic or metal access panel near the wheel well liner. Use a flathead screwdriver to gently pry off the panel or unscrew the fasteners holding it in place.
Extract and Replace the Bulb
Reach through the opening to find the marker bulb socket. Rotate the socket counterclockwise to release it from the housing. Pull out the old 194 or 168 bulb and push the new one firmly into place.
- Do not touch the glass of the new bulb with bare hands.
- Turn the socket clockwise to lock it back into the housing.
- Reattach the access panel securely.
Pro Tip: Turn on your parking lights before closing the panel to verify the new bulb works immediately.
Remove Headlight Assembly for Full Unit Replacement
If your access panel is damaged or you need to replace the entire lens housing, you must remove the headlight assembly. This method ensures you can reach the 11 mm bolts securing the marker.
Unbolt Headlight and Trim Panels
Open the hood and stand between the battery and the headlight. Remove the two 10 mm nuts securing the back of the headlight assembly. Next, remove the two Phillips screws located at the top edge of the headlight trim panel.
Disconnect Wiring and Extract Marker
Reach behind the assembly to find the side marker connector and rotate it counterclockwise to disconnect. Locate the two 11 mm bolts holding the side marker to the trim and remove them.
- Pull the side marker unit straight out carefully.
- Install the new unit and secure it with the 11 mm bolts.
- Reconnect the electrical connector by turning it clockwise until it clicks.
- Reinstall the trim panel and headlight assembly in reverse order.
Warning: Do not overtighten the 11 mm bolts as the plastic housing can crack easily under pressure.
Replace Fender Marker Lights on Super Duty Trucks

For 1999–2016 models, the process involves working inside the wheel well to access the fender-mounted light. This is common for dually owners needing to fix front amber or rear red markers.
Peel Back Fender Liner for Access
Remove the two Phillips screws from the back side of the fender liner. Use a flat tool to release the push clip near the front of the tire. Gently pull the liner outward to create a working gap large enough for your hand.
Disengage Bracket and Remove Unit
The light sits in a metal bracket with a large front notch and a smaller rear tab. Push the light unit toward the rear of the truck to disengage it from the bracket. Rotate the housing to unplug the wiring harness and remove the unit completely.
Install New Bulb or LED Unit
Pull the old 2825 bulb straight out if only replacing the filament. For a full upgrade, ensure your new LED unit has the correct color sticker (amber for front, red for rear).
- Check that the rubber O-ring is seated properly on the housing.
- Insert the smaller notch of the light into the rear tab of the bracket.
- Slide the unit forward until it clicks securely into place.
- Reconnect the wiring harness and test the light.
Fix for LED Not Lighting: If your new LED does not work, unplug the connector, rotate it 180 degrees, and reconnect to fix polarity issues.
Access Marker Lights Through Grill Removal
Owners of 2011 and newer models may need to remove the front grill to reach dual-function marker and turn signal bulbs. This requires care to avoid damaging cooling components.
Remove Front Grill and Headlight Bolts
Locate and remove four 10 mm bolts securing the grill at the top corners and mid-bottom. Depress the push-tabs along the bottom edge and gently pull the grill forward. Remove the top and side 10 mm bolts holding the headlight assembly.
Loosen Rear Bolt and Pull Assembly
Loosen the rear slotted bolt without removing it completely. If this bolt is hard to reach, thread a piece of wire or a coat hanger through it to guide it into your socket. Pull the headlight straight out, ensuring the alignment pin clears the frame.
Swap Dual-Function Bulb
Identify the socket for the marker light, often a W5W or T10 base. Twist the socket counterclockwise to release it.
- Remove the old bulb and insert the new LED or incandescent replacement.
- Use a low-speed drill with a screwdriver bit to gently press the bulb in if needed.
- Reinstall the headlight and use masking tape to hold it flush while tightening bolts.
Final Check: Verify both marker and turn signal functions work before reattaching the grill push-tabs.
Upgrade to LED on 2017 and Newer Models
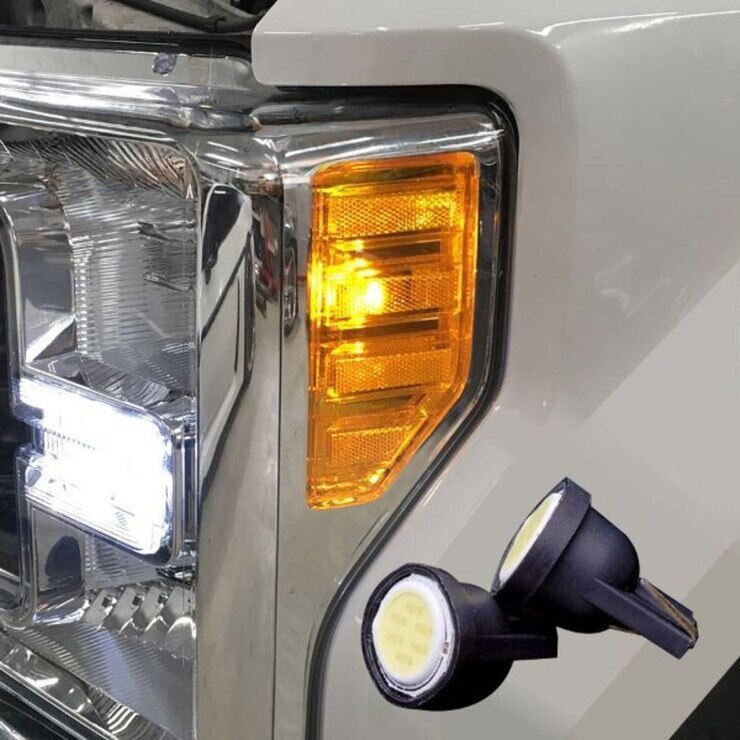
Upgrading to LEDs on modern gas Super Duties provides a sharp deep amber glow that stock yellow bulbs cannot match. The process differs slightly between the driver and passenger sides.
Driver Side Direct Access
Locate the marker socket behind the headlight assembly. Turn the socket counterclockwise to release it. Allow the old bulb to cool if the lights were recently on. Remove the stock 2825 bulb and insert your new MK2 LED.
Passenger Side Air Dam Removal
The passenger side requires removing the front push-in tab on the air dam. Depress the side tabs and lift the air dam upward to access the socket. Follow the same bulb swap steps as the driver side.
- Re-engage the air dam and secure the push tab firmly.
- Test the lights to ensure a consistent amber glow on both sides.
- Flip the LED 180 degrees in the socket if it fails to illuminate.
Troubleshoot Common Marker Light Issues
Even with careful installation, you may encounter issues like non-lighting LEDs or moisture buildup. These problems usually have simple fixes.
LED Polarity and Non-Illumination
LEDs are directional and only work when current flows one way. If your light fails to turn on, the polarity is likely reversed. Unplug the connector or remove the bulb, rotate it 180 degrees, and reconnect.
Moisture Intrusion in Housing
Water inside the housing indicates a failed seal. This often happens if the rubber O-ring was not seated correctly during installation. Remove the unit, inspect the ring for cracks, and ensure it sits flush before clicking the light back into the bracket.
Headlight Misalignment
If your headlight sits crooked after reassembly, the alignment pin may not be engaged. Loosen the bolts, use masking tape to hold the unit flush with the fender, and retighten.
Use Correct Tools and Parts for Success
Having the right equipment prevents damage to your truck’s plastic components and ensures a secure fit.
Essential Tool List
- 10 mm socket and ratchet for grill and headlight bolts.
- 11 mm deep socket for 1992–1996 side marker bolts.
- Phillips screwdriver for fender liners and trim.
- Flathead screwdriver for push clips and prying.
- Masking tape for temporary headlight alignment.
Recommended Replacement Parts
- 194 or 168 bulb for 1992–1996 OBS models.
- 2825 bulb for 1999–2016 fender markers.
- W5W or T10 LED for 2011+ dual-function lights.
- MK2 LED for high-output upgrades on 2017+ models.
- Rubber O-ring to ensure watertight seals on fender units.
Prevent Future Marker Light Failures
Proper maintenance extends the life of your lighting system and keeps your F-350 compliant with safety laws.
Test Before Final Assembly
Always test your marker light with the ignition on before closing up panels. This saves you from repeating the entire disassembly process if a bulb is defective or polarity needs adjustment.
Protect Plastic and Seals
Never force a bulb into a socket as plastic housings crack easily. Inspect O-rings every six months on dually models to prevent moisture buildup. Ensure front markers remain amber and rear markers remain red to meet DOT regulations.
Frequently Asked Questions About F350 Marker Lights
What bulb size does a 1999–2016 F-350 fender marker use?
These models typically use a 2825 incandescent bulb. If you are upgrading to LED, ensure you select a replacement designed for fender applications with the correct bracket fitment.
Why is my new LED marker light not turning on?
LEDs have polarity, meaning they only work in one direction. Unplug the connector or remove the bulb, rotate it 180 degrees, and reconnect it to reverse the electrical flow.
Do I need to remove the grill to change a marker light on a 2015 F-350?
On many 2011+ models, the side marker is accessed behind the headlight, which often requires removing the front grill and loosening the headlight assembly. Check your specific access method based on the year.
How do I stop water from getting into my fender marker light?
Ensure the rubber O-ring is properly seated around the housing before clicking the unit into the bracket. A misaligned or dry O-ring is the most common cause of moisture intrusion.
Can I use red LED markers on the front of my F-350?
No, front marker lights must be amber or yellow to comply with vehicle lighting regulations. Red markers are legally required only for the rear side positions on dually models.
Key Takeaways for Replacing Your F350 Marker Light
Replacing a marker light on your F-350 is a manageable task that improves safety and visibility. Whether you are swapping a simple 194 bulb on an OBS model or upgrading to MK2 LEDs on a 2017 Super Duty, following the correct access method prevents damage to your truck.
Remember to test your lights before final reassembly and check polarity if using LEDs. With the right tools and a little patience, you can restore full function to your lighting system today.


