
A burnt-out or damaged tail light on your Ford F-150 compromises safety and risks a ticket. The good news is that replacing a tail light on any F-150 from 2004 to 2024 is a DIY job you can complete in under 45 minutes per side, without special tools or dealership visits. This guide covers every variation across model years, from halogen bulb swaps on older trucks to sealed LED assembly replacement on newer models, including critical details on BLIS radar modules and proper torque specifications.
You’ll learn exactly which bulbs fit your truck, how to avoid cracking plastic retainers, where to source parts at the best prices, and how to test everything when you’re done. Whether you’re changing just a bulb or swapping an entire cracked housing, these step-by-step instructions apply to all F-150 generations.
Tools Needed for F-150 Tail Light Replacement
Before starting, gather these essential tools to avoid mid-job interruptions. Most F-150 owners already have these items in their garage.
You will need an 8 mm socket with a 1/4-inch ratchet and extension bar. Some 2018-2020 models use 5/16-inch screws instead, which are nearly identical in size. A plastic trim tool is critical for releasing clips without scratching your truck’s paint. Keep gloves handy for handling halogen bulbs, as skin oils can cause premature failure. A flashlight or shop light improves visibility when working in tight spaces inside the bed.
Optional tools include a torque wrench set to 5-7 ft-lbs for precise reinstallation and penetrating oil for corroded bolts on older trucks.
Removing Mounting Bolts from Your F-150
Every F-150 taillight is secured by two mounting bolts located inside the cargo bed. Lower the tailgate fully before starting to access these fasteners clearly.
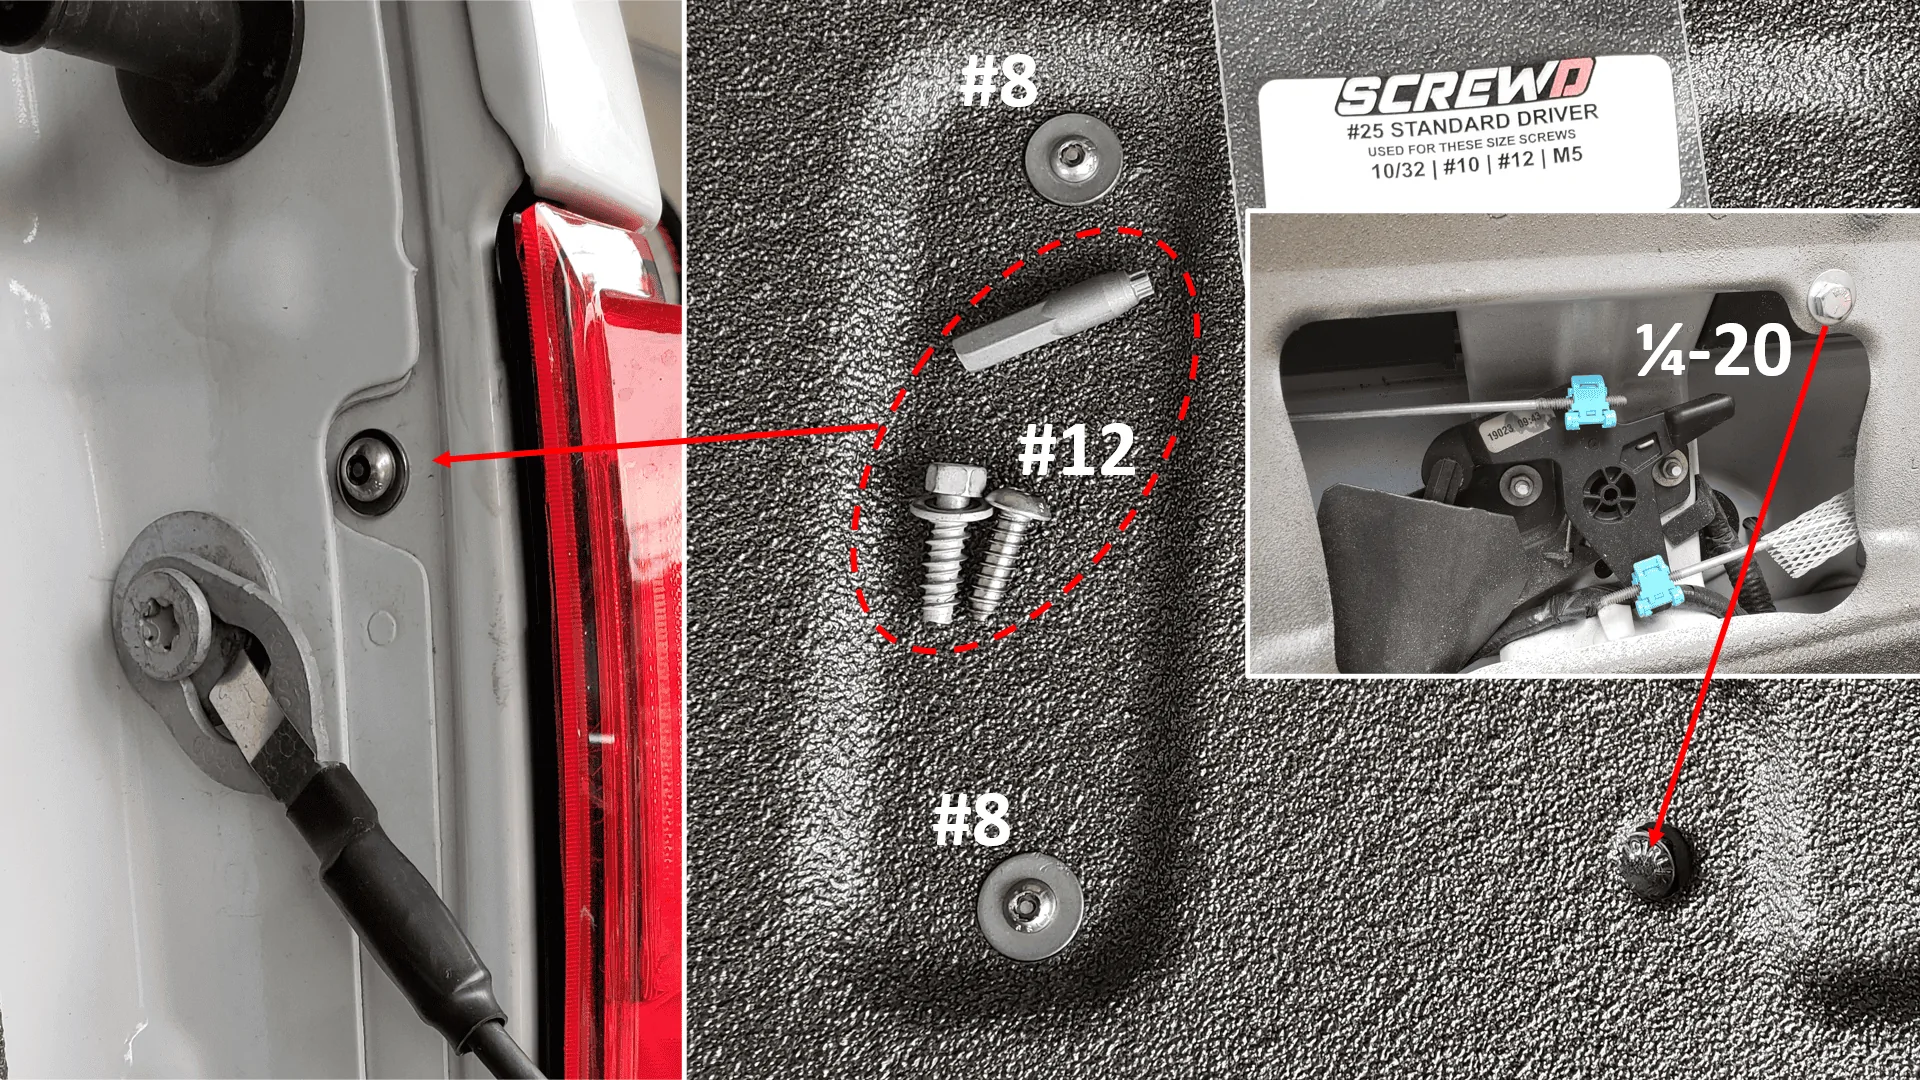
For 2004-2020 models, locate one bolt near the top of the housing and one near the bottom. Use an 8 mm socket with your ratchet and extension to remove both bolts completely. Set them aside safely, as you will reuse the original hardware. Some 2018-2020 variants use 5/16-inch screws instead, which fit the same socket.
For 2021 and newer models, return to 8 mm bolts in the same interior locations. If bolts show corrosion, apply penetrating oil and wait 5-10 minutes before attempting removal. Never force stuck bolts, as stripped threads complicate reinstallation and may require plastic retainer replacement.
Releasing the Taillight Assembly
After removing the bolts, the housing remains held by plastic clips, tabs, or pegs. The removal technique varies by model year, so follow the steps matching your truck.
For 2004-2008 F-150 models, grasp the housing firmly at top and bottom, then pull straight backward. Expect a loud pop as the clips release. Avoid twisting or prying upward, which can break mounting tabs.
For 2009-2014 models, insert a plastic trim tool at the top edge and gently pry outward to disengage clips. Support the housing as it releases to prevent dropping, then pull straight back once clips are free.
For 2015-2020 models, no prying is needed. Pull straight back firmly. Rigid push-in clips along the top, bottom, and rear edges will release with pressure. The housing may resist slightly, so wiggle gently while pulling.
For 2018-2020 models specifically, two plastic pegs at the rear connect to metal inserts in the body panel. The bottom peg usually releases easily, but the top peg often sticks to the insert and pulls out with the housing. If this happens, remove the insert from the old housing and reinstall it into the body panel before mounting the new light. Failure to reinstall causes rattling or misalignment.
Never use metal tools for this step. Plastic trim tools only to avoid paint scratches or broken clips.
Disconnecting the Electrical Connector
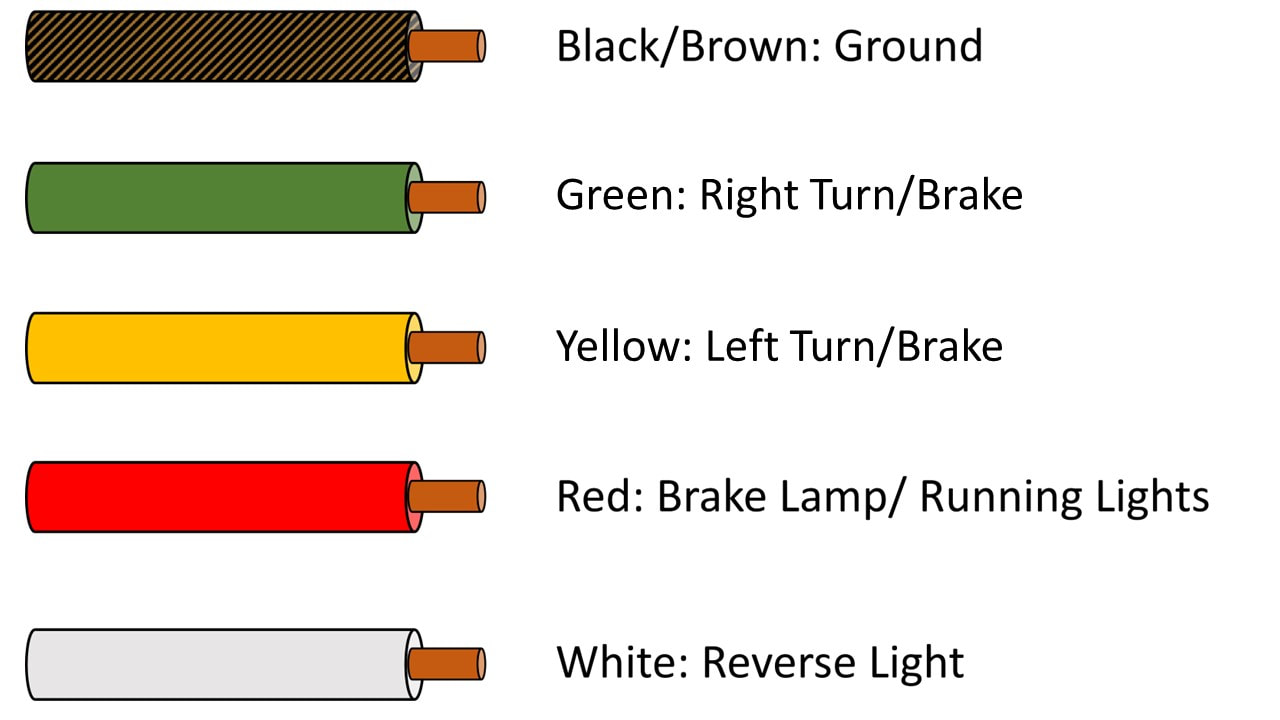
With the housing partially pulled out, reach behind and locate the gray wiring connector. This connector supplies power to all tail light functions.
Press the side release tab or squeeze the locking clip, then pull the connector straight out. Do not yank at an angle, as this can bend pins or damage the harness. On 2009-2014 models, you may need to unplug the connector after removing the housing entirely to access lower bulbs.
Inspect the connector carefully before reconnecting. Look for moisture, corrosion, or bent pins. Clean with electrical contact cleaner if needed, then dry thoroughly. On 2021 and newer trucks with Blind Spot Monitoring, a second connector for the BLIS radar module may be present. Handle this secondary connector with extra care.
Replacing Bulbs on 2004-2020 F-150 Models
If you are only replacing a bulb rather than the entire housing, follow these steps for halogen-equipped trucks. Note that 2021 and newer models use sealed LED units with no individual bulb replacement possible.
Identify the correct bulb type for your model year. The tail and brake light function uses a 3157 bulb for 2004-2014 models and a 3157K vibration-resistant bulb for 2015-2020 models. The turn signal shares the same dual-filament bulb. The reverse light uses a 7440 for 2004-2014 and a 3156 for 2015-2020.
To remove sockets, locate them on the back of the housing. Each socket has an arrow marked lock. Rotate the socket counterclockwise about one-quarter turn to unlock, then pull straight out. Remove the old bulb by wiggling gently from the base. Insert the new bulb without touching the glass, as skin oils cause hot spots and premature failure. Use gloves or a clean cloth. Reinsert the socket and rotate clockwise until it clicks into place.
On 2009-2014 models, the lower socket may be blocked by a tab. Unplug the wiring connector first to gain access.
Consider LED upgrade options for longer life and faster response. Some LED bulbs require additional resistors to prevent hyper-flashing or dashboard warnings.
Installing the New Taillight Assembly
If replacing the entire housing, prepare the new unit before mounting. Confirm that your replacement matches your model year, trim level, and BLIS compatibility status.
Pre-installation checks include transferring the BLIS module from the old housing to the new one on equipped trucks. Verify the gasket or seal is intact to prevent moisture intrusion. Ensure bulbs are installed and locked if replacing a halogen model.
To mount, align plastic pegs or tabs with body openings. For 2018-2020 models, ensure metal inserts are seated in the body panel, especially the top one. Press the housing straight forward until all clips snap into place. You should feel distinct clicks indicating full engagement. Do not force the housing. Misalignment causes gaps, rattling, or water intrusion.
Reconnecting Wiring and Fastening Bolts
With the housing properly seated, reconnect the wiring. Align the gray harness and push straight in until the side tab clicks or locks. Gently tug to confirm security. On BLIS models, connect the secondary radar module connector if present.
Reinstall the two mounting bolts. Hand-start them first to prevent cross-threading. Tighten to 5-7 ft-lbs or snug hand-tight. Do not over-tighten, as plastic retainers strip easily. Label bolts if replacing both sides to avoid mix-ups.
Testing Your New F-150 Tail Lights
After installation, perform a complete lighting check to verify everything works correctly. Close the tailgate, turn the ignition to Run without starting the engine, and test each function.
Activate the parking lights to check tail lights. Press the brake pedal to verify brake lights. Shift into reverse to test reverse lights. Activate left and right turn signals to confirm proper operation.
During visual inspection, verify the housing sits flush with body panels with no gaps or warping. Light output should be even and the correct color with no flickering or dimness. Open and close the tailgate several times to ensure no interference with wiring or housing.
Common troubleshooting includes checking fuse number 23 or 35 in the interior fuse box if lights do not work. Inspect for corroded contacts or loose ground if flickering occurs. Recheck metal insert installation on 2018-2020 models if rattling is present. Replace the housing or repair the seal if moisture appears inside.
When to Replace the Entire Taillight Assembly
Sometimes bulb replacement is not enough. Full taillight replacement is required when the lens is cracked, shattered, or yellowed from UV exposure. Water has entered and caused internal corrosion. LEDs have failed on 2015 and newer models. Mounting pegs or clips are broken. The seal is compromised, leading to recurring fogging.
A common myth suggests you can replace just the lens cover. Reality is that F-150 taillights are sealed units with lens, reflectors, and housing fused together. Repairs with glue or tape are temporary at best. For a cracked lens, plan for full assembly replacement.
OEM vs Aftermarket F-150 Taillight Options
Your part source affects fit, cost, and long-term reliability. Consider these options based on your budget and priorities.
OEM Ford parts cost $300-$750 but offer perfect fit, BLIS-ready integration, and full warranty coverage. Aftermarket units from brands like TYC, Depo, or Anzo cost $100-$400 and are widely available, though fitment issues and shorter lifespan are possible. Used salvage yard parts cost $80-$250 and are genuine OEM at low cost, but carry risk of hidden damage and no warranty. Refurbished units cost $150-$350 and are tested for functionality but may have cosmetic flaws.
Recommended sources include RockAuto.com for competitive aftermarket and OEM pricing, Car-Part.com for nationwide salvage yard searches, eBay for used OEM assemblies often under $200, and TascaParts.com for authorized Ford dealer pricing.
One owner reported being quoted $750 at a dealership, found the same unit on eBay for $180, and saved over $500.
BLIS Module Transfer for 2021+ Models

Many 2021-2024 F-150s include Blind Spot Information System integrated into the taillight assembly. The BLIS module is removable and transferable to a new housing without reprogramming if moved intact.
To identify BLIS-equipped assemblies, look for a small black radar pod on the outer edge, additional wiring harness beyond standard lighting, or a darkened or tinted lens section. The module must be installed in a housing with a BLIS mount. A missing or faulty module triggers dashboard warnings.
Confirmed by users, swapping the BLIS module over requires no special tools or programming.
Frequently Asked Questions About F-150 Tail Light Replacement
How long does it take to replace a tail light on an F-150?
Most DIYers complete the job in 15-45 minutes per side, depending on whether you are changing just a bulb or replacing the entire assembly. Beginner mechanics should plan for closer to 45 minutes on their first attempt.
Do I need special tools to change my F-150 tail light?
No special tools are required. An 8 mm socket with ratchet, a plastic trim tool, and gloves cover most situations. A torque wrench is optional but recommended for proper fastener installation.
Can I replace just the bulb on my 2015-2020 F-150?
Yes, 2015-2020 models use replaceable halogen bulbs. Use 3157K bulbs for tail/brake/turn signals and 3156 for reverse lights. The 2021 and newer models use sealed LED assemblies requiring full housing replacement.
Will replacing my tail light trigger a check engine light?
No. Standard tail light replacement does not trigger check engine lights or require reprogramming. BLIS-equipped models may show warnings if the radar module is not transferred properly, but lighting changes do not affect the emissions system.
Do I need to reprogram the BLIS module after replacement?
No reprogramming is needed if you transfer the BLIS module intact from the old housing to the new one. The module functions immediately once connected to the vehicle’s existing system.
Key Takeaways for Changing Your F-150 Tail Light
Replacing a tail light on your Ford F-150 is a rewarding DIY repair that saves significant money compared to dealership service. The process requires only basic tools and careful attention to clip and bolt sequences. For 2004-2020 models, you can often get by with simple bulb replacement using the correct 3157 or 3156 types. For 2021 and newer LED models, budget for full assembly replacement with BLIS module transfer if equipped.
Source parts strategically to maximize value. Aftermarket units work well for non-BLIS trucks, while OEM or used genuine Ford parts ensure proper integration on complex models. Always test all lighting functions before finishing, including brake lights, turn signals, reverse lights, and tail lights. A thorough test prevents returns and ensures road safety.
Your next step is to identify your exact model year and trim level, then order the appropriate parts. With the right bulbs or assembly in hand, you can complete this repair in an afternoon and restore your F-150’s safety and appearance.


