
If your Ford F-150 has loose steering, uneven tire wear, or clunking noises when turning, a worn inner tie rod could be the culprit. Replacing it is a critical maintenance task that restores precise steering control and prevents rapid tire damage. This guide walks you through the complete inner tie rod replacement process for Ford F-150 models from 2004 to 2020, with exact steps, tools, torque specs, and alignment tips.
You will learn how to safely remove the old inner tie rod, count turns for accurate reassembly, install the new part correctly, and avoid common mistakes that lead to misalignment or boot damage. Most importantly, you will understand why a professional alignment is non-negotiable after this repair.
Lift and Secure the F-150 Safely

Before doing any work, ensure your F-150 is stable and secure. Safety comes first. Never rely on a jack alone.
Break Lug Nuts Before Lifting
Park on a level surface and apply the parking brake. Place wheel chocks behind the rear tires. Use a 21 mm socket to loosen the front lug nuts while the vehicle is still on the ground.
2004 to 2008 models may require removing the center cap first. All 2009 to 2020 models have five lug nuts per wheel. Never lift the truck with the wheels off. Always break lug nuts loose before raising the vehicle.
Raise and Support the Front End
Position a floor jack under the front frame rail or lower control arm. Lift until the front wheels are off the ground. Place jack stands under solid frame points. Double-check stability before crawling underneath.
Remove the Front Wheel
With the truck safely lifted, take off the front wheel for full access. Remove all lug nuts and set them aside. Pull the wheel straight off. If stuck, tap the edge gently with a rubber mallet. Lay the wheel flat to avoid rolling hazards.
Now you can see the steering knuckle, outer tie rod, and jam nut your starting point for disassembly.
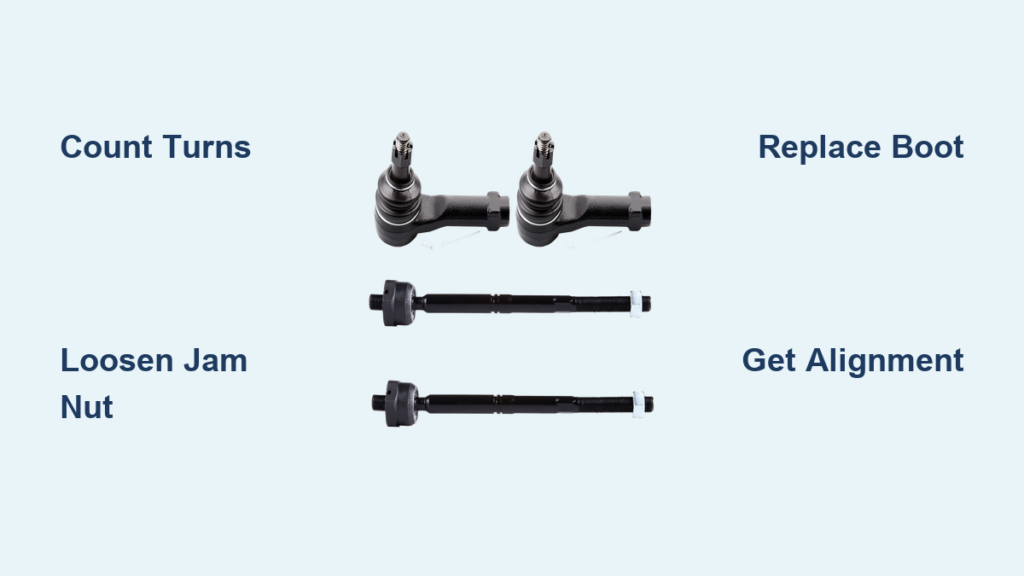
Loosen the Jam Nut Between Tie Rods
The 24 mm jam nut locks the inner and outer tie rods together. Loosening it is your first mechanical step.
Apply Penetrating Oil
Spray PB Blaster or WD-40 Specialist on the jam nut threads. Let it soak for 10 to 15 minutes, especially on older trucks with rust.
Use the Right Tools
Attach a 24 mm wrench or socket to the jam nut. Turn clockwise first to break static friction, then counter-clockwise to unscrew. If the inner tie rod spins, use locking pliers on the shaft to hold it steady.
For 2009 to 2014 models, you can also use a 15 mm wrench on the flat cutout of the inner tie rod for better grip. Leave the nut on the threads, just loosen it enough to slide down later.
Disconnect Outer Tie Rod from Steering Knuckle
Now free the outer tie rod so you can unscrew it from the inner rod.
Remove the Mounting Nut
Unscrew the 21 mm mounting nut from the tie rod stud. If it is a castle nut, pull out the cotter pin first. Never reuse old cotter pins.
Re-thread Nut for Protection
Screw the nut back on 2 to 3 turns to protect the threads during separation.
Separate the Tapered Joint
Use a tie rod separator, also called a pickle fork. Insert and tighten until the joint pops free. This is the best method because it is clean and safe. Alternatively, strike the side of the knuckle sharply with a rubber mallet to shock the stud loose. Never hit the threaded end. This damages the ball joint inside.
Once loose, swing the knuckle outward to give the tie rod shaft room to move.
Count Turns Before Removing Outer Tie Rod

This step is critical. Count the number of turns it takes to unscrew the outer tie rod from the inner one. This preserves your original toe alignment. Skipping this means you will need more adjustment during the final alignment.
Unscrew the outer tie rod by hand and count full rotations. For example, note “31 full turns to remove.” Reinstall with exactly the same number. For 2009 to 2014 models, you can alternatively count exposed threads between the jam nut and outer tie rod. Take a photo of the assembly before disassembly as a backup reference.
Remove the Bellows Boot and Clamps
The rubber bellows boot protects the inner tie rod and steering rack from dirt and moisture. Remove it carefully to avoid damage.
Remove Outer Clamp
Use long-nose pliers to remove the outer clamp near the outer tie rod.
Remove Inner Clamp
Clamp types vary by model year. For 2004 to 2014 models, you will often find a one-time-use metal clamp. Pry it off with a screwdriver. For 2009 to 2020 models, you may have plastic wire ties. Cut these with wire cutters. For 2015 to 2020 models, you may find a squeeze-type hose clamp. Loosen this with pliers.
Slide Off the Boot
Lubricate the edges with penetrating oil or silicone spray. Gently pry the seal using a small pick or screwdriver. Slide the boot off the inner tie rod shaft, then off the steering rack.
Inspect for Damage
Check for cracks, tears, or fluid leaks. If steering fluid is leaking, the rack seal may be compromised. Consider full rack replacement. A torn boot leads to contaminated steering racks and premature inner tie rod failure.
Remove the Inner Tie Rod from the Rack
Now extract the old inner tie rod from the steering rack.
Use a Specialty Tool
A dedicated inner tie rod removal tool fits perfectly. These are often available as loaners from auto parts stores. Insert between control arms and turn counter-clockwise. If unavailable, use locking pliers on the shaft. Wrap with tape to prevent damage.
Break It Loose Safely
Hold the steering rack steady to avoid internal damage. If stuck, reapply penetrating oil and wait 15 minutes. Use gentle heat with a propane torch. Avoid overheating the rack. Never force it. Excessive pressure can crack the housing and lead to expensive repairs.
Install the New Inner Tie Rod
Now it is time to install the replacement. Do it right to avoid future issues.
Prepare the Threads
Apply a small drop of blue thread locker to the male threads. Use Loctite 243 or equivalent. Exception: Do not use thread locker on 2004 to 2008 models. Rely on the jam nut design instead. Add copper anti-seize to the mid-section for easier future removal.
Hand-Thread Into the Rack
Screw the new inner tie rod in clockwise by hand. Turn until it bottoms out. Ensure straight alignment to prevent cross-threading.
Snug It Down
Use locking pliers to tighten one-quarter to one-half turn past hand-tight. Do not over-tighten. You are not torquing, just securing full engagement. The rack seal must not be compressed.
Reinstall the Bellows Boot
A properly sealed boot keeps contaminants out and grease in.
Slide Boot Onto Rack and Shaft
Place the wide end onto the steering rack. Stretch gently. Slide the narrow end over the new inner tie rod. Lubricate the groove on the shaft with chassis grease or kit-supplied lubricant.
Seal and Secure
Apply silicone paste to boot edges to prevent drying. Ensure no kinks or twists. The boot must move freely with the shaft.
Reattach Clamps
Reuse the outer clamp if undamaged, or install a new one. For the inner clamp on the rack side, if the original was one-time-use, replace it. If there is no clamp, use a heavy-duty wire tie. Form a loop, tighten with pliers, and trim excess. For 2015 to 2020 models using a squeeze clamp, tighten evenly. Do not crush the boot.
Test fit by moving the shaft in and out. The boot should flex smoothly without resistance.
Reconnect the Outer Tie Rod
Now rebuild the connection using your turn count.
Screw On Outer Tie Rod
Apply light grease to the threads. Thread the outer tie rod onto the new inner rod. Use the exact number of turns you counted earlier. Hand-tighten only. Do not torque yet.
Reattach to Steering Knuckle
Align the stud and press it into the knuckle. Tap gently with a rubber mallet if needed. Install the 21 mm mounting nut. If it is a castle nut, insert a new cotter pin after tightening. Never back off the nut to align the pin. Go to the next slot instead.
Torque the Mounting Nut
Use the correct specification based on your model year. For 2004 to 2008 models, the torque specification is either 76 ft-lb or 111 ft-lb due to conflicting data. Verify via VIN. For 2009 to 2014 models, use 85 ft-lb. For 2015 to 2020 models, use 76 to 85 ft-lb. When in doubt, use 85 ft-lb. It is within the safe range for all models.
Tighten the Jam Nut
This locks the outer tie rod in place and maintains alignment.
Apply Anti-Seize
Coat the mid-thread zone and contact surface between jam nut and outer tie rod with copper anti-seize.
Position and Tighten
Slide the 24 mm jam nut down to halfway or three-quarters of the thread. Hold the outer tie rod with a wrench to prevent movement. Tighten the jam nut firmly. There is no official torque spec, but it must be fully seated and immovable. Check for no gaps and no wobble. Wipe off excess anti-seize.
Reinstall the Wheel and Lower the Truck
Now put everything back together.
Mount the Wheel
Place the wheel back on the hub. Hand-tighten lug nuts in a criss-cross star pattern.
Torque Lug Nuts Correctly
Lower the truck until the tire just touches the ground. This prevents spinning. Use a torque wrench to tighten lug nuts to 150 ft-lb in a star pattern. Lower completely and recheck if needed. Always torque with the vehicle weight on the suspension. This protects wheel bearings.
Post-Replacement: Alignment and Testing
You are not done yet. Skipping these steps risks tire damage and unsafe handling.
Get a Professional Alignment
A four-wheel alignment is mandatory after inner tie rod replacement. Even with perfect turn counting, slight variances affect toe alignment. Benefits include preventing uneven tire wear, eliminating steering pull, and ensuring symmetrical adjustment. Driving without alignment will wear out tires in weeks.
Road Test the Vehicle
Drive at low speed first. Check for steering looseness, clunking noises, and vibration in the wheel. If any issues arise, recheck jam nut tightness, mounting nut torque, boot security, and cotter pin installation.
Inspect Power Steering System
If you saw fluid during boot removal, check the reservoir level. Top off with correct fluid if needed. Many 2015 to 2020 models have electric power steering. No fluid is needed for these.
Model-Specific Summary for Ford F-150
| Feature | 2004 to 2008 | 2009 to 2014 | 2015 to 2020 |
|---|---|---|---|
| Lug Nuts | 6 per wheel | 5 per wheel | 5 per wheel |
| Jam Nut Loosen Direction | Clockwise first | Clockwise first | Clockwise first |
| Boot Clamp Type | One-time metal | Metal or squeeze | Squeeze or wire ties |
| Thread Locker | No | Yes, light | Yes, light |
| Torque Outer Nut | 76 to 111 ft-lb | 85 ft-lb | 76 to 85 ft-lb |
| Center Cap | Yes | No or Integrated | Integrated |
Maintenance and Troubleshooting Tips
Prevent Future Issues
Inspect tie rods every 15,000 miles for play or boot damage. Replace both sides together. This keeps steering balanced. Always use anti-seize on threads. This prevents seizure. Photograph setups before disassembly. This saves time later.
Fix Common Problems
If you have loose steering, the cause is likely wrong turn count or loose jam nut. Recheck turns and re-torque. For clunking noise, the cause is likely loose mounting nut or pinched boot. Tighten nut and inspect boot. For uneven tire wear, the cause is no alignment. Schedule alignment now. For torn boot, the cause is over-stretched or dry boot. Replace boot and lubricate. For stuck jam nut, the cause is no penetrant. Soak with PB Blaster and wait.
Recommended Replacement Kits
Save time and money with complete kits. TRQ PSA34649 is a full tie rod set with inner and outer for both sides. It costs about $84.95 and fits 2015 to 2020 F-150, Expedition, and Navigator. TRQ PSA34648 is a driver and passenger pair for about $44.95. TRQ PSA35274 is a 14-piece suspension kit ideal for full refresh. It costs about $399.95. TRQ parts are OE-spec, include grease and hardware, and are a quality choice.
Frequently Asked Questions About Inner Tie Rod Replacement on Ford F-150
How long does it take to replace an inner tie rod on an F-150?
The replacement takes 2 to 4 hours for one side if you have basic mechanical experience. Plan for additional time if both sides need replacement or if rust makes parts difficult to remove.
Do I need an alignment after replacing the inner tie rod?
Yes. A professional four-wheel alignment is mandatory. Without it, your tires will wear unevenly and steering will be compromised. Even perfect turn counting cannot replace proper alignment.
Can I replace just one inner tie rod?
You can, but experts recommend replacing both at the same time. This ensures balanced steering, equal wear, and simpler alignment. If one is worn, the other is likely close to failure.
What happens if I skip the turn counting step?
Skipping the turn count means you will not preserve your original toe setting. The vehicle will likely need more alignment adjustment afterward. In extreme cases, driving without proper toe can cause rapid tire wear within a few hundred miles.
How do I know if my inner tie rod needs replacement?
Common signs include loose steering feel, clunking or clicking when turning, uneven tire wear, and play in the steering wheel. Inspect the bellows boot for cracks or tears. If the boot is damaged, the inner tie rod is likely already contaminated.
Key Takeaways for Replacing Inner Tie Rod on Ford F-150
Replacing the inner tie rod on your Ford F-150 is a straightforward DIY task with the right tools and patience. The most critical steps are counting turns to preserve alignment, using penetrating oil on rusty parts, and securing the bellows boot properly to prevent future contamination. Never skip the professional alignment afterward. This is not optional. Use quality parts from trusted brands like TRQ, Moog, or AC Delco. Cheap replacements fail prematurely and cost more in the long run. With this guide, you can restore tight, precise steering to your F-150 and avoid costly trips to the mechanic.


