You plug in your trailer, flip on the lights, and nothing happens. No brake lights, no turn signals, not even running lights. This is one of the most common electrical problems across F-150 model years 2010 to 2025, and it usually has a simple cause. The issue typically stems from blown fuses, bad grounds, failed modules, or missing factory parts. With a multimeter and some basic tools, you can diagnose and fix this yourself without visiting a dealership.
This guide walks you through every major cause of F-150 trailer lights not working, with model-specific fixes for each generation. You’ll learn exactly where to check, what to test, and which parts most commonly fail.
Start with the Fuse Box Under the Hood
The first place to investigate when your F-150 trailer lights not working is the Smart Junction Box under the hood. Blown or missing fuses account for over half of all trailer light failures, so this is where you should begin.
For 2015 through 2025 models, focus on three critical fuses. Fuse number 34 is a 25-amp fuse that controls trailer tow parking lamps, also known as running lights. Fuse number 35 is a 20-amp fuse that feeds the stop and turn relay for brake lights and turn signals. Fuse number 36 is a 25-amp fuse that provides power to the trailer lighting control module itself. Each of these must show 12 volts with the key turned on.
For 2010 through 2014 F-150s, the fuse layout differs slightly. Look for fuse number 45, a 20-amp fuse that controls the trailer stop and turn feed. Fuses number 37 and 38, both 15-amp, handle left and right stop lights respectively. Trailer running lights on these older models typically run through fuse number 21 or number 31, which are 20 to 30-amp fuses that vary by trim level.
Use a fuse puller or needle-nose pliers to extract each fuse. Check for a broken metal filament inside the fuse or a darkened appearance, which indicates failure. Even if a fuse looks intact, test it with a multimeter set to continuity mode. Some fuses fail internally without showing visible damage.
Check the Interior Fuse Panel for 12V Power
On 2020 and newer F-150s, a second critical fuse hides in the passenger-side kick panel. Fuse number 9 is a 30-amp fuse that powers the orange 12-volt auxiliary pin on the 7-pin connector. This fuse is frequently missing at the factory, with many owners discovering it loose in a plastic bag tucked into the glove box or door pocket.
If fuse number 9 is absent, install it immediately. You should also verify that relay number 21 is seated in the underhood fuse box. Without both the fuse and the relay, the trailer’s interior lights, refrigerator, or battery charging feature will not work, even if other trailer lights function normally.
Test the Trailer Tow Lighting Control Module

For 2015 through 2025 F-150s, the electrical system uses a Trailer Tow Lighting Control Module instead of traditional relays. This module sits on the rear frame rail, just behind the bumper near the hitch. A black plastic cover protects it, and you can remove it with basic hand tools to access the unit.
The module manages all trailer lighting functions including brake lights, turn signals, running lights, and the 12-volt auxiliary power circuit. It communicates through the vehicle’s CAN bus, so a failure often triggers diagnostic trouble code U0252, which indicates lost communication with the lighting control module.
Before replacing the module, verify that power is reaching it. Check fuses number 34, 35, and 36 with a multimeter. Each should show 12 volts with the key on. Next, test the ground connection by checking continuity between the module’s black wire and the vehicle chassis. You should read zero ohms or near zero.
Then test the CAN bus signals. The violet and orange wire carries CAN High, which should measure approximately 2.5 to 3.5 volts. The gray and orange wire carries CAN Low and should show approximately 2.0 to 2.5 volts. Finally, test the outputs by activating the brake or turn signal and checking for 12 volts on the yellow wire for left signals, green wire for right signals, and brown wire for running lights.
If inputs are correct but no output voltage appears, the module has failed and requires replacement. The good news is that replacement modules are plug-and-play with no programming needed. OEM units from salvage yards or online parts sellers work perfectly, and hundreds of owners have resolved complete brake and turn signal failures with a 50 to 100-dollar module swap.
Fix Ground Connection Problems
A poor ground connection causes trailer lights to flicker, dim, or fail entirely, and it is often overlooked during diagnosis. The factory ground wire connects near the hitch with a small screw, and over time, rust, paint, or vibration can break the connection.
To fix the truck-side ground, remove the ground wire from the frame. Sand the contact point until you reach bare metal. Install a ring terminal with a bolt, washer, and lock nut to ensure a solid connection. Tighten securely and apply dielectric grease to the connection to prevent future corrosion. Consider upgrading to a 10 AWG ground wire for improved performance.
The trailer side matters equally. The white ground wire on the trailer must connect to bare, unpainted metal on the trailer frame. Avoid mounting over rust or paint, and never use wire smaller than 10 to 12 AWG. Always use a star washer to bite through any oxidation and ensure solid contact.
Test continuity with a multimeter between the trailer connector’s white pin and the trailer frame. You should read zero ohms, which confirms a good ground path.
Test the 7-Pin Trailer Connector
A 7-pin trailer light tester is a 20-dollar tool that instantly reveals which circuits are live at the connector. If you prefer using a multimeter, you can test each pin directly.
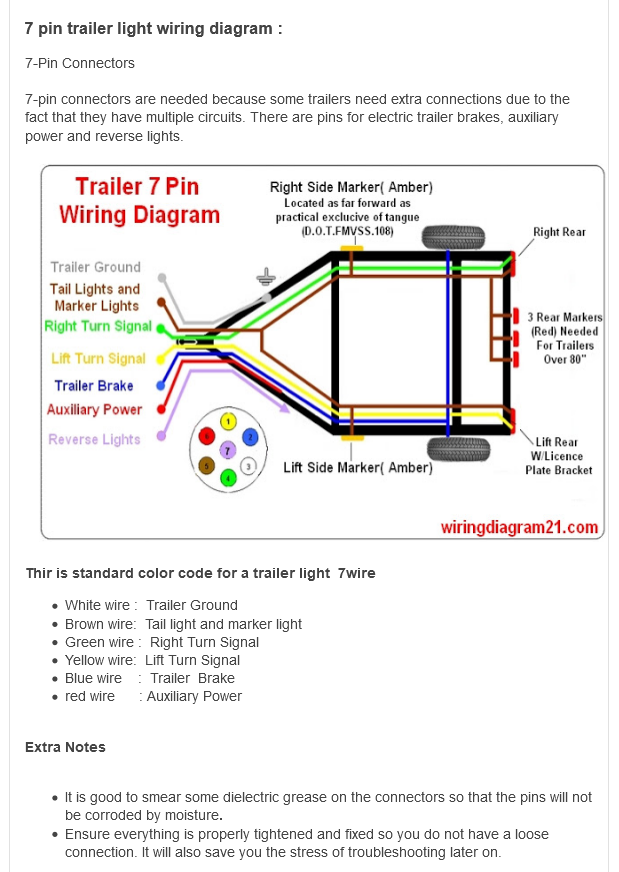
With the multimeter, check for 12 volts on the brown wire when headlights are turned on for running lights. The yellow wire should show 12 volts when the left turn signal is activated. The green wire shows 12 volts with the right turn signal active. The orange wire provides 12 volts with the key on, but only if fuse number 9 is installed. The white wire is ground and should show zero volts with continuity to the chassis. The blue wire carries 12 volts to electric brakes when the brake controller is active, and the light blue wire provides 12 volts when the vehicle is in reverse.
If voltage is present at the truck’s connector but trailer lights do not work, the problem lies on the trailer side, not the truck.
Clean Corroded or Damaged Plugs
Green corrosion on pins, bent contacts, or moisture damage can all prevent proper connection. A loose locking tab, especially common on 2020 models, can cause intermittent connection. Clean all pins with electrical contact cleaner and apply dielectric grease to prevent future corrosion. Replace the connector entirely if the pins are damaged or the locking mechanism is broken.
For a temporary fix on loose plugs, insert a small screw into the locking notch to hold the connector seated until you can replace it.
Inspect the Under-Dash Trailer Module on 2020+ Models
On 2020 and newer F-150s, a secondary trailer control module sits above the driver’s footwell, near the brake pedal. A known issue involves the bottom harness connector popping loose during floor mat installation or from foot movement.
Symptoms of a disconnected under-dash module include no trailer running lights, disabled auto start-stop, and fuses that appear intact even though the module seems dead. To fix this, remove the lower dash panel, locate the black module box with multiple connectors, and firmly reconnect the lower harness. Ensure the locking tabs click into place.
Always test for output voltage with the key on and headlights manually activated before disassembling the dash.
Bypass Auto Headlight Mode
Multiple owners of 2021 through 2025 F-150s report that trailer running lights fail when headlights are set to Auto mode. Even with daytime running lights on, the Body Control Module may not activate trailer lights unless the headlights are manually turned on.
This is a known software quirk in Ford’s BCM logic. To fix it, turn the headlights to the manual ON position and retest your trailer lights. Always test trailer lights with headlights manually on rather than in Auto mode.
Install Resistor Adapters for LED Trailers
If you use LED trailer lights, your F-150 may display a turn signal failure warning even when all lights appear to work correctly. This happens because LEDs draw less current than incandescent bulbs, and the BCM interprets the lower draw as a bulb outage.
To fix this, install a 7-to-4-pin adapter with built-in load resistors. These adapters typically provide 50 watts per side and simulate the correct current draw. Mount them in a ventilated area to prevent overheating. Without resistors, repeated BCM error logging can lead to circuit shutdown or diagnostic confusion.
Install these resistors proactively even if your lights seem to work, because they prevent future issues during towing.
Use FORScan for Advanced Diagnostics
When physical checks pass but lights still fail, use FORScan, a free OBD2 diagnostic software. Connect via the OBD2 port and read BCM-related trailer codes. Common codes include U0252 for lost communication with the trailer lighting module, C1A00 through C1A0F for trailer light circuit faults, and B2A00 for ground faults.
FORScan helps identify CAN bus communication drops, intermittent ground issues, and BCM logic errors. Use it after installing LED adapters to clear stored codes and reset the BCM.
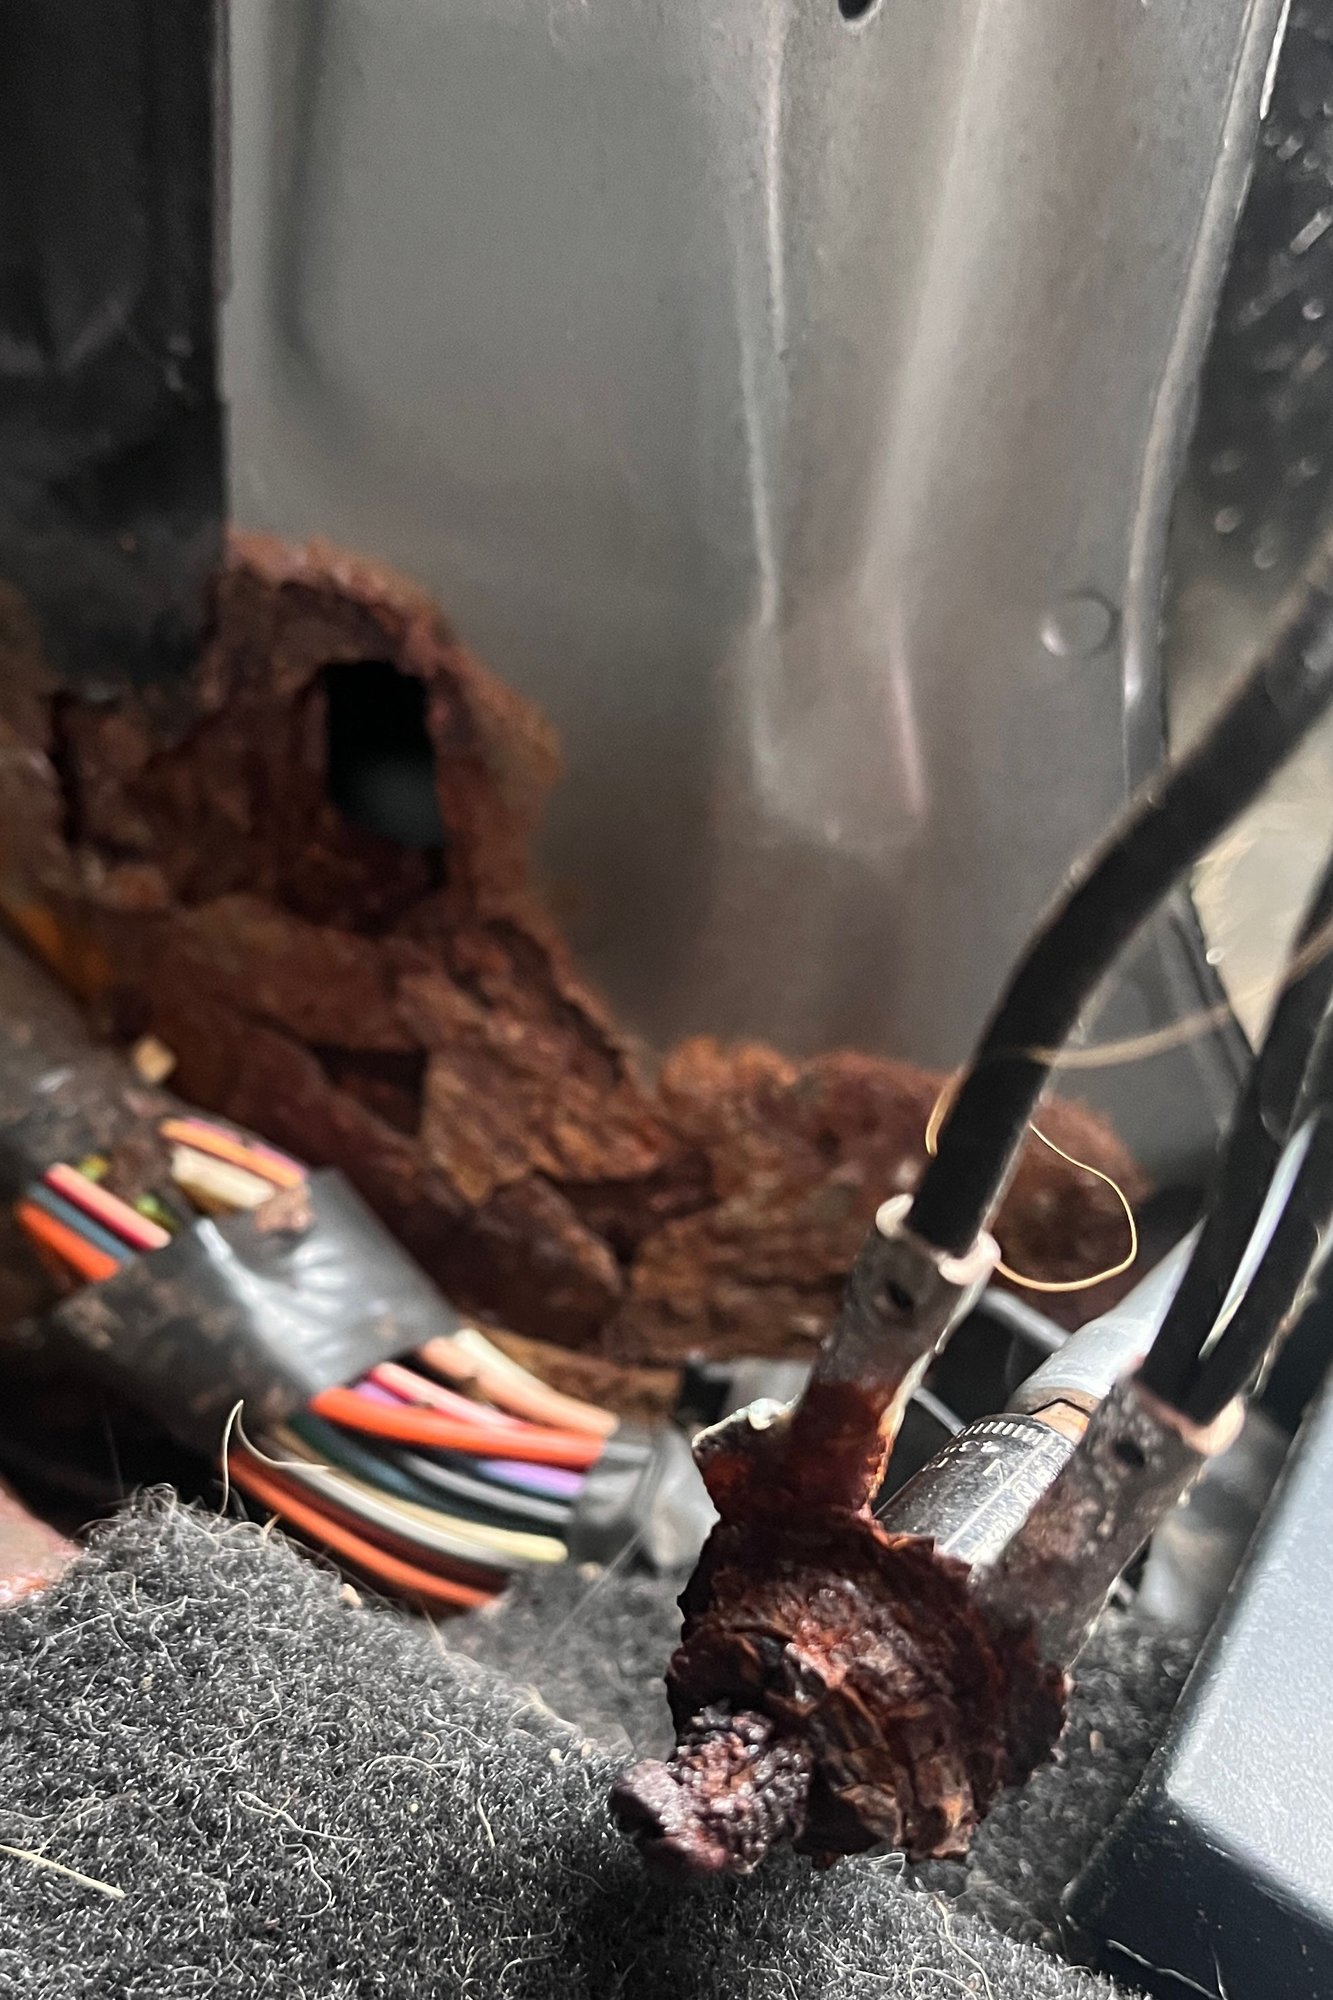
Check for Rodent Damage and Wiring Issues
If trailer lights behave erratically or one side fails completely, inspect the wiring along the frame rails and hitch area. Look for exposed copper, chew marks, or brittle insulation. Rodents often nest under vehicles during winter and chew through wiring harnesses.
One owner found no passenger-side lights due to mouse-damaged wires near the bumper. Repair damaged sections with heat-shrink butt connectors and protect the repairs with flexible conduit or wire loom. Park in a sealed garage or use rodent deterrents to prevent future damage.
Verify the 12V Auxiliary Circuit Is Powered
The orange pin on the 7-pin connector provides 12-volt auxiliary power for trailer batteries, lights, or appliances. However, it is not active by default. It requires fuse number 9 in the interior fuse box and relay number 21 installed in the underhood SJB.
Many new F-150s ship without relay number 21 installed. Check your spare parts bag or the parts that came with your truck. Install a 30 to 40-amp relay to enable trailer battery charging, interior lighting, and refrigerator operation.
Frequently Asked Questions About F-150 Trailer Lights Not Working
Why do my trailer running lights work but brake lights do not?
This pattern points to a problem with the stop and turn circuit. Check fuse number 35 in the underhood fuse box for 2015+ models, or fuse number 45 for 2010-2014 models. If those fuses are good, the Trailer Tow Lighting Control Module may have failed and is not outputting voltage to the brake and turn signal circuits.
Can I fix trailer lights myself without dealership tools?
Yes. Most trailer light issues are caused by blown fuses, bad grounds, or failed modules, all of which you can diagnose with a multimeter. The Trailer Tow Lighting Control Module on 2015+ models is plug-and-play with no programming required. FORScan is free software that reads diagnostic codes through the OBD2 port.
Why does my truck show a turn signal failure warning with LED trailer lights?
LED lights draw less current than traditional incandescent bulbs. The BCM interprets this lower draw as a bulb failure and triggers a warning. Install a 7-to-4-pin adapter with built-in load resistors to simulate the correct current draw and eliminate false warnings.
What causes trailer lights to work on another vehicle but not my F-150?
If your trailer works on another truck, the problem is definitely in your F-150’s electrical system. Start by testing the 7-pin connector with a multimeter or trailer light tester. Check for voltage on all circuits. If voltage is present at the connector but lights do not work, inspect the trailer’s own wiring and ground connection.
How do I know if my trailer lighting control module has failed?
Test the module inputs first. Verify that fuses number 34, 35, and 36 all show 12 volts with the key on. Check for proper ground continuity. Then test outputs by activating turn signals and brakes. If inputs are good but no output voltage appears on the yellow, green, or brown wires, the module has failed and needs replacement.
Key Takeaways for F-150 Trailer Lights Not Working
The F-150 trailer lights not working problem is almost always solvable with a systematic approach. Start by checking fuses under the hood and in the interior kick panel, because missing or blown fuses cause the majority of failures. Next, inspect ground connections at the hitch and on the trailer itself, as poor grounds create intermittent or complete failures.
For 2015+ models, the Trailer Tow Lighting Control Module is a common failure point. Test inputs first, then outputs, and replace the module if voltage is not reaching the 7-pin connector. Always test trailer lights with headlights in manual ON mode rather than Auto mode, and install resistor adapters if you use LED trailer lights.
With proper diagnostic steps, over 90 percent of trailer light issues can be fixed without a dealership visit. Keep spare fuses number 9, 34, 35, and 36 on hand, and test your trailer lights before every trip to ensure reliable towing performance.