

If your 1986 Ford F150 fuel gauge not working, you are dealing with one of the most common reliability issues in these classic trucks. The fuel gauge system relies on aging sending units, decades-old wiring, and ground connections that have corroded over time. Whether your gauge reads empty when the tank is full, sticks on full, or bounces erratically, the root cause can usually be traced to a handful of electrical or mechanical failures. The good news is that with systematic testing, you can identify the exact problem without replacing parts unnecessarily.
This comprehensive guide walks you through every diagnostic step, from quick jumper wire tests to detailed resistance measurements and tank selector switch inspection. You will learn how to test the sending unit, check the tank selector switch on dual-tank models, verify grounding at G701, and determine whether the problem lies in the tank, wiring, or instrument cluster.
Decode Common Fuel Gauge Symptoms
Before you begin troubleshooting, identify what your gauge is telling you. Each behavior points to a specific failure mode, and understanding the symptom helps you choose the right test first.
Gauge Reads Empty at All Times
An empty reading typically means the sender circuit is shorted to ground or the signal wire is touching metal somewhere along its path. This could indicate a faulty sending unit with internal short, damaged insulation on the signal wire, or a bad tank selector switch on dual-tank models routing the signal incorrectly. The gauge interprets the short as zero resistance, which corresponds to an empty tank.
If the oil pressure or temperature gauge also reads low or erratic, suspect the instrument voltage regulator or a shared ground problem at G701.
Gauge Stuck on Full or Above Full
When the gauge pegs to full, it usually indicates an open circuit somewhere in the system. A broken wire between the sender and gauge, a disconnected or corroded connector, or a failed sender resistor can all cause this behavior. The gauge interprets lack of resistance as a full tank because the circuit is not complete.
Gauge Fluctuates or Bounces Erratically
Erratic movement often means there is a loose connection at the sender or switch, a worn rheostat inside the sending unit, or a poor ground at G701 behind the instrument panel. A failing voltage regulator can also cause inconsistent pulsing that makes the gauge jump around. If other gauges bounce simultaneously, the problem is likely in shared power or grounding.
One Tank Works, the Other Does Not
On dual-tank models, this is a classic tank selector switch issue. The switch routes both fuel pump power and sender signal between the front and rear tanks. If only one tank reads correctly, the switch contacts are dirty or corroded, the internal grease has hardened, or the signal wire is not making contact in one position.
Test the Sending Unit with a Jumper Wire
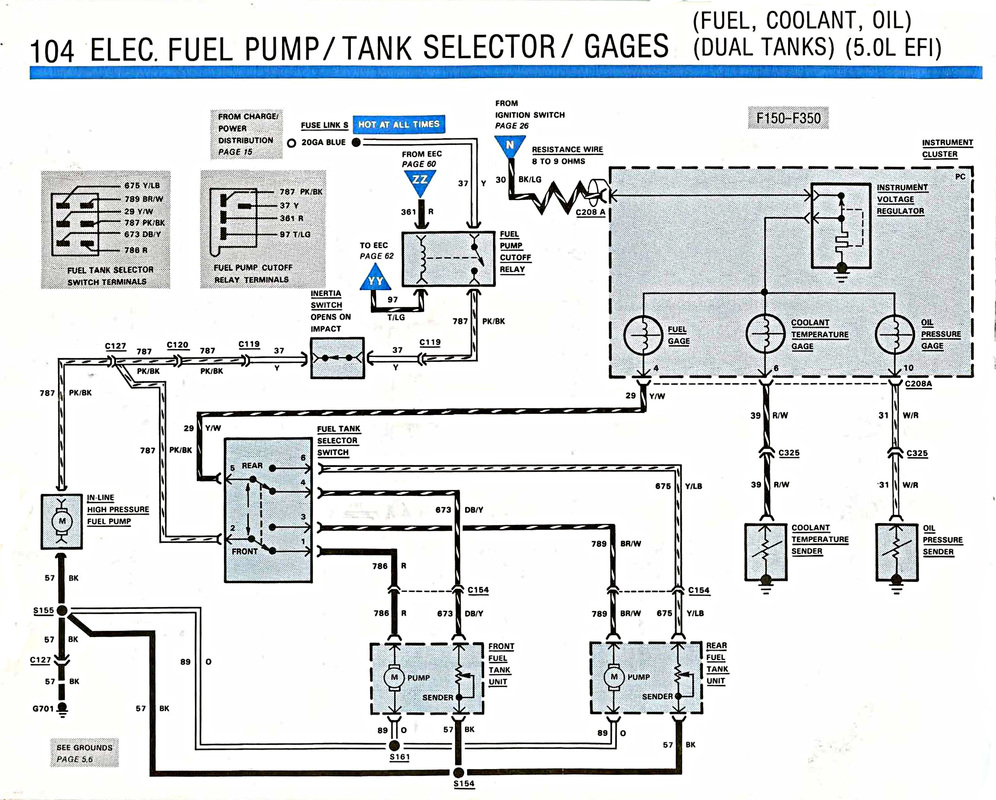
This quick test tells you whether the gauge and wiring are functional, narrowing the problem down to the sending unit or the rest of the system.
Perform the Jumper Wire Test
- Locate the sending unit connector near the fuel tank.
- Unplug the connector, which has two wires.
- Identify the signal wire using your wiring diagram.
- Use a jumper wire to connect the signal wire directly to chassis ground.
- Turn the ignition to ON without starting the engine.
Observe the gauge response. If the gauge rises to full, the gauge and wiring are good, and the problem lies in the sending unit. If there is no movement, the fault is in the wiring, instrument cluster, or gauge itself.
One user confirmed this method: jumping the connector caused the gauge to go to full, and testing revealed the sender had zero ohms resistance, requiring replacement.
Never ground the pump power wires, as this can blow the fuel pump fuse.
Measure Sending Unit Resistance

This test confirms the electrical health of the sender by measuring its variable resistance across the full range of float travel.
Required Tools and Setup
You need a digital multimeter set to ohms. Accessing the sender may require dropping the fuel tank, as the 1986 F150 does not have in-cab access to the sending unit.
Steps to Measure Resistance
- Remove the sender from the tank.
- Place the red probe on the sender terminal and the black probe on a clean metal part of the sender body.
- Manually move the float arm from bottom to top.
- Record the resistance at both positions.
Expected Readings
| Float Position | Resistance |
|---|---|
| Full (float up) | 10-12 ohms |
| Empty (float down) | 72-73 ohms |
| Mid-level | Smooth transition between values |
Interpret the results. Zero ohms indicates a shorted sender that must be replaced. Infinite resistance means an open circuit from a failed resistor or broken connection. If resistance does not change as you move the float, the contact strip is worn and the sender needs replacement. A float stuck at mid-range suggests the arm is bent or binding inside the housing.
Inspect the Float and Arm Mechanically
Even when resistance readings appear acceptable, mechanical problems can cause false readings that fool the gauge.
Common Mechanical Failures
A brass float filled with fuel will sink and cause the gauge to read empty even with a full tank. The float arm can bend from impact or age, preventing proper travel. The arm may bind inside the housing, causing the float to stick at half travel. The resistor strip inside the sender can corrode, creating erratic signal output.
Fix a Sinking Float
Remove the float from the sender arm and shake it. If you hear fuel sloshing inside, the float has a leak and is saturated. You can replace just the float to save money compared to buying a complete sender assembly. One user reported saving $100 by replacing only the brass float rather than the entire unit.
Check the Tank Selector Switch
On dual-tank models, this switch controls both fuel delivery and sender signal. A failing switch causes one tank to read incorrectly or produces no response when switching between tanks.
Wire Colors at the Switch
| Function | Wire Color |
|---|---|
| Front tank sender | Dark Blue/Yellow |
| Rear tank sender | Yellow/Light Blue |
| Gauge signal output | Yellow/White |
| Front pump power | Brown/White |
| Rear pump power | Pink/Black |
Test for Continuity
- Unplug the switch connector.
- Set your multimeter to continuity mode.
- Move the lever to Front and check that the front tank sender wire connects to the gauge signal wire.
- Move the lever to Rear and verify the rear tank sender wire connects to the gauge signal wire.
- Good continuity shows near zero ohms when the circuit is complete.
Clean and Repair the Switch
Factory grease hardens over time, attracting dirt and causing poor contact.
- Pry open the housing, which has six plastic tabs.
- Clean the contacts thoroughly with a wire brush or contact cleaner.
- Spray with WD-40 to dissolve old grease.
- Re-grease with wheel bearing grease, not dielectric grease.
- Drill a quarter-inch hole in the housing for socket access to the retaining bolt if needed.
- Reassemble and test.
This repair costs under $10 compared to $50 or more for a new switch.
Verify Ground Connections
A poor ground is one of the most overlooked causes of gauge failure. The key ground point is G701, located behind the instrument panel near the right side of the radio.
Test the Ground Circuit
- Disconnect the sender wire at the tank.
- Measure resistance between the sender wire and chassis ground.
- A reading near zero ohms indicates good ground.
Fix a Bad Ground
- Remove the G701 bolt.
- Clean the metal surface with a wire brush.
- Apply dielectric grease to prevent future corrosion.
- Reattach the ground wire securely.
If the oil pressure and temperature gauges are also erratic, G701 is almost certainly the culprit.
Diagnose Wiring Issues
Broken or chafed wires can cause intermittent or dead signals that make the gauge unreliable.
Trace the Signal Path
On single-tank models, the signal travels from the sender through the yellow/white wire directly to the instrument cluster. On dual-tank models, the path goes from the sender to the tank selector switch, then through the yellow/white wire to the cluster.
Check for Voltage at the Gauge
- Remove the instrument cluster.
- Locate the yellow/white wire at the fuel gauge input.
- Turn the ignition to ON.
- Test for pulsed voltage between 5 and 8 volts from the voltage regulator.
If there is no voltage, check fuse number 18 for the instrument cluster and verify the voltage regulator function, which is shared with the oil pressure and temperature gauges.
Replace the Sending Unit
When testing confirms a failed sender, you must drop the tank to access and replace it.
Steps to Remove the Rear Tank
- Use up as much fuel as possible or siphon it out.
- Remove the spare tire.
- Loosen the filler neck clamps by removing the three screws inside the fuel door.
- Remove the skid plate bolts, four total.
- Support the tank with a floor jack.
- Lower the tank six to eight inches.
- Disconnect the electrical connector, two fuel lines, and the air bleed line.
- Lower the tank completely.
Sender Terminal Layout
Viewed from the top with fuel lines pointing away, the pins from left to right are pump ground, 12-volt pump, sender signal, and ground.
Test After Removal
Measure resistance between the sender pin and ground pin. Infinite or zero ohms means replacement is needed. Also check for internal rust or tar-like muck in the tank, which may require replacing the entire tank.
Consider a Universal Sender/Gauge Kit
For trucks with aged clusters or unreliable gauges, a universal kit offers a reliable modern upgrade that bypasses the original instrument cluster entirely.
Benefits of Universal Kits
These kits provide accurate readings with simple two-wire installation. They take less than an hour to install and eliminate the need to troubleshoot aging cluster electronics.
Installation Overview
- Mount the new gauge in the dash.
- Run the signal wire to the sender.
- Connect power and ground.
- Calibrate if required.
One user reported giving up on the old gauge and installing a universal kit, achieving perfect results in under an hour.
Fix Common Post-Replacement Issues
Even after replacing the sender, problems can persist. Here is how to address the most common follow-up issues.
Gauge Reads Only Quarter Tank After New Sender
This indicates the float arm was bent during installation, the sender is not seated properly, or wiring was swapped or shorted. Recheck float movement across the full range and verify resistance output matches specifications.
Gauge Bounces After Repair
Check the G701 ground connection, the voltage regulator in the cluster, and the oil pressure gauge behavior. If the oil gauge also bounces, replace the instrument voltage regulator.
Gauge Responds Briefly When Switching Tanks
This suggests intermittent contact in the selector switch, a loose wire at the connector, or a partial short in the sender harness. Inspect and clean all connections, and repair or replace the switch as needed.
Inspect the Fuel Return Valve
On dual-tank models, this mechanical valve under the driver’s door routes return fuel to the correct tank based on fuel pressure.
Problems Caused by a Faulty Return Valve
If the valve is missing, clogged, or bypassed, fuel may return to the wrong tank. This causes fuel slosh that affects sender readings and can make the gauge fluctuate unexpectedly.
Test the Valve
Start the engine and listen for hissing or fuel flow near the valve. Check for leaks or blockages. Replace if damaged or missing.
Frequently Asked Questions About 1986 Ford F150 Fuel Gauge Not Working
How do I test my fuel sending unit without removing the tank?
Perform the jumper wire test at the connector. Disconnect the sender connector, identify the signal wire, and use a jumper to connect it to chassis ground. Turn the ignition to ON. If the gauge moves to full, the sending unit is faulty. If there is no movement, the problem is in the wiring or gauge.
Why does my fuel gauge read empty when the tank is full?
This indicates a shorted sender circuit. The sender may have an internal short showing zero ohms, the signal wire insulation is damaged and touching ground, or the tank selector switch is routing the signal incorrectly on dual-tank models.
Can I replace just the float on my fuel sending unit?
Yes, the brass float can be purchased separately and often solves the problem when the gauge reads empty despite a full tank. A float that has leaked and filled with fuel will sink, causing false empty readings. This costs significantly less than replacing the entire sender assembly.
What causes my fuel gauge to bounce around while driving?
Erratic bouncing usually stems from a loose connection, a worn rheostat in the sender, poor ground at G701, or a failing voltage regulator in the instrument cluster. If other gauges bounce simultaneously, check the shared ground and voltage regulator first.
Is the tank selector switch on my dual-tank F150 repairable?
Yes, the switch can be cleaned and repaired for under $10. The common failure is hardened factory grease causing poor contact. Disassemble the switch, clean the contacts with wire brush and contact cleaner, re-grease with wheel bearing grease, and reassemble.
Why does one tank work but not the other on my dual-tank truck?
This is almost always a tank selector switch problem. The switch routes the sender signal between tanks, and corroded contacts prevent proper signal routing in one position. Test continuity through the switch in both positions and clean or replace as needed.
Key Takeaways for Fixing Your 1986 Ford F150 Fuel Gauge
The 1986 Ford F150 fuel gauge not working issue is almost always fixable with methodical testing. Start with the jumper wire test at the sender connector to determine whether the problem lies in the sending unit or the gauge and wiring system. Measure sender resistance across the full float range to confirm electrical health, and inspect the float for leaks or mechanical binding.
For dual-tank models, clean the tank selector switch before replacing it, as hardened grease is the most common cause of failure. Verify ground connections at G701, especially if multiple gauges are acting erratically. When in doubt about aging components, a universal sender and gauge kit offers a reliable long-term solution that bypasses the original instrument cluster entirely.
With the right diagnostic approach and this step-by-step process, you can restore accurate fuel readings and drive your classic F150 with confidence.


