
If you’re working on your Ford F150’s fuel system, depressurizing it first is a critical safety step you cannot skip. Modern F150s run fuel pressure between 30–60 psi, and opening a pressurized line without releasing that pressure can spray gasoline onto hot engine components, creating fire hazards and serious injury risks. This guide covers every factory-recommended method to safely release fuel pressure before you replace filters, service pumps, or disconnect fuel lines.
You’ll learn how to use Ford’s built-in inertia switch, pull the fuel pump relay, bleed pressure through the Schrader valve, and avoid common mistakes that leave your truck unable to start. Whether you’re a first-time DIYer or experienced mechanic, these steps ensure you complete the job safely.
Use the Inertia Fuel Shutoff Switch

The inertia fuel shutoff switch is Ford’s factory-designed safety feature that cuts power to the fuel pump during a collision. It’s also the manufacturer’s recommended method for depressurizing the system during maintenance.
Locate the Inertia Switch
Find the inertia switch on the passenger side of the cab, behind the kick panel near the floor. It’s mounted on the firewall or inner fender and has a red or black reset button on top with a two-wire connector. This location applies to most 1997–2008 F150 models.
The switch is often hidden under a rubber cover. Remove the kick panel by gently pulling upward. It’s secured with plastic clips that release with firm pressure. No tools are typically needed.
Disable the Fuel Pump
You have two options to disable the fuel pump:
Unplug the electrical connector from the switch to cut power immediately. This is the cleanest approach.
Gently tap the switch housing with a rubber mallet or your hand to trip the internal mechanism. The red button will pop up, breaking the circuit.
Depressurize the Engine
With the fuel pump disabled, follow these steps:
Turn the ignition to “Run” position without starting the engine.
Crank the engine for 10–15 seconds until it stalls from fuel starvation.
Repeat once more to ensure all pressure is released.
Re-Pressurize After Service
After completing your repair, you must reset the system properly:
Press the red reset button down firmly until it clicks. This re-enables the fuel pump circuit.
Reconnect the electrical plug if you removed it.
Turn the ignition to “Run” for 2–3 seconds, then off.
Repeat this cycle 2–3 times to prime the fuel system.
Start the engine. It may crank longer than usual but should fire within 5–10 seconds.
Critical Warning: If the reset button isn’t fully depressed, the fuel pump stays disabled and the engine won’t start, even with all other components working correctly.
Pull the Fuel Pump Relay
This method avoids interior disassembly and is ideal when you need quick access under the hood.
Find the Relay
Open the hood and locate the power distribution box. The fuel pump relay is labeled “FUEL PUMP,” “FP,” or “PUMP.” Check the diagram on the fuse box lid for exact placement. On many models, relays are easy to remove by hand without tools.
Disable and Depressurize
Pull out the fuel pump relay from its socket.
Turn the ignition to “Run.” You should not hear the fuel pump prime, which normally produces a brief 2-second hum near the fuel tank.
Crank the engine for 10–15 seconds until it stalls.
The system is now depressurized and ready for service.
Reinstall After Service
Reinsert the relay into its socket.
Cycle the ignition to “Run” 2–3 times to prime the system.
Start the engine and check for any fuel leaks around connections.
Remove the Fuel Pump Fuse
Similar to the relay method, removing the fuse cuts power to the fuel pump and allows the system to depressurize.
Locate the Fuse
The fuel pump fuse may be in the under-hood fuse box or interior panel. Look for labels like “Fuel Pump,” “FP,” or “PWR.” Consult your owner’s manual or fuse box diagram for exact location.
Depressurize
With the engine running, use fuse pullers or needle-nose pliers to remove the fuel pump fuse.
The engine will run until it stalls, burning off remaining fuel pressure.
Wait for complete shutdown before proceeding with your repair.
Note: Fuses are harder to remove without tools, and interior panels can be tight. The relay method is often easier for most users.
Bleed Pressure at the Schrader Valve
This direct mechanical method physically releases fuel pressure from the fuel rail.
Find the Schrader Valve
Look on the fuel rail in the engine compartment, typically on the driver side for 4.2L, 4.6L, and 5.4L engines. It resembles a tire valve stem and may have a black or red plastic cap protecting it.
Tools Needed
Flat-blade screwdriver or fuel pressure gauge with bleed valve
Rag or thick towel to catch fuel spray
Safety glasses and fuel-resistant gloves
Container or plastic cup for catching fuel
Release the Pressure
Remove the fuel filler cap to vent tank pressure.
Remove the Schrader valve cap.
Wrap a thick rag around the valve to contain spray.
Press the center pin with a screwdriver, or attach a gauge and open the bleed valve.
Fuel will spray out under pressure. Continue until no flow and no hissing sound remain.
Fire Risk: This method releases raw gasoline into the air. Only perform in a well-ventilated area away from sparks, flames, or hot exhaust components.
Let the Truck Sit Overnight (Passive Method)
A low-tech option when time allows and urgent repair isn’t required.
Procedure
Turn off the engine and remove the fuel filler cap.
Wait 8–12 hours (overnight is ideal).
Assume the system is depressurized the next day before disconnecting lines.
Effectiveness
A 2001 F250 V10 owner confirmed 0.0 psi at the Schrader valve after leaving the cap off overnight, proving this method can work in some cases.
Limitations
This method isn’t reliable if the fuel pump’s check valve holds pressure. It won’t work for urgent repairs. Residual fuel may still leak when disconnecting lines.
Safety First: Essential Precautions
Never skip safety steps when working with pressurized fuel systems.
Wear Protective Equipment
Safety glasses are mandatory. Fuel under pressure can spray into your eyes or face. One user reported fuel hitting his ear and face during a filter change.
Use nitrile or fuel-resistant gloves.
Wear long sleeves and avoid loose clothing.
Work Environment
Operate in a well-ventilated area, preferably outdoors.
Keep open flames, cigarettes, and sparks away from the work area.
Have a Class B fire extinguisher (rated for flammable liquids) within reach.
Never use compressed air on the fuel system.
Spill Control
Place absorbent rags under fuel connections before loosening any fitting.
Wrap a thick towel around fittings to catch residual fuel.
Avoid lying directly under the fuel filter when removing it.
Tools You’ll Need
Having the right tools makes the job faster and safer.
Must-Have Tools
Fuel line disconnect tools in sizes 5/16″, 3/8″, and 1/2″ prevent damage to quick-connect O-rings. One user noted you will need the special tool to disconnect the lines from the filter.
Helpful Additions
Fuel pressure gauge with bleed valve allows testing and controlled release.
Fuse pullers or needle-nose pliers for fuse removal.
Small pry tool helps unclip electrical connectors.
Socket set and screwdrivers for removing panels.
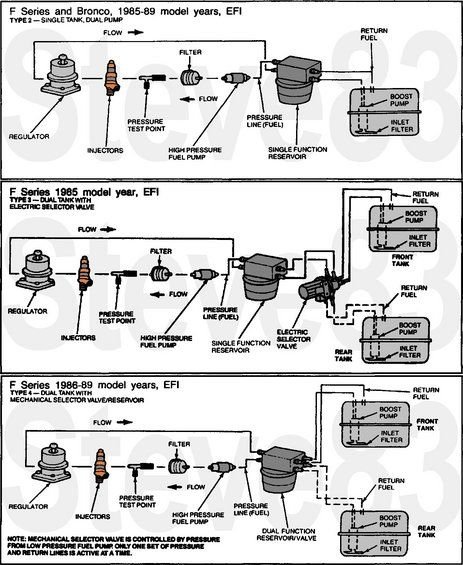
Key Fuel System Components

Understanding these parts helps you troubleshoot and work safely.
Fuel Rail Schrader Valve
The Schrader valve serves as the pressure test and bleed point. Operating range is 29–60 psi depending on engine type.
Inertia Fuel Shutoff Switch
This safety device disables the fuel pump on impact. The red reset button must be fully pressed down to restore function.
Fuel Pump Relay
Controls power to the fuel pump. Located in the under-hood fuse box. Easy to remove and reinstall for quick depressurization.
Fuel Filter
Mounted on the frame rail near the fuel tank. Even if it looks clean externally, it can be internally clogged. One filter change raised pressure from 29 psi to 31 psi and fixed drivability issues.
Troubleshoot Common Fuel Pressure Issues
Low fuel pressure can mimic misfires, stalling, or poor acceleration.
Case Study: Intermittent Stalling
A 1990 F250 5.8L with dual tanks exhibited random dying. Testing revealed only 10 psi at the Schrader valve despite audible fuel pump operation.
Possible causes include clogged fuel filter, failing fuel pump, restricted tank pickup, leaking pressure regulator, or faulty Schrader valve.
Expert Advice: Full diagnostics are needed. Test with a known-good gauge and check both tanks independently.
Model and Year Tips
The inertia switch location behind the passenger kick panel is standard for 1997–2008 F150s.
Relay access under the hood is easier than fuses on many models including 1998.
The Schrader valve appears on most return-style fuel systems.
This guide applies only to gasoline engines. Diesel Power Stroke models have different procedures.
Best Methods Ranked
| Method | Safety | Ease | Recommendation |
|---|---|---|---|
| Inertia Switch | High | High | Factory method, most recommended |
| Fuel Pump Relay | High | High | Best under-hood option |
| Fuel Pump Fuse | High | Medium | Harder to access |
| Schrader Valve | Medium | Medium | Effective but messy |
| Let Truck Sit | Low | High | Slow and unreliable |
Final Step-by-Step Summary
Turn off the engine and remove the ignition key.
Remove the fuel filler cap to vent tank pressure.
Choose your method: trip the inertia switch and crank, pull the fuel pump relay and crank, bleed the Schrader valve with a tool, or wait 8–12 hours.
Confirm zero pressure before disconnecting any lines.
Perform your repair (fuel filter replacement, pump service, etc.).
Reconnect all parts securely.
Reset the inertia switch by pressing the red button down, or reinstall the relay or fuse.
Cycle ignition to “Run” 2–3 times to prime the system.
Start the engine and check for leaks.
Frequently Asked Questions About Depressurizing Fuel System F150
Do I really need to depressurize the fuel system before changing the filter?
Yes. The fuel system stays pressurized even after the engine is off. Skipping this step can result in a dangerous spray of gasoline when you disconnect the filter lines.
How long does it take to depressurize the fuel system on an F150?
Using the inertia switch or relay method takes about 30 seconds of cranking. The Schrader valve method releases pressure in seconds. Letting the truck sit overnight takes 8–12 hours.
Why won’t my F150 start after resetting the inertia switch?
The reset button must be fully pressed down until it clicks. If not fully depressed, the fuel pump remains disabled and the engine won’t start even with all other components working properly.
Can I use the Schrader valve method safely?
Yes, but with caution. Wear safety glasses and work in a well-ventilated area away from sparks or flames. Wrap a thick rag around the valve to control fuel spray.
What’s the easiest method for depressurizing an F150 fuel system?
Pulling the fuel pump relay under the hood is often the easiest. No interior disassembly is needed, and it takes seconds to perform.
Key Takeaways for Depressurizing Your F150 Fuel System
Always depressurize before opening any fuel system component. Use the inertia switch or fuel pump relay method for the safest results. Wear eye protection, use proper disconnect tools, and never skip the reset step after service. With these steps, you’ll complete your F150 fuel system work safely and successfully every time.


