
If your 2007 Ford F-150 won’t start and all you hear is a loud click, you’re not alone. One of the most common failure points on the 5.4L V8 model is the starter motor. When it fails, the engine won’t crank even with a fully charged battery and working headlights. Replacing the starter isn’t easy, but it’s entirely doable with the right tools and technique. The biggest challenge is that stubborn top mounting bolt tucked between the exhaust manifold and frame rail. This guide walks you through every step from disconnecting the battery to testing your fix so you can get your truck back on the road in under three hours.
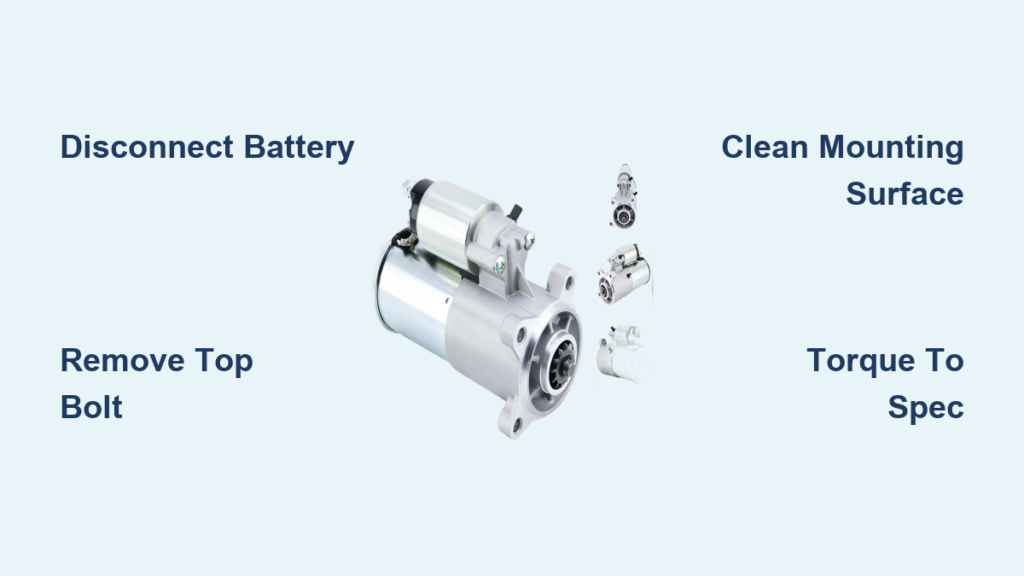
Disconnect Battery Safely Before Starting
Before touching any tools, cut power to prevent sparks or short circuits. The starter carries full battery voltage, so one accidental ground can fry electronics or cause injury.
Remove Negative Terminal
Use a 10 mm wrench or socket to loosen the negative battery cable. Disconnect it completely and tuck it away from the battery post. Wrap the end in a clean rag or use a cable protector to ensure it cannot reconnect. Never skip this step because live power near the solenoid is dangerous.
Confirm Power Is Off
Turn the key to “on” and check for dashboard lights. If nothing powers up, the battery is safely disconnected. This also resets minor electrical glitches, helping isolate starter issues from other faults.
Locate the Starter and Plan Your Approach

On the 2007 F-150 with the 5.4L V8, the starter is mounted low on the passenger side near the transmission bell housing. Knowing where it sits and what blocks access saves time and frustration.
Find the Starter Body
Crawl under the truck and look where the engine meets the transmission. The starter is a cylindrical unit bolted at two or three points. It connects to a large red battery cable and smaller signal wires. You will see it nestled between the exhaust manifold and frame rail.
Assess Clearance Challenges
The top bolt is the main obstacle. It is buried behind the starter body with barely enough room for a socket. The crossmember and wheel well liner further limit access from above. Some mechanics remove the crossmember while others use flexible tools. Either way, plan your approach before starting.
Remove Electrical Connections From Starter
With the battery off, disconnect all wiring from the starter. Label each connector or take photos so you can reconnect them correctly later.
Unhook Main Power Cable
Use a 13 mm socket to remove the large bolt securing the red battery cable to the solenoid. This carries full 12V, so keep it away from metal surfaces once loose. If the terminal is corroded, clean it with a wire brush or emery cloth before removal.
Disconnect S Terminal Wire
The small signal wire triggers the solenoid when you turn the key. It is fastened with a 10 mm bolt. Swing space is extremely limited, often less than 15 degrees. Use a flex-head ratchet or stubby wrench to avoid slipping and stripping the bolt.
Remove Ground Stud and Optional Connector
A 13 mm nut secures the ground wire to a stud on the starter or mounting surface. Remove it carefully to maintain grounding path integrity. Some models have an additional 8 mm connector, likely a sensor or secondary ground. Confirm its presence on your truck and set aside safely.
Extract Mounting Fasteners
Now comes the hardest part: getting out the bolts that hold the starter in place. Two fasteners are standard, top and bottom, with some models using a stud-and-nut combo at the bottom.
Loosen Bottom Fastener First
If it is a bolt, loosen it slightly but leave it threaded to support the starter’s weight. If it is a stud with nut, remove the nut but do not let the starter drop. This keeps it stable while you tackle the top bolt.
Extract the Top Bolt
This is where most people struggle. The top bolt is 13 mm, not 14 mm, so do not guess. Use a short extension between 1 and 3 inches, a swivel socket, and a 1/4 inch drive flex-head ratchet. Approach from underneath for the best angle.
Break initial torque with a 3/8 inch drive, then switch to the smaller ratchet for full removal. Two swivels in series can help navigate the tight turn. A helper guiding the socket from below makes this much easier.
Remove Crossmember If Needed
If the top bolt will not budge or space is too tight, remove the crossmember. It is held by four bolts, two per side. Use 18 mm or 15 mm sockets depending on condition. Spray with penetrating oil first if rusted. Once removed, access improves dramatically.
Pull Out the Old Starter
With all fasteners gone, carefully pull the starter straight out. It may need slight wiggling to clear the flywheel or frame.
Support During Removal
Letting the starter drop can damage wiring or pinch fingers. Hold it securely as you guide it out. Place it on a clean surface for inspection.
Inspect for Failure Signs
Check the old unit for burnt smell indicating internal short or overheating. Look for corrosion on the solenoid terminal leading to voltage drop. Examine for worn brushes or seized gear, common at around 70,000 miles. Watch for moisture damage if the truck was driven in mud or flooded areas. These clues help confirm the diagnosis and prevent repeat failures.
Clean Mounting Surface and Flywheel
A dirty or corroded interface can cause poor grounding and premature failure. Take a few minutes to prep the area.
Scrape Off Corrosion
Use a wire brush or die grinder with wire cup to clean the aluminum bell housing where the starter mounts. Remove all rust, grime, and old sealant. This ensures solid electrical contact and prevents future seizing.
Inspect Flywheel Teeth
Shine a flashlight into the access hole and rotate the engine slightly to view the flywheel ring gear. Look for chipped, cracked, or heavily worn teeth. Damaged teeth can mimic starter failure by preventing engagement. If damage is found, the starter may have failed due to misalignment or could cause the new one to fail quickly.
Install New Starter Unit

Now reverse the removal process, but in the correct order. Installing wrong leads to misalignment or stripped bolts.
Align Bottom Hole First
Guide the new starter into place, making sure the drive gear slides smoothly into the flywheel ring gear. Insert the bottom fastener and hand-tighten. Do not torque yet because you need to let it pivot for top bolt alignment.
Thread Top Bolt with Swivel Tools
Use the same short extension and swivel socket to start the top bolt. Hand-thread it first to avoid cross-threading. Aluminum threads in the block are easy to strip, so go slow. Tighten the top bolt fully first because you will not get another good shot once the starter is secured below.
Torque to Specification
Use a torque wrench if possible. Over-tightening cracks aluminum while under-tightening causes vibration and loosening. Apply anti-seize compound to bolt threads, especially in aluminum, to prevent future seizing.
| Fastener | Torque |
|---|---|
| Mounting bolts | 18 ft-lb |
| Ground stud nut | 15 ft-lb |
| Power cable bolt | 9 ft-lb with locking washer |
| Signal wire bolt | 53 in-lb |
Reconnect Electrical Wiring
Reattach all wires in reverse order of removal. Clean terminals again if needed.
Reattach Ground First
Secure the 13 mm ground nut to reestablish chassis grounding. This prevents stray voltage during reconnection.
Reconnect S Terminal and Power Cable
Reinstall the 10 mm signal wire. Do not over-tighten because the terminal is fragile. Then bolt on the large red cable with the 13 mm socket. Ensure no bare metal touches the body.
Replace Solenoid Cover If Available
Some starters come with a plastic cover over the solenoid terminal. Install it to prevent accidental shorting from tools or debris.
Reconnect Battery and Test Start
You are almost done. Time to bring the system back to life.
Reconnect Negative Terminal
Reattach the black battery cable and tighten securely. A small spark is normal because it means the ECU and clock are re-powering.
Test Crank Function
Turn the key to “start.” Listen for immediate engagement, smooth consistent cranking, and automatic disengagement when the engine starts. No clicking or no crank means double-check battery charge, ground connection, S terminal attachment, and ignition switch function. Grinding noise could mean damaged flywheel teeth or misaligned starter.
Troubleshoot Post-Installation Issues
Even a perfect install can reveal other problems. Do not assume every noise is the starter.
Investigate Ticking Sounds
Some users report a passenger-side ticking after replacement. Possible causes include loose spark plug common on 5.4L engines, exhaust manifold leak, or failing cam phasers or timing chain tensioners. If the tick worsens when warm, it is likely unrelated to the starter but worth monitoring.
Prevent Repeat Failures
Avoid cheap starters in the $30 to $50 range. Given the labor, invest in a Duralast Gold, OE-replacement, or marine-grade sealed unit. These handle moisture better and come with lifetime warranties. Clean connections annually and apply anti-seize during future services.
Choose the Right Replacement Starter
Not all starters are built the same. Pick one that lasts.
Recommended Brands
Duralast Gold from Advance Auto runs about $200 after discount with lifetime warranty and includes core refund. AutoZone Premium offers 20% off with shipping and solid performance. NAPA Echlin or Bosch provide OE-level quality at slightly higher cost. Avoid rebuilt solenoids or no-name imports because they fail faster and cost more in long-term labor.
Upgrade for Harsh Conditions
If you drive in mud, snow, or coastal areas, consider a sealed or marine-grade starter. It resists moisture and corrosion far better than standard units.
Key Tips From Experienced Mechanics
Learn from those who have done this a dozen times.
Use an Air Ratchet Setup
Pros use an air ratchet with a 3-inch 3/8-inch extension, impact wobbler, and 13 mm impact socket. This cuts job time to under 10 minutes once the crossmember is out.
Try the One-Eye Trick
One mechanic claims closing one eye improves depth perception when reaching blindly. It helps align sockets in tight, unseen spaces.
Two Short Extensions Beat One Long
Stacking two 3-inch extensions with a stubby adapter gives better control than a single 6-inch bar. There is less chance of hitting the frame or dropping the socket.
Final Checks and Long-Term Care
Before closing up, verify everything.
Do a Wiggle Test
Grab the starter and try to move it. If it shifts, the bolts are not tight enough. A solid unit will not budge.
Clear the Work Area
Remove rags, tools, and loose parts from under the truck. Start the engine and let it run for 30 seconds. Watch for warning lights or unusual noises.
Schedule Preventive Maintenance
Clean starter connections during oil changes. Inspect for corrosion every 6 months. Keep bell housing area free of mud and debris. Reapply anti-seize during future removals.
Frequently Asked Questions About Replacing the 2007 F-150 Starter
How long does it take to replace the starter on a 2007 Ford F-150?
The first starter change takes 1.5 to 3 hours. Once you have battled that top bolt, the second replacement takes under 30 minutes.
What are the symptoms of a failing starter on a 2007 F-150?
Common symptoms include clicking noise when turning the ignition key with no engine crank, no-crank condition despite functional headlights and battery, and intermittent starting behavior where the engine starts only after multiple attempts.
Why is the top bolt so difficult to remove on the 2007 F-150 starter?
The top bolt is located behind the starter body between the exhaust manifold and frame rail. Clearance is extremely limited, requiring swivel sockets, short extensions, and sometimes crossmember removal to access it properly.
Can I replace just the starter solenoid instead of the whole unit?
While solenoid-only repairs exist, they are not recommended for the 2007 F-150. The labor intensity justifies investing in a complete high-quality starter with warranty. Cheap solenoid repairs often fail faster and cost more in the long run.
What causes starter failure on the 2007 Ford F-150?
Common causes include moisture ingress and mud exposure leading to brush and bearing degradation, internal solenoid contact failure, and worn components at around 70,000 miles. Corroded electrical connections also contribute to premature failure.
Do I need to remove the exhaust manifold to replace the starter?
No, exhaust manifold removal is not required. However, clearance remains tight, and the top bolt access is the most challenging aspect of the job even with the manifold in place.
Key Takeaways for Replacing Your F-150 Starter
Replacing the starter on a 2007 Ford F-150 with a 5.4L V8 is a feasible DIY task, but the top mounting bolt access is the single greatest challenge. Under-vehicle approach with swivel sockets, short extensions, and a helper is mandatory for success. Crossmember removal dramatically improves access and is recommended for rust-prone or high-mileage vehicles. Clean all electrical connections thoroughly because corrosion is a common cause of repeat failure. Torque to specification using 18 ft-lb for mounting bolts, 15 ft-lb for ground, and 9 ft-lb for power cable. Invest in a high-quality Duralast Gold or OE-replacement unit with lifetime warranty because the labor cost justifies a durable part. Monitor for post-installation noises like ticking, which may indicate unrelated issues such as loose spark plugs or failing cam phasers. Apply anti-seize compound during reinstallation to prevent future bolt seizure, and inspect starter connections annually during routine maintenance to extend the replacement unit’s life.


