
If your Ford F-150 clunks over bumps, steers loosely, or fails alignment, worn lower ball joints are likely the culprit. These critical suspension components connect the lower control arm to the steering knuckle, allowing smooth wheel movement while maintaining stability. Over time, especially between 100,000 and 150,000 miles, they wear out, creating play that compromises safety and tire life.
Replacing lower ball joints on a 1997 to 2015 F-150 is a feasible DIY job with the right tools and approach. While 4WD and 2WD models differ slightly in axle setup, the core process remains consistent: remove the front wheel, separate the knuckle, press out the old joint, and press in the new one using a ball joint press kit. This guide walks you through every step, from diagnosis and disassembly to torque specs, reassembly, and post-installation checks.
Diagnose Ball Joint Wear on Your F-150
Check for Clunking and Steering Drift
Worn lower ball joints often announce themselves with a clunk or knock when hitting bumps or turning. You might also feel steering vibration or notice the truck drifting to one side. These symptoms mimic bad tie rods or control arm bushings, so a thorough inspection is essential.
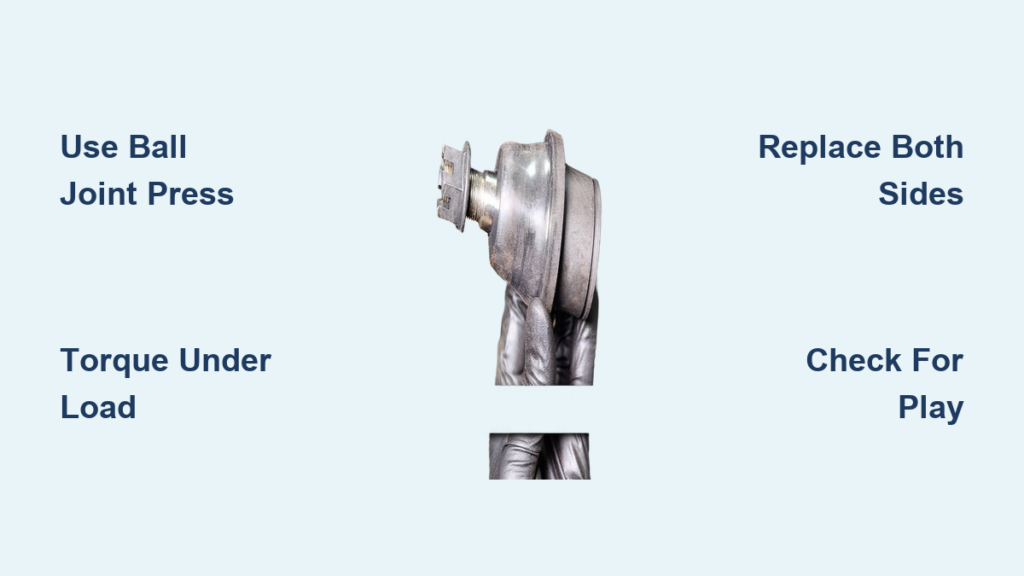
If your F-150 recently failed alignment due to unadjustable camber or caster, worn ball joints are a likely cause. Even if only one side seems bad, replace both sides. Wear is usually even, and doing both prevents a second teardown down the road.
Perform the Pry Bar Test
To confirm play, follow these steps:
- Jack up the front end and support with jack stands.
- Place a pry bar between the lower control arm and steering knuckle.
- Lift and lower the control arm while watching for movement.
Excessive vertical play, more than 1/8 inch, means the joint is worn. Also inspect the rubber boot. If it is torn or leaking grease, replacement is urgent.
Pro Tip: Have a helper turn the steering wheel while you watch suspension movement. Any slop at the ball joint stud indicates failure.
Gather Essential Tools and Equipment
Required Tools for the Job
You will need:
- Floor jack and jack stands
- Lug wrench or impact gun
- 24 inch breaker bar
- Torque wrench, 1/2 inch drive
- Ball joint press kit, rentable from AutoZone or O’Reilly
- Snap ring pliers with 90 degree bend
- Pry bars, two different sizes
- Hammer and mallet
- Swivel sockets, 6 inch and 10 inch
- Penetrating oil such as PB Blaster
- Brake cleaner and wire brush
Critical: Rent a ball joint press kit. It is the only safe way to remove and install press fit joints without damaging the control arm, especially on aluminum arms found in later model F-150s.
Safety First: Lift and Secure the Truck
Follow these steps for safe lifting:
- Park on level ground, engage the parking brake, and chock the rear wheels.
- Loosen lug nuts slightly before lifting.
- Jack up the front using a frame mounted lift point.
- Place jack stands under the frame rails. Never rely on the jack alone.
- Remove both front wheels.
Warning: Never work under a vehicle supported only by a floor jack. Always use jack stands.
Expert Note: Turn the steering wheel fully to the opposite side, for example right for driver side work, to improve access to the ball joint.
Remove Front Wheel and Brake Components
Disconnect ABS and Remove Caliper
Start by unplugging the ABS sensor:
- Locate the red slide connector and brown locking tab near the knuckle.
- Use a small screwdriver to release the brown tab.
- Slide the red connector apart.
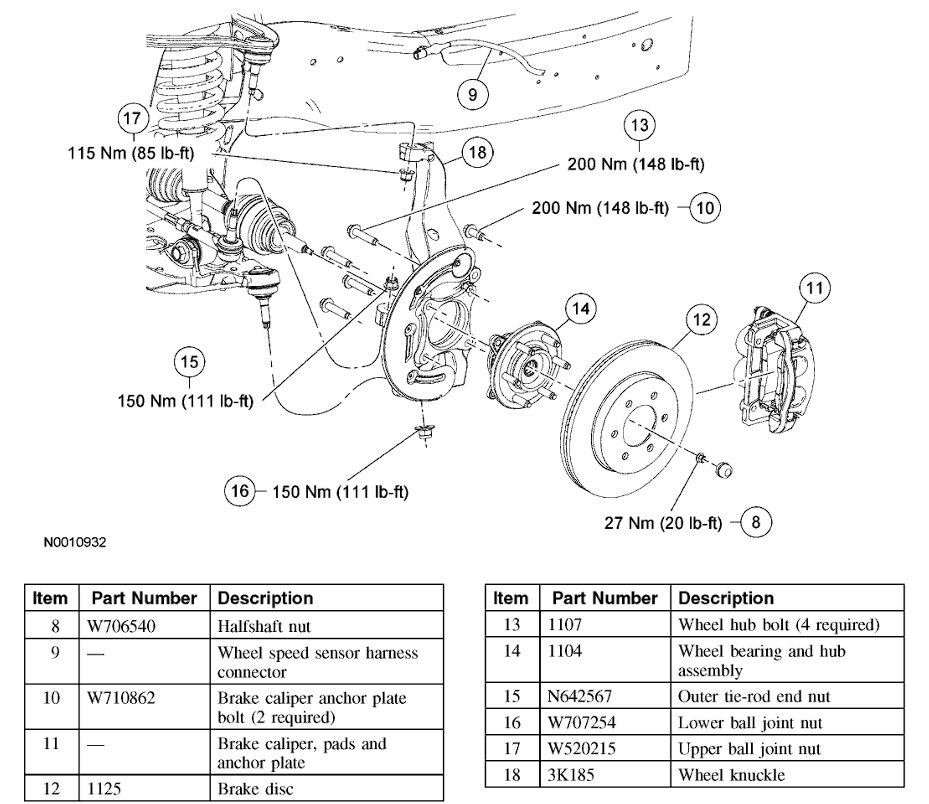
Next, remove the brake line bracket from the fender, typically an 8 mm or 10 mm bolt. Remove the caliper mounting bolts, usually 18 mm or 21 mm. Hang the caliper with a bungee cord or wire. Never let it dangle by the brake hose.
Remove the rotor by sliding it off the hub. If it sticks, clean the hub with a wire brush and spray with penetrating oil.
Remove Axle Nut and Separate Steering Components
Remove Axle Nut on 4WD vs 2WD Models
For 4WD models:
- Pry off the dust cap with a flathead screwdriver.
- Remove the 13 mm or 24 mm axle nut.
For 2WD models:
- Remove the axle nut cap, then the axle nut.
Note: The axle stays in place. It moves with the knuckle. You will slide it out later during reassembly.
Torque Reminder: Reinstall with 25 ft-lbs for 4WD or 20 ft-lbs for 2WD. Use a pry bar between lug studs to prevent hub rotation.
Disconnect Tie Rod End
Follow these steps:
- Loosen the 21 mm tie rod securing nut, leaving 4 to 5 threads engaged.
- Tap the side of the knuckle with a hammer to break the taper.
- Pull the tie rod end down and out.
- Secure it with a bungee to avoid stressing the steering boot.
Separate Upper Ball Joint If Needed
Some F-150 models require upper joint separation for clearance:
- Loosen the 21 mm or 22 mm upper ball joint nut, leaving it threaded.
- Use a pry bar between the upper control arm and knuckle to pop it free.
- Tap lightly if needed.
Note: On some years, you can drop the knuckle without separating the upper joint. If tight, separate it.
Remove Lower Ball Joint and Knuckle
Remove the Lower Ball Joint Nut
Remove the 24 mm nut from the lower ball joint stud. Re-thread it a few turns as a safety stop. Tap the knuckle downward with a hammer to push the stud out.
Slide Knuckle Off the Axle
Lower the knuckle assembly off the axle shaft. For 4WD models, guide the CV axle through the hub carefully. Now the knuckle is free. Place it on a bench or the sway bar for ball joint work.
Press Out the Old Ball Joint
Remove the Snap Ring
Locate the snap ring in the groove on the control arm. Use 90 degree snap ring pliers to remove it. If rusted, tap gently with a screwdriver and hammer.
Warning: Wear safety glasses. Snap rings can eject suddenly.
Soak with Penetrating Oil
Spray PB Blaster or Liquid Wrench around the ball joint base. Let it soak for up to 24 hours if corrosion is heavy.
Use a Ball Joint Press Kit
Follow these steps to press out the old joint:
- Assemble the press. Place the lower receiver cup under the joint. Position the top adapter over the stud. Insert long bolts through the press arms into the control arm bolt holes.
- Tighten bolts evenly with a wrench or breaker bar.
- Crank steadily until the joint pops free.
Expert Advice: Never beat on the ball stud with a hammer. You risk cracking an aluminum control arm. Use the press every time.
Install New Lower Ball Joint

Prepare the Control Arm
Clean the bore with 400-grit sandpaper and brake cleaner. Lubricate with chassis grease or anti-seize. Ensure the grease-relief hole faces inward, toward the vehicle center.
Pro Tip: Freeze the new ball joint for 1 to 2 hours. Metal contraction can aid installation.
Press in the New Joint
Follow these steps:
- Set up the press. Place a cup under the control arm. Insert the new ball joint into the bore. Top with a flat adapter or cup to distribute pressure.
- Crank evenly until the flange is flush with the control arm surface.
- Confirm the joint is fully seated and centered.
Install the Snap Ring
Use the new snap ring included with Moog joints. Install with sharp edge down, round side up. Fully seat it in the groove with pliers. Rotate the joint to ensure the ring does not catch.
Install Grease Fitting and Lubricate
Remove the plug with a 10 mm zerk tool. Install the grease fitting, oriented forward or upward for future access. Pump 20 to 35 strokes of grease until it emerges from the boot. This confirms proper seal and lubrication.
Recommended Part: Moog-K500267. It includes a serviceable zerk, snap ring, and lifetime warranty.
Reassemble the Front Suspension
Reinstall the Knuckle
Slide the knuckle over the CV axle for 4WD or hub for 2WD. Align the lower ball joint stud with the knuckle hole. Hand-thread the 24 mm nut and tighten temporarily.
Reconnect Upper Ball Joint
Align the stud and nut. Tap the knuckle upward if needed to seat. Torque to 85 ft-lbs and insert the cotter pin. Do not back off to align the hole.
Reattach Tie Rod End
Insert the stud into the knuckle. Install and torque the nut to 85 ft-lbs. Ensure the cotter pin hole aligns.
Reinstall Brake and Wheel Components
Mount Rotor and Caliper
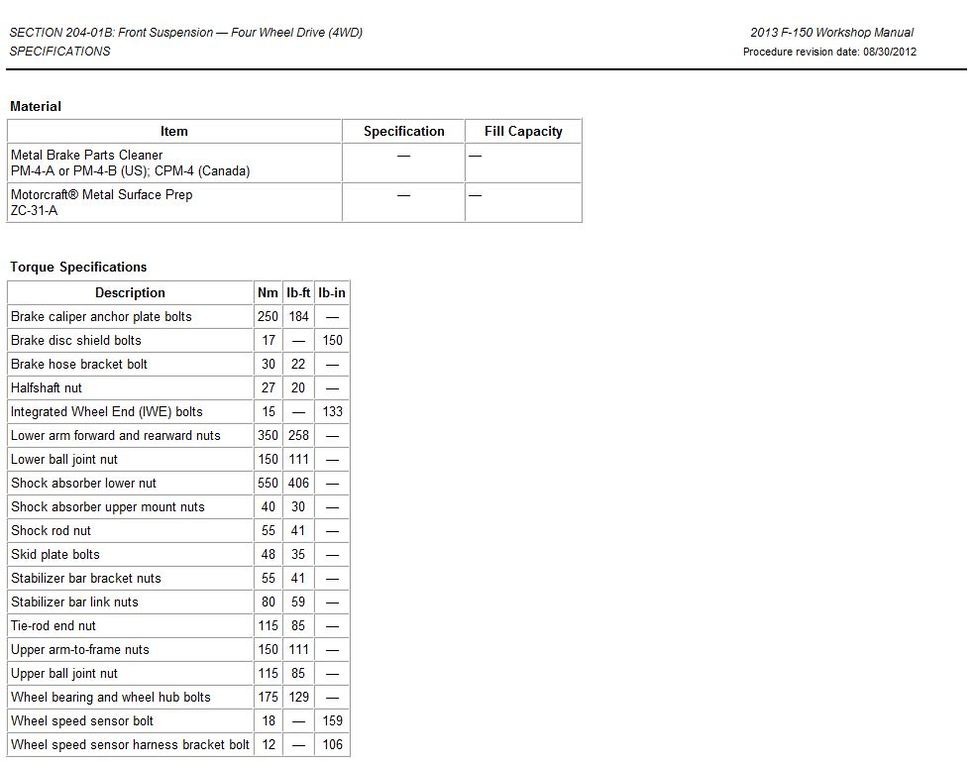
Slide the rotor onto the hub. Reinstall the caliper bracket if removed and torque bolts to 148 ft-lbs. Reinstall the caliper and torque to 18 ft-lbs.
Reconnect ABS and Vacuum Lines
Re-engage ABS connectors. Push the red slide first, then lock the brown tab. On 4WD models, reconnect the vacuum line to the IWE actuator. Ensure a tight seal.
Reinstall Axle Nut and Cap
For 4WD, torque to 25 ft-lbs using a pry bar to hold the hub. For 2WD, torque to 20 ft-lbs. Reinstall the dust cap with grease or RTV to seal.
Install Wheel and Torque Lug Nuts
Mount the wheel and hand-tighten nuts. Lower the truck slightly to remove suspension load. Torque lug nuts to 150 ft-lbs in a criss-cross star pattern.
Torque Lower Ball Joint Nut Under Suspension Load
Why Load Matters
The lower ball joint nut must be torqued under load to ensure proper bearing preload. If torqued in the air, the joint may bind or wear prematurely.
How to Torque Under Load
Follow this procedure:
- Lower the truck until tires touch the ground but weight is not fully on.
- Place a floor jack under the lower control arm.
- Raise until suspension reaches normal ride height.
- Torque the lower ball joint nut to 111 ft-lbs for 2004 to 2014 models, or 85 ft-lbs for 2015 models.
Critical Rule: If the cotter pin hole does not align at torque spec, do not back off. Proceed to the next available hole.
Post-Installation Checks and Road Test
Final Assembly Inspection
Confirm all bolts are torqued. Check that the snap ring is seated, the boot is intact, and the ABS connector is clicked. Inspect vacuum lines on 4WD models for leaks. Ensure no gaps at tie rod, ball joint, or caliper.
Grease the Joint Again
Pump 20 to 35 strokes of grease. Watch for grease to emerge from the boot. This confirms full lubrication.
Perform a Low-Speed Test
Drive at under 25 mph and check for:
- Clunking or knocking
- Steering wandering
- Brake pulsation
- 4WD engagement issues if equipped
Get a Wheel Alignment
Alignment is mandatory after ball joint replacement. Focus on caster, camber, and toe-in. Toe-in is most commonly affected. Use cam bolts on the upper control arm if camber adjustment is needed. Marking bolt positions before removal helps preserve baseline alignment.
Avoid Common DIY Mistakes
Skip the Hammer, Use the Press
Beating on the ball stud risks cracking aluminum control arms. Always use a ball joint press kit.
Do Not Forget Anti-Seize
Apply anti-seize to axle splines, hub, and threads to prevent future seizing.
Never Back Off to Align Cotter Pin
This compromises joint integrity. Torque fully, then use the next available hole.
Replace Both Sides
Wear is even on both sides. Replacing only one leads to imbalance and premature wear on the other.
Frequently Asked Questions About Ford F-150 Ball Joint Replacement
How long does it take to replace lower ball joints on an F-150?
The job takes 4 to 6 hours per side for an intermediate DIYer. This includes disassembly, pressing out the old joint, pressing in the new one, and reassembly. Plan for a full day if replacing both sides.
What are the symptoms of a bad lower ball joint on a Ford F-150?
Common symptoms include clunking over bumps, steering looseness or vibration, vehicle drifting to one side, uneven tire wear, and excessive play detected with a pry bar test. A torn or leaking grease boot is also a warning sign.
Do I need a special tool to replace F-150 ball joints?
Yes. A ball joint press kit is essential. It safely presses the old joint out and the new one in without damaging the aluminum control arm. These kits are available for free rental at AutoZone, O’Reilly, and Advance Auto Parts with a deposit.
What is the torque spec for the lower ball joint nut on a 2004 to 2014 F-150?
The lower ball joint nut torques to 111 ft-lbs for 2004 to 2014 models. For 2015 models, it is 85 ft-lbs. This must be done under suspension load, not with the wheel hanging freely.
Can I replace just one lower ball joint on my F-150?
It is not recommended. Wear is typically even on both sides. Replacing only one leads to uneven handling and the other side will likely fail soon, requiring another teardown.
How often do Ford F-150 lower ball joints need replacement?
Lower ball joints typically fail between 100,000 and 150,000 miles. Regular inspection during this mileage range helps catch wear before complete failure.
Key Takeaways for Replacing Lower Ball Joints on Your Ford F-150
Replacing lower ball joints on your F-150 is a rewarding DIY project that saves significant labor costs. The process requires patience, the right tools, and attention to torque specifications, especially the critical step of torquing the lower ball joint nut under suspension load. Using a ball joint press kit is non-negotiable. Hammering risks cracking the aluminum control arm, a costly mistake.
Always replace both lower ball joints at the same time, even if only one shows symptoms. Inspect related components like tie rods and upper ball joints while the knuckle is removed. Finish with a professional wheel alignment to ensure proper handling and tire wear. With proper preparation and care, you will restore safe, smooth handling to your truck.


