
If your Ford F-150’s clutch feels spongy, sticks to the floor, or makes shifting gears difficult, air in the hydraulic system is likely the culprit. Bleeding the clutch removes trapped air, restoring firm pedal feel and proper disengagement. This guide delivers a complete, step-by-step breakdown tailored to both external and internal slave cylinder setups found in 1993–2006 F-150s. You’ll learn the best methods, tools, and pro tips to achieve a rock-solid pedal, even on the most stubborn systems.
Identify Your Ford F-150 Slave Cylinder Type
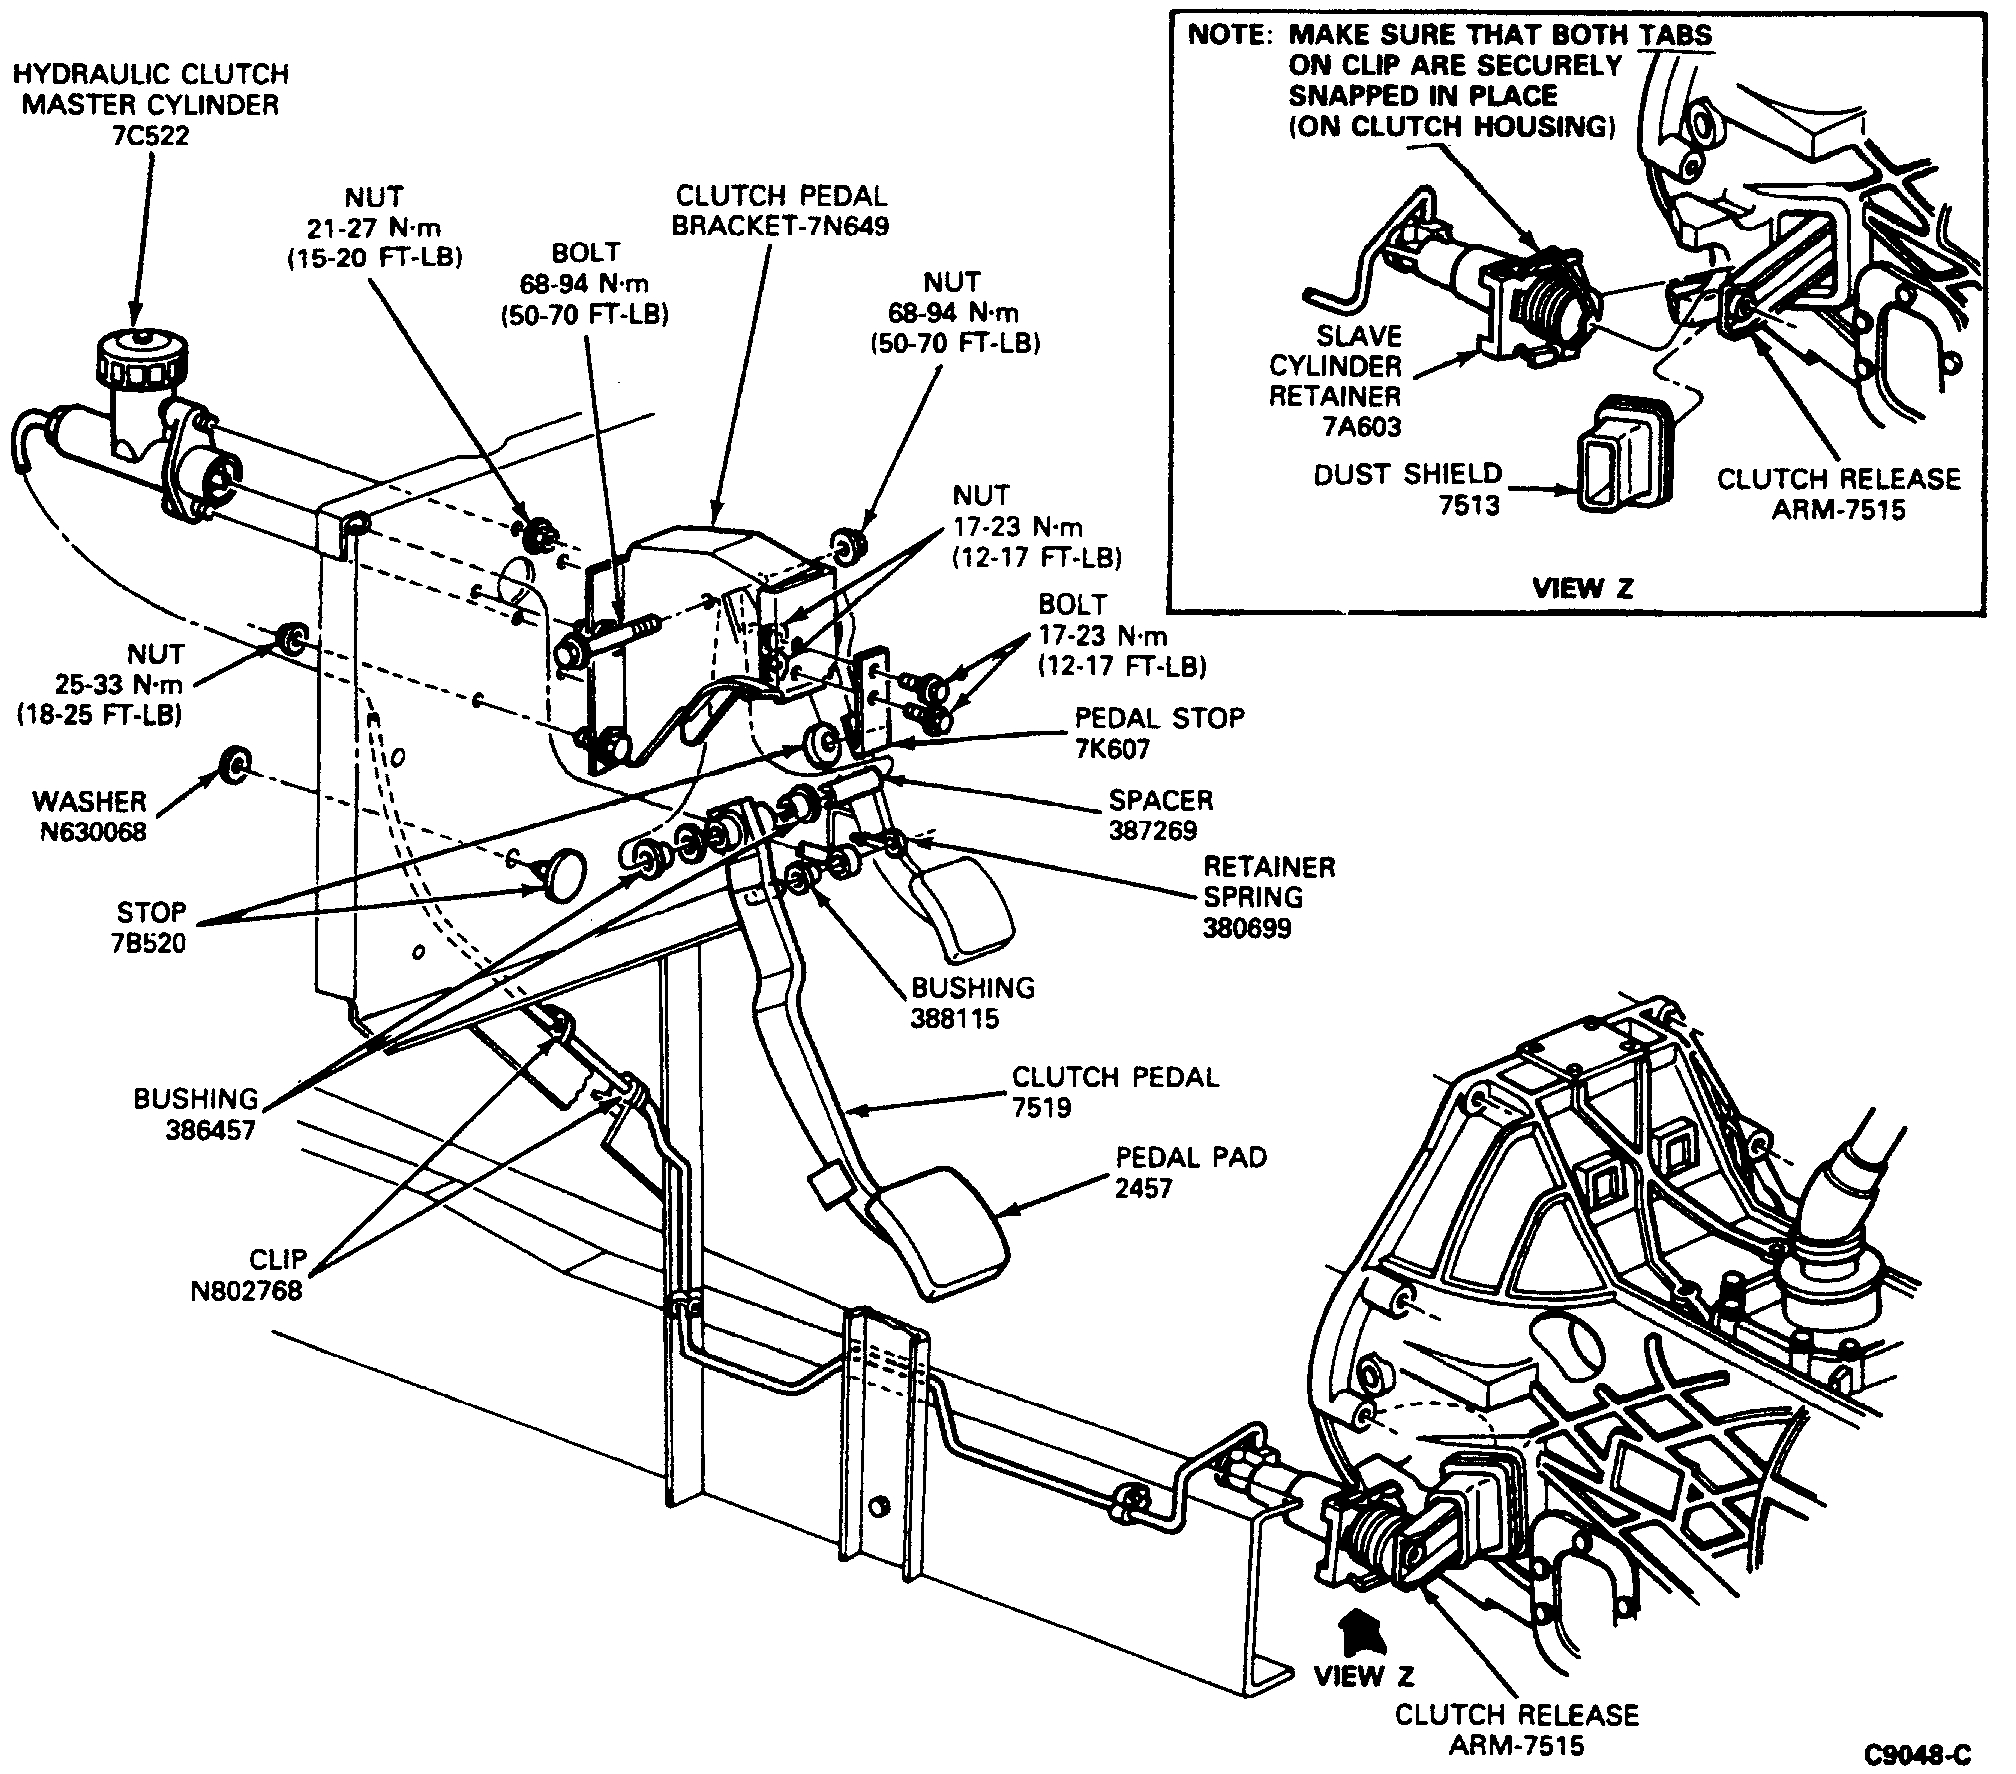
Before starting, confirm whether your F-150 has an external or internal slave cylinder, as this determines your bleeding strategy.
External Slave Cylinder (Pre-1999, 4-Speed Manual)
Found on older F-150s with 4-speed manual transmissions, this unit mounts externally on the bell housing and has an accessible bleeder valve.
• Bleedable using standard pump-and-hold methods
• Look for a hex or Allen-style bleeder valve on the transmission side
• Easier to service without major disassembly
Internal Concentric Slave Cylinder (1993–2006, 5-Speed M5OD)
Most common on 5-speed manual F-150s, this slave is housed inside the transmission bell with no external bleeder.
• No traditional bleed valve requires alternative methods
• Bleeding must pull air from the slave back toward the master cylinder
• Vacuum, reverse, or pressure bleeding is required
Quick ID Tip: If you cannot find a bleeder on the transmission, you likely have an internal slave. Also, 5-speed models typically use this design.
Remove the Master Cylinder Diaphragm Before Bleeding

A hidden enemy of successful bleeding is the black rubber diaphragm inside the clutch master cylinder cap. This component must be removed for a successful bleed.
Why Remove the Diaphragm
• This cup blocks air from escaping the reservoir
• Causes false low-fluid readings and prevents proper fluid flow
• Leads to incomplete bleeding and a spongy pedal
How to Remove It
- Open the clutch fluid reservoir near the brake master cylinder
- Lift out the black rubber cup and discard it permanently
- Replace the cap loosely during bleeding to keep debris out
Critical Step: Skipping this step can doom your entire bleed attempt.
Fill the Reservoir with Correct Brake Fluid
Use DOT 3 or DOT 4 brake fluid. Never use DOT 5, which is silicone-based and incompatible with F-150 clutch systems.
Filling Steps
- Use fresh, sealed fluid. Moisture-contaminated fluid reduces performance
- Fill reservoir to within 1/4 inch of the top
- Keep it full throughout the bleeding process. Never let it run dry
Warning: Brake fluid eats paint. Use drip pans and clean spills immediately.
Choose the Right Bleeding Method for Your F-150
Pick the best method based on your slave type, tools available, and whether you have a helper.
Two-Person Pump-and-Bleed (External Slave)
Ideal for systems with an accessible bleeder valve.
How to Bleed with a Helper
- Attach clear tubing to the bleeder valve and submerge the other end in a fluid-filled container
- Helper presses clutch fully to the floor and holds it
- Open bleeder 1/4 to 1/2 turn. Fluid and air escape
- Close bleeder before helper releases the pedal
- Repeat until flow is steady and bubble-free
- Torque bleeder to 7–10 ft-lbs when done
Tip: Wipe the bleeder clean before opening to avoid dirt entering the system.
Reality Check: Some users report needing 150 or more cycles due to high-line air traps.
Vacuum Bleeding at Master Cylinder (Internal Slave)
Best solo method for internal slaves. This pulls air from the highest point.
What You Need
• Mighty Vac or similar vacuum pump
• Coned adapter for reservoir
• Fluid catch cup
Vacuum Bleed Steps
- Remove diaphragm and fill reservoir with fresh brake fluid
- Insert coned adapter into reservoir and seal tightly
- Connect vacuum pump and apply approximately 25 inches Hg
- Manually press and release clutch pedal
- Watch for bubbles. Continue until flow is clear and steady
- Let system sit under vacuum for 2–3 minutes between cycles
- Repeat 2–3 times if needed
Pro Insight: This method pulls air from the slave end up through the line, perfect for concentric systems.
Success Sign: Pedal feels firm and returns halfway after the first cycle.
Reverse Bleeding: Pop the Pedal Technique
Use this after primary bleeding to force residual air back to the master cylinder.
How It Works
- Remove master cylinder cap
- Have helper press clutch to the floor
- Helper releases pedal quickly, letting it pop up fast
- Watch reservoir. Bubbles rise from the bottom
- Repeat 10–20 times until no more bubbles appear
Key: Fast pedal return is essential. Weak spring? Assist manually.
Gravity Bleeding (Solo, Pre-Bleed)
Let gravity do the work. Ideal for initial fill or no-helper situations.
Steps
- Open bleeder valve if accessible
- Fill reservoir completely
- Let fluid drain slowly. Air exits with flow
- Wait several hours or overnight
- Close bleeder, top off fluid, finish with pump or vacuum
Caution: Check fluid level often. Do not let master run dry.
Bench Bleed the Master Cylinder
Do this before installation if replacing the master cylinder.
Why It Matters
• Prevents air from entering during install
• Can eliminate the need for full system bleeding
Procedure
- Remove master cylinder and mount at 45-degree angle in a vise with reservoir up
- Fill with fluid and remove diaphragm
- Attach tubing to outlet and submerge in fluid
- Slowly depress piston 10–15 times
- Tap body to release trapped air
- Stop when flow is bubble-free and piston feels stiff
- Pre-fill line with syringe if possible
Bonus: Drastically cuts down post-install bleeding time.
Pressure Bleeding (Fastest, Professional Method)
Used by Ford technicians. Completes bleed in minutes.
Equipment Needed
• Motive Products 0107 Power Bleeder or similar
• 3-tab adapter for F-150 master cylinder
Steps
- Fill pressurized tank with DOT 3 or DOT 4 fluid
- Attach to master cylinder
- Pressurize to 15–20 psi
- Open bleeder valve. Air and fluid exit under pressure
- Close valve, release pressure, test pedal
Advantage: No pumping needed. Works great on internal slaves.
Elevate the Front of Your Truck for Better Air Removal
Tilt the master cylinder upward to help air escape toward the reservoir.
Why It Works
• Makes master cylinder the highest point in the system
• Encourages air to rise toward the reservoir naturally
How to Do It
• Use ramps or jack stands to lift the front end
• Even a small incline helps. No need for extreme height
User Tip: Jack it up. The clutch master needs to be tilted up at an angle for bleeding.
Perform Reverse Bleeding with Oil Squirt Can (Gary’s Method)
For systems that ran completely dry.
Steps
- At slave cylinder, locate white plastic locking sleeve on hydraulic line
- Push sleeve inward with screwdriver to release
- Pull line out
- Insert oil squirt can filled with brake fluid into line end
- Force fluid backward through line into master reservoir
- Continue until bubbles appear in reservoir
- Reconnect line. Push until it clicks
Diagnostic Use: If pedal feels firm with line disconnected but soft when reconnected, the master cylinder is bad.
Final Slave Cylinder Purge Technique
Eliminate the last bit of air trapped in the slave.
Quick Burp Technique
- Close bleeder valve
- Press clutch fully
- Crack open bleeder for 1 second, then close
- Release pedal
- Repeat 2–3 times
Effect: Forces final air pocket out of the slave cavity.
Check for Successful Clutch Bleed
After bleeding, verify the system is fully functional.
What a Good Clutch Feels Like
• Firm, solid pedal with no sponginess
• Returns fully to top position
• Engages in the middle to upper third of travel
• Approximately 1.5 inches of reserve from floor to engagement point
Functional Tests
- In-Gear Test (Engine Off): Shift into gear, press clutch. Vehicle should not roll on a slight incline
- Start Test: Start engine in gear with clutch pressed. Should start only if safety switch is engaged
- Shift Quality: Smooth, grinding-free gear changes with complete disengagement
Leak Check: Inspect master, slave, and line connections for wetness.
Troubleshoot Common Bleeding Problems
Even with the right method, issues can arise. Here is how to fix them.
Spongy Pedal After Bleeding
Cause: Residual air or improper technique.
Fix: Repeat with vacuum or reverse bleeding.
Pedal Sticks to the Floor
Cause: Faulty master cylinder or internal leak.
Fix: Replace master. Bench bleed before install.
No Pressure Builds
Cause: Master failure, disconnected line, or air lock.
Fix: Inspect connections. Bench test master.
Fluid Leaking from Reservoir
Cause: Rubber diaphragm still installed.
Fix: Remove and discard the spacer cup.
Pedal Travel Decreases Over Time
Cause: Air slowly settling.
Fix: Re-bleed after 1–2 days of driving.
Expert Tip: If pedal feels firm with line disconnected but pressure drops when reconnected, the master cylinder is defective.
Maintain Your Ford F-150 Clutch System
Prevent future issues with regular checks.
Fluid Maintenance
• Inspect fluid level monthly
• Replace fluid every 2–3 years to prevent moisture buildup
• Always use DOT 3 or DOT 4
Component Replacement Tips
• Replace slave cylinder when clutch is serviced. Internal units require transmission work
• Bench bleed any new master cylinder before installation
• Consider a power bleeder for future jobs. It pays off in time saved
Frequently Asked Questions About Bleeding a Ford F-150 Clutch
How do I know if my F-150 has an internal or external slave cylinder?
If you cannot find a bleeder valve on the transmission bell housing, you have an internal concentric slave cylinder. Also, 5-speed manual F-150s typically use internal slaves, while 4-speed models use external units.
Can I use DOT 5 brake fluid in my Ford F-150 clutch?
No. Never use DOT 5 fluid. It is silicone-based and incompatible with F-150 clutch hydraulic systems. Use only DOT 3 or DOT 4 brake fluid.
Why does my clutch pedal still feel spongy after bleeding?
Residual air likely remains in the system. Try combining vacuum bleeding with reverse bleeding techniques. Some systems require 150 or more pump cycles to fully purge air.
Do I need to remove the rubber diaphragm in the master cylinder cap?
Yes. This black rubber spacer cup must be removed before bleeding. It blocks air from escaping the reservoir and causes false low-fluid readings.
How long does it take to bleed a Ford F-150 clutch?
Two-person pump-and-bleed takes 15–30 minutes. Pressure bleeding with a power bleeder completes the job fastest. Gravity bleeding may take several hours or overnight.
Why should I elevate the front of the truck when bleeding the clutch?
Elevating the front tilts the master cylinder upward, making it the highest point in the system. This helps air bubbles naturally rise toward the reservoir for easier removal.
Key Takeaways for Bleeding Your Ford F-150 Clutch
Bleeding a Ford F-150 clutch, especially with an internal slave cylinder, can be frustrating, but success comes from patience and the right method. First, identify your slave cylinder type since internal slaves require vacuum or pressure bleeding rather than traditional methods. Second, always remove the rubber diaphragm from the master cylinder cap before starting, as this small step prevents most failed bleeding attempts. Third, combine multiple techniques such as vacuum bleeding followed by reverse bleeding for stubborn air pockets. Most users need two or three methods working together to fully purge the system. Stick with it. Once you achieve that solid pedal, shifting will feel like new again.


