

If your F-150 fan speed is not working, you’re dealing with one of the most common HVAC headaches reported by truck owners across multiple generations. The symptom is unmistakable: your blower runs full blast on high speed but refuses to respond on lower settings, or worse, delivers no airflow at all despite the climate control screen showing everything is normal. The cause depends heavily on your model year, with older trucks (2003–2014) typically suffering from a failed blower motor resistor that costs under $50 to replace, while newer models (2015–2023) often face more complex HVAC module failures requiring dealer-level repairs. This guide walks you through exact diagnostic steps, model-specific fixes, and the professional insights you need to fix the problem without wasting money on unnecessary parts.
Decode Your F-150 Fan Issue
Before grabbing tools, identify your exact symptom to pinpoint the likely cause. The behavior of your fan reveals where the problem lives in the HVAC system.
Only High Speed Works
Fan runs at full blast only when set to speed 4 on older models or speed 7 on newer trucks, with no response from lower settings. This points directly to a failed blower motor resistor on 2003–2014 models or an electronic control module issue on 2015 and newer. High speed bypasses the resistor entirely through a relay, so if lower speeds don’t work, the resistor or control circuit is faulty.
No Fan at Any Speed
If your fan won’t run at all regardless of speed setting, check the blower relay and fuses first. When even high speed doesn’t work, power isn’t reaching the motor at all, which indicates a relay failure, blown fuse, or wiring problem. A simple relay swap test can confirm this in under two minutes.
Weak or Intermittent Airflow
Your fan runs but delivers speed-1 airflow even at maximum setting, or it may work normally at startup then drop to low speed after several minutes. This pattern is common in 2015–2023 models and often relates to HVAC module failure or airflow restrictions within the system.
Climate Control Shows Speed But No Airflow Change
Your screen updates correctly, the fan icon moves, temperature adjustments register, but nothing happens with actual airflow. This points to a communication failure between the climate control module and the blower circuit, or an internal defect in the HVAC control unit.
Test the Blower Relay First

Swap Relay #3 with #4
The fastest free diagnostic for complete fan failure takes less than two minutes and requires no tools. The blower motor relay lives in the under-hood Power Distribution Box, and positions #3 and #4 are physically and electrically identical, making them perfect for swap testing.
Steps:
- Turn ignition OFF
- Open the Power Distribution Box cover
- Remove Relay #3 (blower motor relay) and Relay #4 (rear window defrost)
- Swap their positions
- Turn ignition ON and test fan operation
If the fan works after the swap, Relay #3 was faulty. If nothing changes, the problem lies elsewhere in the circuit. Always use an OEM Ford relay for replacement, as aftermarket units frequently fail within months.
Replace the Blower Motor Resistor (2003–2014 Models)
Why Resistor Failure Is Common
The blower motor resistor regulates all low and mid fan speeds by varying resistance in the circuit. When it burns out, only high speed remains functional because that path bypasses the resistor entirely. Heat and age cause these resistors to fail typically between 80,000 and 120,000 miles.
Locate Behind Glove Box
The resistor mounts directly in the HVAC air duct behind the glove box. Access requires releasing the glove box by squeezing both sides to free the retaining clips, then letting it drop down to reveal the small rectangular module with wiring connected to it.
Remove and Replace
Tools needed:
- 8mm socket or wrench (stubby or flexible recommended)
- Small plastic shim to hold socket on bolt
Steps:
- Disconnect the electrical connector by pressing the release tab
- Remove the two 8mm screws securing the resistor
- Pull the resistor straight out of its housing
- Insert the new unit, aligning guide pins
- Reconnect the harness and reinstall screws
- Test all fan speeds before closing the glove box
Never power the resistor outside the HVAC duct, as it will overheat and fail immediately. Use a Motorcraft OEM resistor for reliable longevity, as cheaper aftermarket units often fail within a year.
Check Power at Terminal 4
Verify 12V with Ignition On
Before replacing the resistor, confirm power is actually reaching it. On 2006 and newer models, Terminal 4 on the resistor connector should show 12 volts when the ignition is ON.
Use a multimeter or test light to check this terminal. If power is present at Terminal 4 but the fan only works on high, the resistor is confirmed faulty. If no power reaches Terminal 4, the problem is upstream at the relay, fuse, or wiring.
Diagnose 2015–2023 F-150 Fan Issues
No Resistor? No Simple Fix
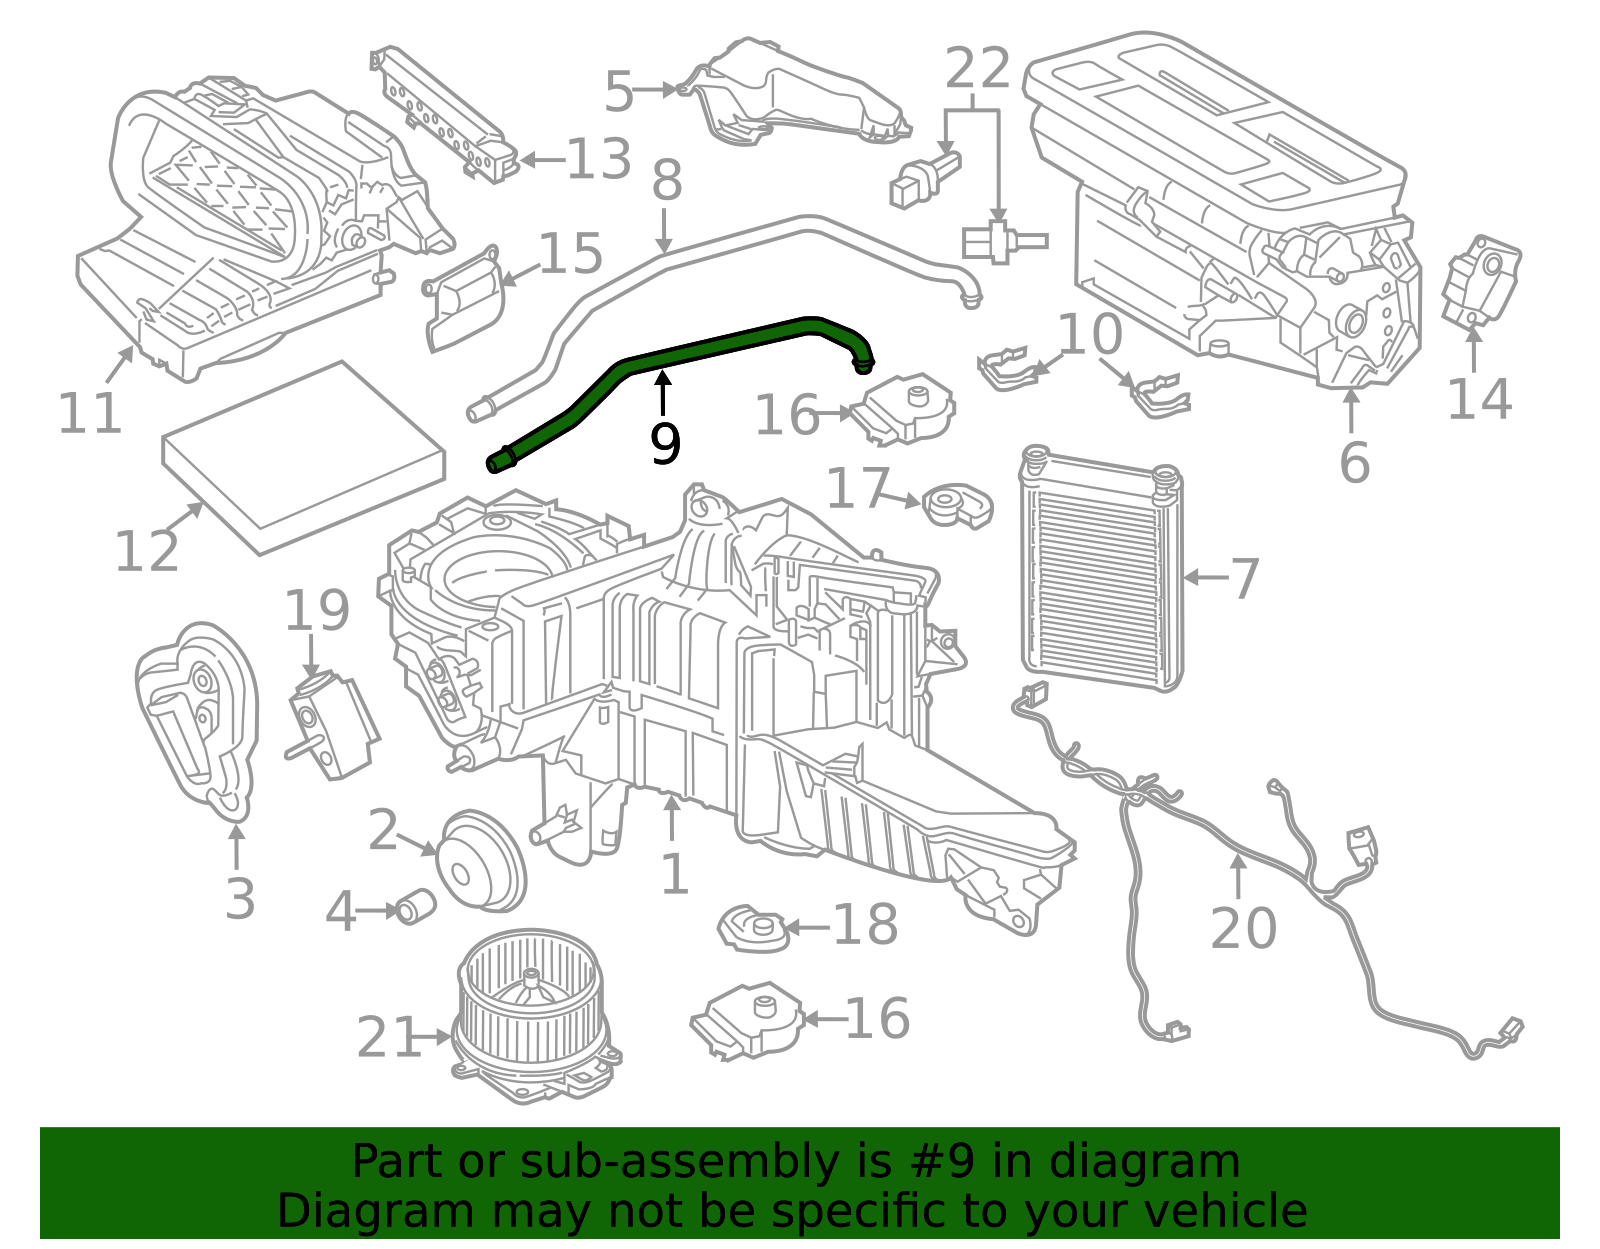
Newer F-150s use solid-state blower control modules instead of traditional resistors, making at-home repairs much more difficult. The symptoms differ from older models and point to deeper system issues.
Common Symptoms in Newer Trucks
Fan runs weakly even at speed 7, air blows only from defrost vents regardless of mode selection, the climate control screen shows fan moving but no actual airflow change occurs, and intermittent recovery after shutting off the ignition for several minutes. These patterns indicate HVAC module defects rather than simple component failures.
TSB 22–2089: HVAC Module Replacement
This Technical Service Bulletin applies to 2015–2023 F-150 models and addresses HVAC performance issues including low fan speed and airflow problems. The repair requires replacing the entire HVAC evaporator case, which involves removing the entire dashboard and takes 8–16 hours of labor. Parts cost $800–$1,200 or more, making this a dealer-level repair only.
TSB 24–2093: A/C Not Blowing Issue
This bulletin applies specifically to 2021–2023 models, excluding PowerBoost and Lightning variants. The repair procedure is accessible only through Ford’s FDRS diagnostic system and was confirmed as active in April 2024.
Scan for DTCs with Ford-Level Tools
Use FDRS or IDS for 2015+ Models
Generic OBD2 scanners cannot detect HVAC-specific diagnostic trouble codes. You need either the Ford Diagnostic and Repair System (FDRS) or the Integrated Diagnostic System (IDS) to access codes specific to the climate control system.
These tools monitor blower motor current draw, compare HVAC module commands versus actual fan speed, check air distribution actuator positions, and identify CAN bus communication errors. Independent technician Jesse-Infotainment offers remote VIN-based diagnostics to check for hidden DTCs without requiring a dealer visit.
Inspect for Frozen Evaporator or Refrigerant Issues
Ice Buildup Restricts Airflow
Some 2021 model owners report frozen lines under the hood alongside fan speed issues. This indicates refrigerant overcharge or moisture in the system causing ice to form on the evaporator, blocking airflow even when the fan runs normally.
Signs to watch for:
- Weak airflow after AC runs for 10–15 minutes
- Airflow returns to normal after sitting for 30+ minutes
- Hissing or gurgling sounds under the dash
The fix requires evacuating and recharging the A/C system and replacing the receiver-drier to remove moisture.
Calibrate Air Distribution Actuators
Why Air Blows Only from Defrost Vents
Actuators control vent direction between face, floor, and defrost modes. If an actuator sticks or becomes misaligned, the system defaults to defrost vents for safety. Listen for soft clicking sounds under the dash when cycling through vent modes. No sound indicates a failed or jammed actuator.
Fixing this requires calibration through the FDRS or IDS diagnostic tool, or replacement of the faulty actuator if manual recalibration doesn’t resolve the issue.
Replace Climate Control Module If Needed
When the Dial or Touchscreen Fails
Older models use potentiometer-based fan speed dials that wear out over time, while newer models rely on electronic signals in the infotainment system. Symptoms include needing to fiddle with the dial to temporarily restore lower speeds, the screen showing fan movement without actual response, or no power signal reaching the resistor or control module.
Replacement may require programming in newer models, and this component is often overlooked after ruling out relays, resistors, and fuses.
Avoid Costly Mistakes: Repair Complexity Guide
| Model Range | Likely Fix | Labor Time | Cost | DIY Possible? |
|---|---|---|---|---|
| 2003–2014 | Blower motor resistor | Under 30 min | $50–$150 | Yes |
| 2015–2023 | HVAC module replacement | 8–16 hrs | $1,500–$3,000+ | No |
HVAC module repairs require dashboard removal, actuator calibration, and refrigerant recovery, making them impossible for home mechanics. Always check your VIN against available TSBs, as covered repairs may be free or discounted through Ford’s warranty or goodwill programs.
Final Fixes and Pro Tips
Try These First Before Visiting the Dealer
- Cycle the ignition by turning the truck off and back on, which may reset the HVAC module
- Press the Max A/C button to force full-speed fan operation, bypassing normal climate logic
- Check for TSBs using your VIN by contacting Ford directly
- Record intermittent issues on video with time and date stamps to show the technician
Visit the dealer if your 2015 or newer model shows weak airflow or defrost-only mode, if the truck is still under warranty or within a TSB coverage window, or if the problem occurs primarily in hot weather under AC load.
Frequently Asked Questions About F-150 Fan Speed Issues
Why does my F-150 fan only work on high speed?
This indicates a failed blower motor resistor in 2003–2014 models. The resistor controls low and mid speeds, but high speed bypasses it through a relay. When the resistor fails, only high speed remains functional.
Can I drive my F-150 with a non-working fan?
Yes, but you’ll have no cabin heating or defogging capability, which creates safety issues in cold or rainy weather. The problem won’t worsen by driving, but you should address it promptly.
How much does it cost to fix F-150 fan speed issues?
For 2003–2014 models, expect $50–$150 for DIY resistor replacement. For 2015–2023 models with HVAC module failure, dealer repairs cost $1,500–$3,000 or more.
Where is the blower motor resistor located on my F-150?
It mounts behind the glove box, secured by two 8mm screws in the HVAC air duct. Squeeze the glove box sides to release it and let it drop for access.
Are aftermarket blower motor resistors reliable?
Cheap aftermarket resistors often fail within a year due to poor heat tolerance. Motorcraft OEM resistors last significantly longer and are worth the extra investment.
Key Takeaways for Fixing Your F-150 Fan Speed
Always start with the relay swap test because it’s free, takes less than two minutes, and resolves many complete fan failure cases. For 2003–2014 trucks, the blower motor resistor is the primary cause of speed control loss and can be replaced in under 30 minutes for under $150 using OEM parts. For 2015 and newer models, check for TSB 22–2089 or TSB 24–2093 coverage before authorizing expensive repairs, as these issues may be covered under Ford’s warranty programs. Document any intermittent problems with video and environmental notes to help technicians diagnose elusive issues, and always use OEM Ford parts for relays and resistors to avoid premature repeat failures.


