If your 2001 Ford F150 back door won’t open, you are dealing with one of the most common mechanical failures in extended cab trucks. This problem affects the rear-hinged half-doors (also called suicide doors or SuperCab doors) and leaves drivers stranded when both the interior pull handle and exterior handle stop working. The good news is that the latch mechanism itself is almost never broken. The real culprit is a failed cable system where plastic components degrade over time, preventing the inner wire from moving the latches. This guide walks you through diagnosing the issue, opening a stuck door manually, and choosing the best permanent repair that costs around $10 and takes less than an hour with basic tools.
Diagnose the Failure First
Before removing any panels, confirm what is actually broken. A simple test saves time and prevents unnecessary work.
Check Handle Feedback and Door Movement
Pull both the interior and exterior handles. If you feel no resistance or a mushy, spongy feeling, the cable has disconnected from its anchor point. If the door pops slightly outward when you pull the handle, the lower latch released but the upper latch stayed engaged. This partial release confirms the latches work fine. The problem is entirely in the actuation system that connects your handle to those latches.
Test Both Handles Separately
Operate the inside pull handle and outside handle one at a time. If neither works, the failure is in the common cable path or anchor point. If one works and the other does not, the issue may be isolated to a specific handle connection. Either way, the next step involves removing the interior door panel for visual inspection.
Remove the Interior Door Panel
Accessing the latch and cables requires removing the door trim. This takes five to ten minutes with the right tools.
Gather Essential Tools
You will need a Phillips screwdriver, a 10 mm socket with ratchet, and a trim removal tool to pry off plastic clips without damaging them. A magnetic parts tray keeps screws organized and prevents them from falling into the door cavity.
Unfasten Screws and Clips
Start by removing two Phillips screws on the upper trim panel. Then remove one 10 mm nut and two Phillips screws on the lower section. Pull any push-pin nuts around the panel edge. Gently pry the perimeter with a trim tool, then lift the panel upward to clear the window sill. Set it aside carefully without disconnecting the speaker unless needed for access.
Manually Open the Stuck Door

If the door will not unlatch, you must open it manually before performing any repair.
Access the Latch Cables
Fold back the moisture barrier inside the door. If space feels tight, remove the speaker using four 6 mm bolts for better access. You will see two cables. The bottom latch cable runs horizontally near the door edge. The top latch cable extends upward toward the front of the door.
Release the Latches by Hand
Push the bottom cable inward to disengage the lower latch. For the top latch, pull the cable downward while someone pulls the exterior handle. You can also use pliers or vise-grips to mimic handle motion. Once both latches release, the door will swing open.
Pro Tip: If only one cable is broken, manually operate the working one to open the door.
Identify the Real Problem: Plastic Parts Fail
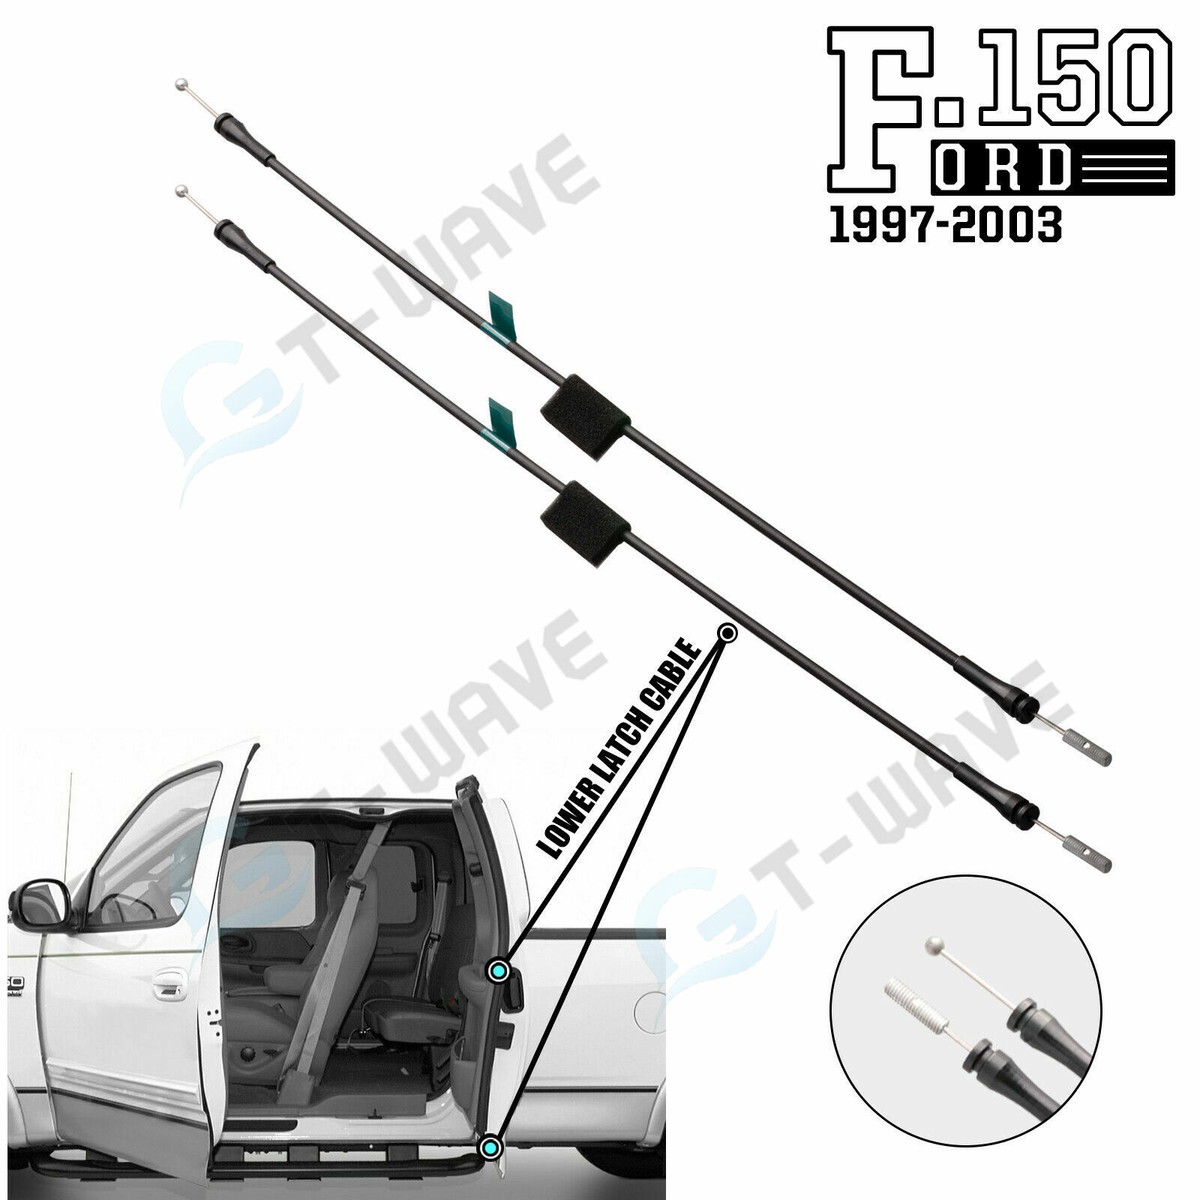
The steel cable inside almost never breaks. The failure is almost always in the plastic housing, grommets, or end caps that anchor the outer sheath.
Why the Cables Stop Working
These plastic components become brittle from heat, cold, moisture, and age. When the outer sheath is not fixed in place, pulling the handle moves the entire assembly instead of sliding the inner wire. Think of a bike brake cable with a loose housing. No force reaches the latch.
Look for Cracked or Dislodged Grommets
Inspect where the cable sheath connects to the door frame or latch. If the plastic grommet is cracked or missing, the cable cannot transmit motion. Even slight movement in the housing means the system will not work.
Use a Zip Tie for Quick Access (Temporary Fix)
If you need to open the door right now, a heavy-duty zip tie provides temporary function.
Secure the Cable Sheath
Find a solid metal point in the door such as a bracket or bolt. Zip-tie the cable housing to this point. This re-anchors the sheath so pulling the handle moves only the inner wire. Test by pulling the handle. If the latch releases, you have restored function temporarily.
Limitations of This Fix
Zip ties can last weeks or months but are not durable long-term. They can snap, fray, or become impossible to remove. Use this only as a field expedient, not a permanent solution.
Try the Valve Stem Fix (DIY Metal Replacement)
For a stronger temporary fix, repurpose a tubeless tire valve stem.
Modify the Valve Stem
Drill out the metal core, then cut grooves on the side so it fits over the metal bracket. Trim the end to one-eighth inch thick and press it into the latch cable groove. This creates a metal-to-metal connection that will not crack like plastic.
Why It Works
The rubber body grips the bracket while the metal stem holds the cable. It is a clever workaround used by mechanics and owners who want better durability than OEM plastic without buying new parts.
Install the Dorman Repair Kit (Best Permanent Fix)
The Dorman Door Cable Repair Kit number 9-6-111 is the top-rated long-term solution.
Why It Is Superior to OEM
This kit replaces the weak plastic ends with metal connectors that resist cracking. They click into place like OEM but last far longer. At around $10, it is the most cost-effective fix with no compromise on reliability.
Install in Minutes
Disconnect the old cable from the handle by pushing in the retaining clips. Cut the cable near the broken plastic end. Insert the Dorman metal end into the cable. Push or twist until it locks. Reattach to the handle and test. No crimping or special tools needed. The metal ends work like bicycle brake levers, simple and strong.
Expert Note: Even if only one door is broken, replace both sides. They wear the same way and will fail together.
Avoid OEM Cable Replacements (Same Problem Returns)

Replacing the entire cable with an OEM-style part may seem logical but wastes money.
Same Plastic, Same Failure
OEM cables come with the same brittle plastic ends that failed the first time. Even brand-new, they break within a few years. At $30 to $50 each, you pay more for the same weak design.
Save Money, Skip the Dealer
Dealerships often charge $150 or more for labor and push full latch replacements. These are unnecessary unless the latch itself is bent or broken. The latch is almost always fine. The real fix is the cable anchor, not the latch.
Reassemble and Adjust Properly
After repair, proper reassembly matters. A poorly adjusted cable fails again quickly.
Reinstall Components in Order
Reattach the top latch with three hex screws. Reconnect the bottom latch through the speaker hole. Reinstall the speaker and wiring. Reconnect the door handle using 10 mm and 9 mm bolts. Snap the panel back and replace all screws.
Set Correct Cable Tension
Adjust so the latch releases smoothly, then add only one-quarter turn more. Over-tightening stresses the plastic or metal retainers and causes premature failure. A properly adjusted cable gives firm handle feedback with no slack and no strain.
Lubricate for Longevity
Prevent future issues with proper maintenance.
Apply White Lithium Grease
Coat all moving parts including latch pivots, cable guides, and handle linkages. This reduces friction, prevents rust, and extends life. Do this annually or whenever the door feels stiff.
Avoid Slamming the Door
Suicide doors are delicate. Slamming increases stress on cables and retainers. Close gently to protect your repair.
Consider the Access Hole (Work Truck Option)
For fleet or utility vehicles, some owners cut a three-by-three inch hole in the inner door panel.
How It Works
Use an angle grinder to create access. When the door fails, reach in and pull the cable by hand. Seal edges with Gorilla Tape to prevent cuts.
Who Should Use This
This works best for work trucks, farm vehicles, or off-road rigs where resale value does not matter. It is fast, functional, and avoids panel removal. Not recommended for daily drivers or vehicles you plan to sell.
Prevent Future Failures
Do not wait for the other door to break. Act now.
Replace Both Sides Proactively
Even if only one door is stuck, replace both cable ends. They have endured the same wear and will fail soon. Use Dorman 9-6-111 kits on both sides.
Inspect During Other Repairs
If you remove the door panel for window, speaker, or lock work, check the cables. Look for cracked grommets or loose sheaths. Fix early before the door locks up.
Check for Recalls (Safety First)
While unrelated to the door latch, 2002 and earlier F-150s, especially those made in Kansas, are subject to a cruise control fire recall.
Verify Your VIN
Visit NHTSA.gov or Ford’s recall site and enter your VIN. If affected, get the cruise control module fixed for free. It is a serious fire risk and often overlooked.
Frequently Asked Questions About 2001 Ford F150 Back Door Won’t Open
Why does my 2001 Ford F150 back door not open from either handle?
The failure is almost always in the plastic cable retainers that anchor the outer sheath. When these degrade, pulling the handle moves the entire cable assembly instead of sliding the inner wire to release the latch.
Can I open the back door without removing the interior panel?
Yes. Remove the panel, fold back the moisture barrier, and manually push the bottom cable inward while pulling the top cable downward. This releases both latches and opens the door.
Is the Dorman repair kit better than OEM replacement cables?
Yes. The Dorman kit replaces weak plastic ends with durable metal connectors. OEM cables use the same brittle plastic that failed originally and often break again within years.
How long does the Dorman repair take?
The repair takes 10 to 15 minutes with basic tools once the door panel is removed. The kit costs around $10 and provides a permanent fix.
Should I replace both rear doors even if only one is stuck?
Yes. Both doors experience identical wear and will likely fail around the same time. Replacing both sides during the same repair session prevents a repeat visit.
Key Takeaways for Fixing Your 2001 Ford F150 Back Door
The 2001 Ford F150 back door won’t open issue stems from degraded plastic cable retainers, not a broken latch. The diagnosis is simple. A mushy handle feel or partial door pop confirms cable failure. Opening the door manually requires accessing the latch cables through the interior panel. The best permanent fix is the Dorman metal-end repair kit number 9-6-111 at around $10. Avoid OEM cable replacements that use the same weak plastic. Replace both sides at the same time, lubricate all moving parts with white lithium grease, and avoid over-tightening the cables. With this repair, your rear doors will work smoothly for years.